Audi A4: Cylinder Block, Belt Pulley Side
Overview - Cylinder Block, Belt Pulley Side
All components are described under: → Servicing - 4-Cylinder 2.0L 4V TFSI Engine; Rep. Gr.13; Cylinder Block Belt Pulley Side; Overview - Cylinder Block Belt Pulley Side.
Ribbed Belt, Removing and Installing
All procedures are described under: → Servicing - 4-Cylinder 2.0L 4V TFSI Engine; Rep. Gr.13; Cylinder Block Belt Pulley Side; Ribbed Belt, Removing and Installing.
Ribbed Belt Tensioner, Removing and Installing
All procedures are described under: → Servicing - 4-Cylinder 2.0L 4V TFSI Engine; Rep. Gr.13; Cylinder Block Belt Pulley Side; Ribbed Belt Tensioner, Removing and Installing.
Vibration Damper, Removing and Installing
Removing
- Remove the fan shroud. Refer to → Chapter "Fan Shroud, Removing and Installing".
All additional procedures are described under: → Servicing - 4-Cylinder 2.0L 4V TFSI Engine; Rep. Gr.13; Cylinder Block Belt Pulley Side; Vibration Damper, Removing and Installing.
Installing
Additional procedures:
- Install the fan shroud. Refer to → Chapter "Fan Shroud, Removing and Installing".
Sub-Assembly Bracket, Removing and Installing
All procedures are described under: → Servicing - 4-Cylinder 2.0L 4V TFSI Engine; Rep. Gr.13; Cylinder Block Belt Pulley Side; Sub-Assembly Bracket, Removing and Installing.
Engine Support, Removing and Installing
Left Engine Support, Removing and Installing
Removing
- Remove the engine cover. Refer to → Servicing - 4-Cylinder 2.0L 4V TFSI Engine; Rep. Gr.10; Engine Cover; Engine Cover, Removing and Installing.
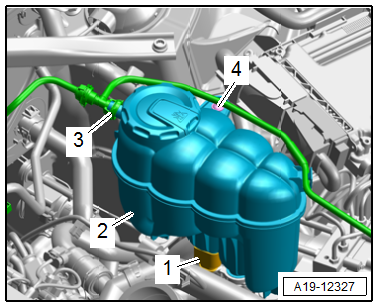
- Lift up the clamp -3- and remove and free up the coolant hose.
- Disconnect the connector -1- for the Engine Coolant Level Warning Switch -F66-.
- Remove the bolt -4-, and push the coolant expansion tank -2- to the side.
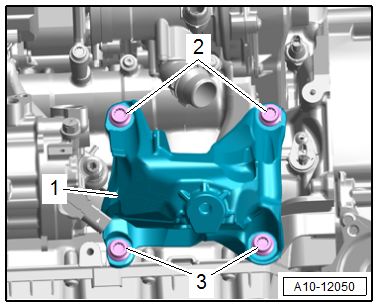
- Remove the upper bolts -2- for the engine support -1-.
 Note
Note
- For clarity, the removed engine is shown.
- The bolts -3- are removed later.
- Remove the left engine mount. Refer to → Chapter "Engine Mount, Removing and Installing".
- Disconnect the connector -arrow- from the A/C compressor.
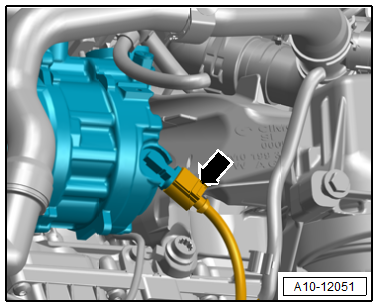
- Remove the lower bolts -3- and the left engine support -1-.
Note
For clarity, the removed engine is shown.
Installing
Install in reverse order of removal and note the following:
Note
Replace the bolts that were tightened with an additional turn after removing them.
- Connect the coolant hose to the connector coupling. Refer to → Fig. "Connect the Coolant Hose to the Connector Coupling".
- Install the engine mount. Refer to → Chapter "Engine Mount, Removing and Installing".
- Install the engine cover. Refer to → Servicing - 4-Cylinder 2.0L 4V TFSI Engine; Rep. Gr.10; Engine Cover; Engine Cover, Removing and Installing.
Tightening Specifications
- Refer to → Chapter "Overview - Subframe Mount"
Right Engine Support, Removing and Installing
Removing
 Caution
There is a risk of destroying electronic components when disconnecting the battery.
Follow the steps for disconnecting the battery.
- Disconnect the battery. Refer to → Electrical Equipment; Rep. Gr.27; Battery; Battery, Disconnecting and Connecting.
- Remove the right engine mount. Refer to → Chapter "Engine Mount, Removing and Installing".
- Remove the nut -2- and the bracket and free up the bracket with the wire.
- Remove the bolts -arrows- and remove the right engine support -1-.
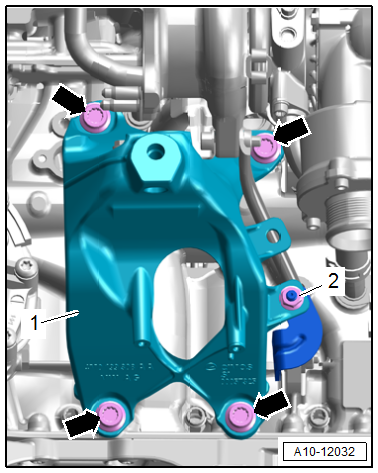
Note
For clarity, the removed engine is shown.
Installing
Install in reverse order of removal and note the following:
Note
Replace the bolts that were tightened with an additional turn after removing them.
- Install the engine mount. Refer to → Chapter "Engine Mount, Removing and Installing".
- Follow all steps after connecting the battery. Refer to → Electrical Equipment; Rep. Gr.27; Battery; Battery, Disconnecting and Connecting.
Tightening Specifications
- Refer to → Chapter "Overview - Subframe Mount"
Cylinder Block, Transmission Side
All procedures and components are described under: → Servicing - 4-Cylinder 2.0L 4V TFSI Engine; Rep. Gr.13; Cylinder Block, Transmission Side.
Crankshaft
All procedures and components are described under: → Servicing - 4-Cylinder 2.0L 4V TFSI Engine; Rep. Gr.13; Crankshaft.
READ NEXT:
 Balance Shaft
Overview - Balance Shaft
1 - Cylinder Block
2 - Bolt
Tightening specifications. Refer to
→ Servicing - 4-Cylinder 2.0L 4V TFSI Engine; Rep. Gr.13; Balance Shaf
Cylinder Head, Valvetrain
Timing Chain Cover
Overview - Timing Chain Cover
All procedures and components are described under:
→ Servicing - 4-Cylinder 2.0L 4V TFSI Engine; Rep. Gr.15; Timing Chain Cover.
Cams
Lubrication
Oil Pan/Oil Pump
Overview - Oil Pan/Oil Pump
1 - Nut
Tightening specifications. Refer to
→ Servicing - 4-Cylinder 2.0L 4V TFSI Engine; Rep. Gr.17; Oil Pan/Oil
Pump; Ove
SEE MORE:
General information
There may be different media sources and connections
available depending on the vehicle
equipment. For example, you can play media files
using a connected USB drive or connect your mobile
devices to the Audi music interface and operate
them through the MMI.
Media and format restrictions: the MMI (in
Fender, Removing and Installing
Special tools and workshop equipment
required
Pop Rivet Nut Pliers -VAS5072A-
Drill
Pop rivets. Refer to the Parts Catalog.
Follow the safety precautions. Refer to
→ Body Interior; Rep. Gr.00; Safety Precautions; Safety
Precautions when Working on Pyrotechnic Components.
Remo
