Audi A4: Headliner, Removing and Installing
Headliner, Removing and Installing, Sedan
Special tools and workshop equipment required
- Pry Lever -80-200-
- Removal Wedge -T40233-
- Omega Clip Tool -T40280-
Removing
 WARNING
Risk of injury due to involuntary deployment.
Pay attention to the safety precautions when working with pyrotechnic components. Refer to → Chapter "Safety Precautions when Working with Pyrotechnic Components".
- Remove the passenger door. Refer to → Body Exterior; Rep. Gr.57; Door; Door Removing and Installing.
- Remove the A-pillar upper trim panels. Refer to → Chapter "A-Pillar Trim Panel, Removing and Installing".
- Remove the B-pillar upper trim panel on the driver side. Refer to → Chapter "B-Pillar Upper Trim Panel, Removing and Installing".
- Remove the D-pillar trim panels. Refer to → Chapter "D-Pillar Trim Panel, Removing and Installing, Sedan".
- Remove the C-pillar trim panel on the driver side. Refer to → Chapter "C-Pillar-Trim Panel, Removing and Installing, Sedan".
- Remove the front roof module. Refer to → Electrical Equipment; Rep. Gr.96; Controls; Front Interior Lamp/Reading Lamp Removing and Installing.
- Equipped on some models: Remove the front camera cover.
- Remove the sun visors. Refer to → Chapter "Sun Visor, Removing and Installing".
- Remove the roof grab handle. Refer to → Chapter "Roof Grab Handle, Removing and Installing".
- Remove the center console. Refer to → Chapter "Center Console, Removing and Installing".
- Move the steering wheel as far upward as possible.
Versions Equipped with A Sliding Sunroof
- Open the sun shade.
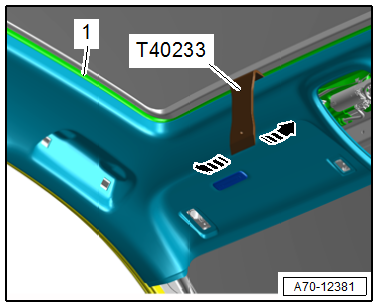
- To avoid dirtying the headliner, clean the -T40233-.
- Push the -T40233- between the frame -1- for the sliding sunroof and the headliner.
- Loosen the headliner using the -T40233- from the sliding sunroof frame all the way around in the direction of -arrows-, as shown.
Continuation for All Vehicles
- Move the front seats all the way to the rear and then into their lowest position. Then position the backrest as far back as it will go.
- Free up the headliner in the area near the door seals.
 Caution
- The headliner bends easily.
- Replace the headliner if it is bent.
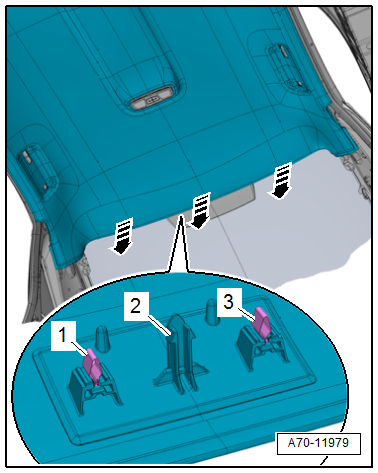
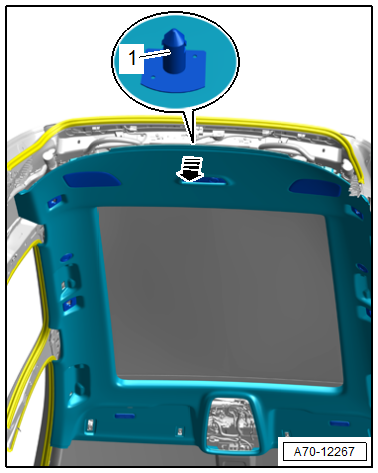
- Unclip the rear headliner at the clips -1 and 3- from the body in the direction of -arrows- using the -80-200-.
- Unclip the rear headliner at the centering pin -2- from the body.
- Remove the sun visor center support. Refer to → Chapter "Sun Visor Center Support, Removing and Installing".
 Note
Note
The headliner is removed through the front passenger door.
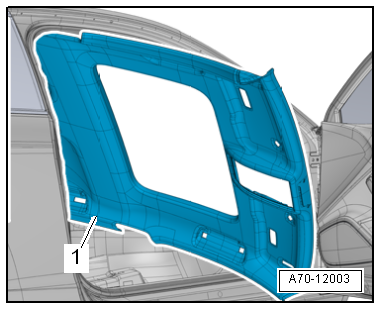
- Lower the front of the headliner -1- on the left side of the vehicle, guide it under the steering wheel and turn it toward the front passenger door opening.
- Remove the headliner through the passenger door as shown in the illustration.
Installing
WARNING
Risk of injury due to involuntary deployment.
Pay attention to the safety precautions when working with pyrotechnic components. Refer to → Chapter "Safety Precautions when Working with Pyrotechnic Components".
- Align the headliner, press in the centering pin at the back of the headliner until it engages audibly in the mounting point of the body.
- Install the center support for the sun visor. Refer to → Chapter "Sun Visor Center Support, Removing and Installing".
- Stretch the door seal lip over.
Versions Equipped with A Sliding Sunroof
- Clip the sides of the headliner into the sunroof frame first, and then into the front and rear.
Further installation is the reverse order of removal.
Installation instructions: For example tightening specifications, replacing components. Refer to → Chapter "Overview - Headliner, Sedan".
Headliner, Removing and Installing, Avant
Special tools and workshop equipment required
- Removal Wedge -T40233-
Removing
WARNING
Risk of injury due to involuntary deployment.
Pay attention to the safety precautions when working with pyrotechnic components. Refer to → Chapter "Safety Precautions when Working with Pyrotechnic Components".
- Remove the front passenger seat. Refer to → Chapter "Front Seat, Removing and Installing".
- Remove the A-pillar upper trim panels. Refer to → Chapter "A-Pillar Trim Panel, Removing and Installing".
- Remove the front passenger side B-pillar upper trim panel. Refer to → Chapter "B-Pillar Upper Trim Panel, Removing and Installing".
- Remove the front passenger side C-pillar trim panel. Refer to → Chapter "C-Pillar Trim Panel, Removing and Installing, Avant".
- Remove the luggage compartment side trim panels. Refer to → Chapter "Luggage Compartment Side Trim Panel, Removing and Installing, Avant".
- Remove the roof end strip. Refer to → Chapter "Roof End Strip, Removing and Installing".
- Remove the D-pillar trim panels. Refer to → Chapter "D-Pillar Trim Panel, Removing and Installing, Avant".
- Remove the front roof module. Refer to → Electrical Equipment; Rep. Gr.96; Controls; Front Interior Lamp/Reading Lamp Removing and Installing.
- Equipped on some models: Remove the front camera cover.
- Remove the sun visors. Refer to → Chapter "Sun Visor, Removing and Installing".
- Remove the vanity mirror illumination. Refer to → Electrical Equipment; Rep. Gr.96; Lamps; Driver and Front Passenger Vanity Mirror Lamp W20/ W14 Removing and Installing.
- Remove the roof grab handle. Refer to → Chapter "Roof Grab Handle, Removing and Installing".
Versions Equipped with A Sliding Sunroof
- Open the sun shade.
- To avoid dirtying the headliner, clean the -T40233-.
- Push the -T40233- between the frame -1- for the sliding sunroof and the headliner.
- Loosen the headliner using the -T40233- from the sliding sunroof frame all the way around in the direction of -arrows-, as shown.
Continuation for All Vehicles
- Move the front seat into the deepest and most forward position and position the backrest as far forward as it will go.
- Fold the rear seat backrests forward.
- Free up the headliner in the area near the door seals.
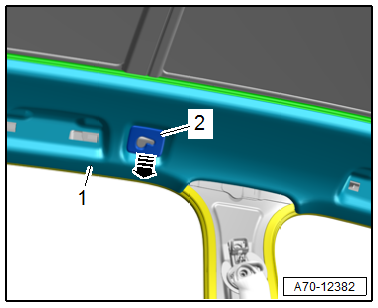
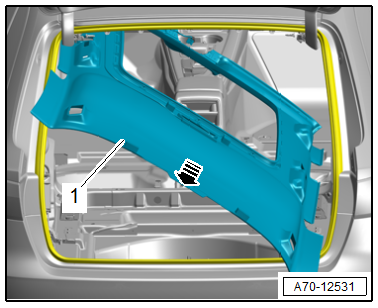
- Unclip the headliner -1- with the trim -2- and bracket from the screen separator mounting eye in the direction of -arrow-.
- Repeat the procedure on the opposite side.
Caution
- The headliner bends easily.
- Replace the headliner if it is bent.
- Grip under the headliner by hand and unclip from the body at the rear of the centering pin -1- in the direction of -arrow-.
Note
The headliner is removed through the rear lid opening.
- Remove the sun visor center support. Refer to → Chapter "Sun Visor Center Support, Removing and Installing".
- Lower the headliner -1- on the right side of the vehicle as shown.
- Remove the headliner carefully through the lid opening in the direction of -arrow- as shown.
- To do this carefully guide the headliner at the edges through the rear lid opening.
Installing
WARNING
Risk of injury due to involuntary deployment.
Pay attention to the safety precautions when working with pyrotechnic components. Refer to → Chapter "Safety Precautions when Working with Pyrotechnic Components".
- Align the headliner, press in the centering pin at the back of the headliner until it engages audibly in the mounting point of the body.
- Install the center support for the sun visor. Refer to → Chapter "Sun Visor Center Support, Removing and Installing".
- Clip the headliner into the screen separator mounting eyes.
- Stretch the door seal lip over.
Versions Equipped with A Sliding Sunroof
- Clip the sides of the headliner into the sunroof frame first, and then into the front and rear.
Further installation is the reverse order of removal.
Installation instructions: For example tightening specifications, replacing components. Refer to → Chapter "Overview - Headliner, Avant".
READ NEXT:
 Roof Reinforcement, Attaching to Body
Roof Reinforcement, Attaching to Body, Sedan
Special tools and workshop equipment required
Assembly adhesive. Refer to the Parts Catalog.
Procedure
- Remove the headliner. Refer to
→ C
Overview - Seat Versions
Component Location Overview - Seat Versions
Overview - Front Seat
I - Standard Seat
Equipment:
Manual seat length/height and angle adjustment
Manual backrest angle adjuster
Height-ad
SEE MORE:
Generator
Generator, Checking
Perform Generator Test
Vehicle Diagnostic Tester is attached.
- Select the Diagnostic mode and
start the diagnostics.
- Select the tab Test Plan.
- Select Select Individual Tests
and choose the following sequence.
Body
Electrical Equipment
27 - Starter, volta
Drive Axle, Removing and Installing
Caution
This procedure contains mandatory replaceable parts.
Refer to component overview and parts catalog prior to
starting procedure.
Mandatory Replacement Parts
Bolt - Outer CV Joint to Drive Axle
Clamp - CV Boot to Outer CV Joint
Clamp - CV Boot to Drive Axle
Bolts - Backing Plat
