Audi A4: Rear Seat Belt Guide, Removing and Installing
Seat Belt Guide in Rear Seat Backrest, Removing and Installing
Special tools and workshop equipment required
- Trim Removal Wedge -3409-
Removing
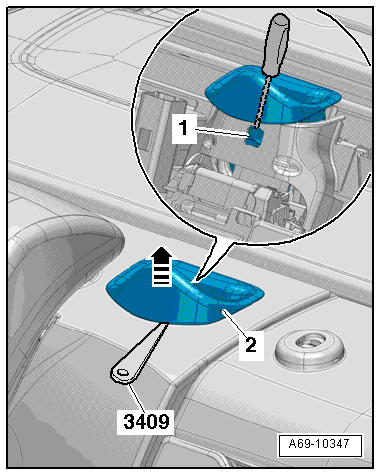
- Remove the center rear belt end fitting. Refer to → Chapter "Rear Seat Belt Latch, Removing and Installing".
- Release the catches -1- by inserting a screwdriver from above through the hole in the belt guide.
- At the same time, unclip the seat belt guide -2- using the Trim Removal Wedge -3409--arrow-.
- Thread the belt end fitting out and remove the seat belt guide.
Installing
Install in reverse order of removal.
Installation instructions: For example tightening specifications, replacing components. Refer to → Chapter "Overview - Rear Center Three-Point Seat Belt".
Rear Seat Belt Guide in Rear Shelf, Removing and Installing
Special tools and workshop equipment required
- Trim Removal Wedge -3409-
Removing
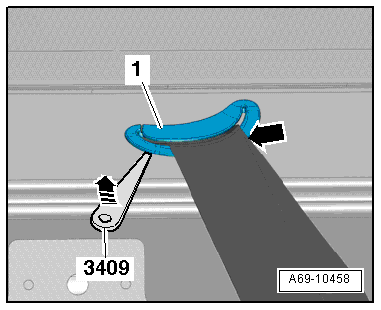
- Unclip the seat belt guide -1- using the Trim Removal Wedge -3409--left arrow-.
- Unclip the belt guide on the opposite side -right arrow- using the Trim Removal Wedge -3409- and pull it out upward from the rear shelf.
- Open the belt guide at the separating point and thread out the belt.
Installing
- Install the belt guide -1- with the edge turned approximately 90º over the cut-out in the parcel shelf as illustrated.
- Insert the belt guide into the corner of the cut-out while turning it at the same time -arrow-.
- Push the belt guide downward until the tabs engage in the parcel shelf.
Install in reverse order of removal.
Installation instructions: For example tightening specifications, replacing components. Refer to → Chapter "Overview - Rear Center Three-Point Seat Belt".

Rear Seat Belt Guide, Removing and Installing, Sedan
Removing
- Remove the side cushion. Refer to → Chapter "Side Cushion, Removing and Installing".
- Remove the rear shelf. Refer to → Chapter "Rear Shelf, Removing and Installing".
 Caution
Risk of malfunction.
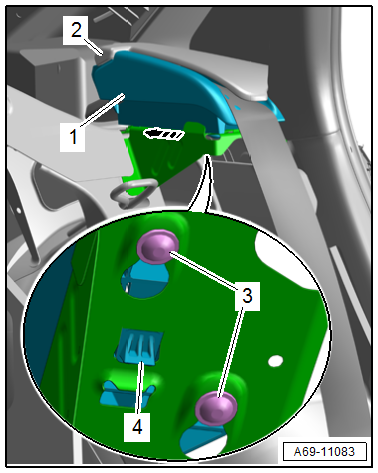
- Do not rotate the bolts -3- under any circumstances when removing and installing the seat belt guide -1-. They are set by the manufacturer.
- Replace the entire belt guide if damaged.
- Push the belt guide retaining hook -4- upward and hold it there.
- Lift the C-pillar trim panel -2- slightly and push the seat belt guide toward the rear in the direction of -arrow- until the bolt heads -3- can be disengaged from the bracket on the body.
- Remove the seat belt guide -1- sideways toward the vehicle interior.
- Equipped on some models on the right side of the vehicle: Disconnect the connector for the parking aid warning buzzer.
- Thread the seat belt webbing out and remove the seat belt guide.
Installing
- Position the seat belt guide on the bracket and use the bolt heads -3- to insert it into the guides on the bracket.
- Pull the belt webbing forward until the retaining hooks engage audibly.
- When installing, make sure that the seat belt guide engages into the C-pillar trim panel correctly.
Further installation is the reverse order of removal.
Installation instructions: For example tightening specifications, replacing components. Refer to → Chapter "Overview - Outer Rear Three-Point Seat Belt".
Outer Rear Belt Guide, Removing and Installing, Avant
Special tools and workshop equipment required
- Trim Removal Wedge -3409-
Removing
Caution
Risk of malfunction.
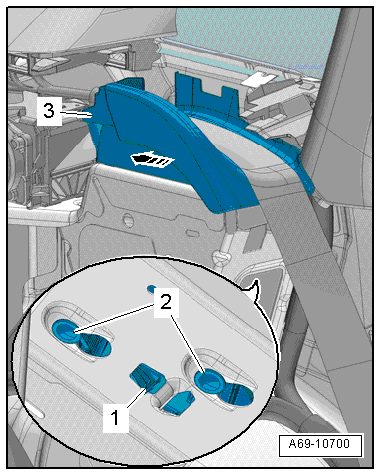
- Do not rotate the bolts -3- under any circumstances when removing and installing the seat belt guide -1-. They are set by the manufacturer.
- Replace the entire belt guide if damaged.
- Remove the side cushion. Refer to → Chapter "Side Cushion, Removing and Installing".
- Remove the luggage compartment side trim panel. Refer to → Chapter "Luggage Compartment Side Trim Panel, Removing and Installing, Avant".
- Push the belt guide retaining hook -1- upward and hold it there.
- Slide the belt guide in the direction of -arrow- back until the bolt heads -2- can be disengaged from the bracket on the body.
- Remove the seat belt guide -3- sideways from the vehicle interior.
- Equipped on some models on the right side of the vehicle: Disconnect the connector for the parking aid warning buzzer.
- Thread the seat belt webbing out and remove the seat belt guide.
Installing
- Position the seat belt guide on the bracket and use the bolt heads -2- to insert it into the guides on the bracket.
- Pull the belt webbing forward until the retaining hooks engage audibly.
- When installing, make sure that the seat belt guide engages into the C-pillar trim panel correctly.
Further installation is the reverse order of removal.
Installation instructions: For example tightening specifications, replacing components. Refer to → Chapter "Overview - Outer Rear Three-Point Seat Belt".
READ NEXT:
 Front Seat Belt Guide, Removing and Installing
Removing
- Remove the B-pillar lower trim panel and bracket for the upper
B-pillar trim panel. Refer to
→ Chapter "B-Pillar Lower Trim Panel, Removing and Installing".
- Push the br
Seat Belt Height Adjuster, Removing and Installing
Caution
This procedure contains mandatory replaceable parts.
Refer to component overview and parts catalog prior to
starting procedure.
Mandatory Replacement Parts
Bolt - Seat Belt Guide
Child Seat Anchors
Overview - Front Child Seat Anchors
1 - Child Seat Anchor
Front passenger seat only
Bolted to the seat pan
Check after an accident. Refer to
→ Chapter "Child Seat Anchors, Check
SEE MORE:
Airbag System
Component Location Overview - Airbag System
1 - Pedestrian Protection Trigger 2 -G599-
Overview. Refer to
→ Chapter "Overview - Pedestrian Protection".
2 - Front Passenger Airbag Deactivation Key Switch -E224-
Not for NAR
3 - Front Passenger Airbag
With
General Information
High pressure side are the condenser, receiver/dryer and
restrictor or expansion valve to separate the high and low
pressure liquid ends.
High pressure results from the restrictor or expansion valve
forming a constriction and causing the refrigerant to
accumulate, thus leading to an increase in
