Audi A4: Child Seat Anchors
Overview - Front Child Seat Anchors
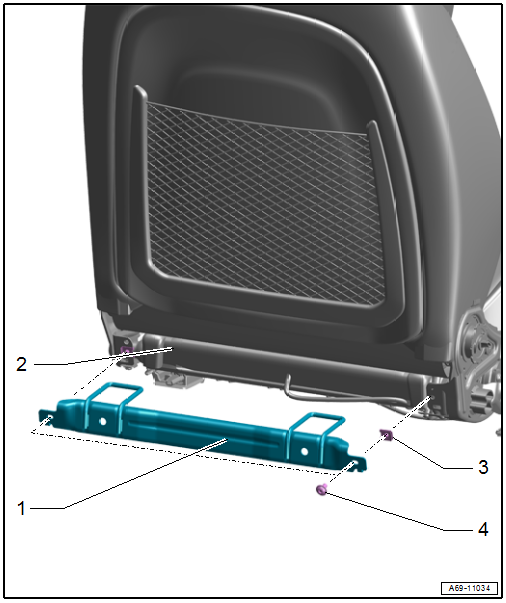
1 - Child Seat Anchor
- Front passenger seat only
- Bolted to the seat pan
- Check after an accident. Refer to → Chapter "Child Seat Anchors, Checking After Collision".
- Replace damaged or deformed child seat anchor
- Removing and installing. Refer to → Chapter "Front Child Seat Anchor, Removing and Installing".
2 - Front Passenger Seat
3 - Spring Nut
- Quantity: 2
- Attached in the seat pan
- Replace any damaged or deformed spring nuts
4 - Screw
- 7.5 Nm
- Replace after removing
- Quantity: 2
Overview - Rear Child Seat Anchors
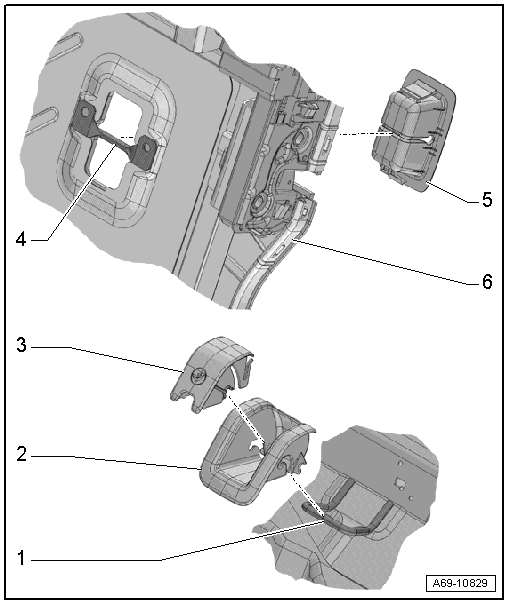
1 - Lower Child Seat Anchor
- Quantity: 4
- Welded to the floor panel.
2 - Guide
- For the lower child seat anchor
- Quantity: 4
- Removing and installing. Refer to → Chapter "Lower Child Seat Anchor Guide, Removing and Installing".
- Must be secure on the anchor
3 - Cap
- Quantity: 4
- Removing and installing. Refer to → Chapter "Lower Child Seat Anchor Guide, Removing and Installing".
- Must be secure on the anchor
4 - Upper Child Seat Anchor
- Quantity: 2
- Welded to the backrest frame.
5 - Cover
- For the child seat anchor
- Quantity: 2
- Removing and installing. Refer to → Chapter "Upper Child Seat Anchor Cover on Rear Seat Backrest, Removing and Installing".
- Insert in the anchor and press on it until it engages audibly
- Can only be pushed onto the rear seat backrest in one position
6 - Rear Seat Backrest
Front Child Seat Anchor, Removing and Installing
 Caution
This procedure contains mandatory replaceable parts. Refer to component overview and parts catalog prior to starting procedure.
Mandatory Replacement Parts
- Screw - Child Seat Anchor to Front Passenger Seat
Removing
- Remove the front passenger seat. Refer to → Chapter "Front Seat, Removing and Installing".
- Remove the tunnel-side seat side trim. Refer to → Chapter "Seat Side Trim on Tunnel Side, Removing and Installing".
- Remove the seat side trim and the bracket on the side sill side. Refer to → Chapter "Seat Side Trim on Side Sill Side, Removing and Installing".
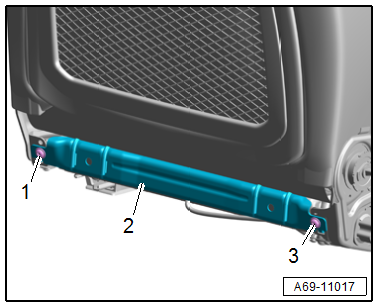
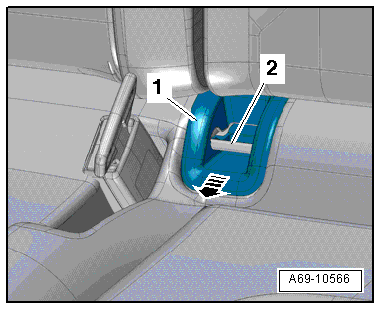
- Disengage the backrest cover tabs and remove the screws -1 and 3-.
- Remove the child seat anchor -2- toward the rear from the front seat.
Installing
Install in reverse order of removal.
Installation instructions: For example tightening specifications, replacing components. Refer to → Chapter "Overview - Front Child Seat Anchors".
Rear Child Seat Anchor, Removing and Installing
Lower Child Seat Anchor Guide, Removing and Installing
Removing
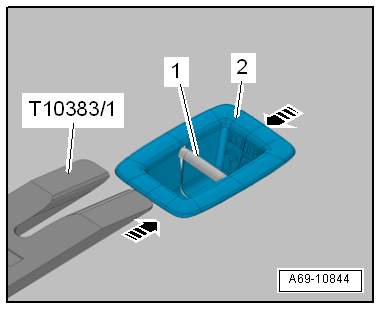
- Unclip the child seat anchor cover -1- from the anchor in the direction of -arrow- and remove.
- Push the child seat anchor guide -1-, corresponding to cut-out, downward and disengage it from the anchor -2-.
- Remove the child seat anchor guide forward in the direction of -arrow-.
Installing
Install in reverse order of removal.
Installation instructions: For example tightening specifications, replacing components. Refer to → Chapter "Overview - Rear Child Seat Anchors".
Upper Child Seat Anchor Cover on Rear Seat Backrest, Removing and Installing
Special tools and workshop equipment required
- Wedge Set -T10383-
- Wedge Set - Wedge 1 -T10383/1-
Removing
- Fold the rear seat backrest forward.
- Release the tabs using the Wedge Set - Wedge 1 -T10383/1- in the direction of -arrows- and pry the cover -2- upward from the rear seat backrest.
- Carefully pull and remove the cover from the child seat anchor -1-.
Installing
Install in reverse order of removal.
Installation instructions: For example tightening specifications, replacing components. Refer to → Chapter "Overview - Rear Child Seat Anchors".
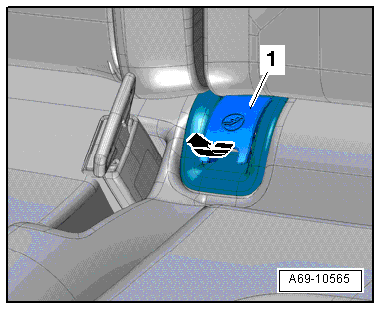
Upper Child Seat Anchor Cover in Rear Shelf, Removing and Installing
Removing
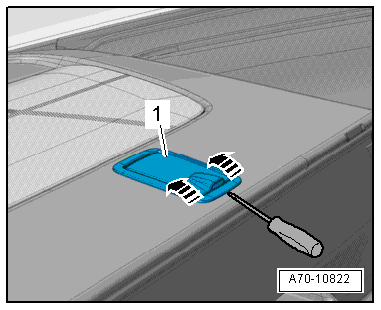
- Fold the rear seat backrest forward.
- Unclip the child seat anchor cover -1- using a screwdriver -arrows- and remove it.
Installing
Install in reverse order of removal.
Installation instructions: For example tightening specifications, replacing components. Refer to → Chapter "Overview - Rear Shelf".
READ NEXT:
 Airbag System
Component Location Overview - Airbag System
1 - Pedestrian Protection Trigger 2 -G599-
Overview. Refer to
→ Chapter "Overview - Pedestrian Protection".
2 - Front Passen
Airbag Control Module
Overview - Airbag Control Module
1 - Center Tunnel
2 - Nut
9 Nm
Quantity: 4
The thread must be paint and contaminant free, nut and ground pins serve
as ground connection for
Battery Interrupt Igniter
Overview - Battery Interrupt Igniter
1 - Connector
For the Battery Interrupt Igniter -N253-
2 - Nuts
Tightening specification. Refer to
→ Electrical Equipment; R
SEE MORE:
Select destination
Applies to: vehicles with navigation system
Fig. 141 Menu: select destination
Opening a menu
Applies to: MMI: Press NAVIGATION on the
home screen.
If the map is displayed, press
(1)
fig. 140.
The following functions are available:
Last destinations
Favorites
Contacts
Received destinat
Setting the distance
Applies to: vehicles with Audi adaptive cruise control
Fig. 112 Operating lever: setting the distance
When approaching a vehicle driving ahead, the
adaptive cruise control system brakes to match
that vehicle's speed and then adjusts to the set
distance. If the vehicle driving ahead accelerates,
the
