Audi A4: Seat Belt Height Adjuster, Removing and Installing
 Caution
This procedure contains mandatory replaceable parts. Refer to component overview and parts catalog prior to starting procedure.
Mandatory Replacement Parts
- Bolt - Seat Belt Guide to Seat Belt Height Adjuster (Replace bolt if it was removed because of an accident when the seat belt was buckled)
- Bolt - Seat Belt Height Adjuster to Pillar (Replace bolt if it was removed because of an accident when the seat belt was buckled)
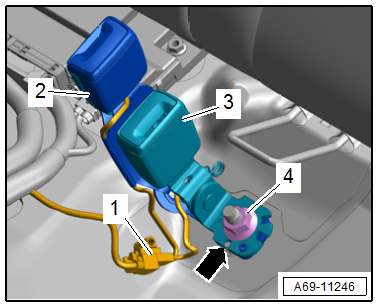
Removing
- Move seat belt height adjuster slider to the lowest position.
- Remove the B-pillar upper trim panel (refer to → Chapter "B-Pillar Upper Trim Panel, Removing and Installing") and move it to the side with the seat belt webbing.
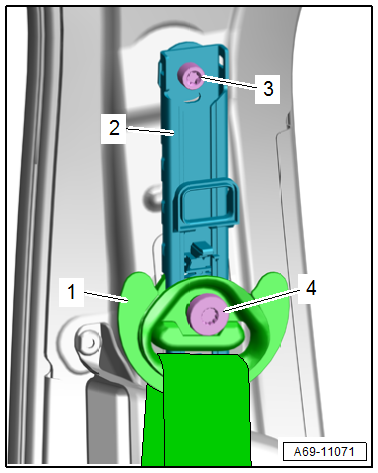
- Remove the bolt -4-.
- Remove the seat belt guide -1- with the seat belt webbing.
- Remove the bolt -3-.
- Remove the seat belt height adjuster -2- upward from the B-pillar.
Installing
Install in reverse order of removal and note the following:
- If parts of the seat belt system are removed due to an accident, replace the belt system bolts.
 Note
Note
- Replacement seat belt height adjusters are delivered with the slider in the lowest position (installation position).
- If removed seat belt height adjusters are reinstalled, these should be placed in the lowest position (installation position).
- The belt height adjuster button must not be pressed when installing the B-pillar trim with slide.
- First, insert the B-pillar trim panel upward into the mount on the roof.

- The retaining pin -1- for the sliding piece on the B-pillar trim panel must engage in the mount -2- on the seat belt height adjuster -arrow-.
- Seat belt height adjuster replacement part: After installing the B-pillar trim, push the slider all the way up.
- This unlocks the seat belt height adjuster assembly anchorage.
- When checking function, the following conditions must be fulfilled:
- The seat belt height adjuster must audibly engage at every possible position (and in the highest position too).
- Belt height adjuster button must return to upper position by itself after being pressed.
- The belt relay must swing into vertical position or carrier direction by itself after tightening the screw.
If any of the listed conditions are not fulfilled, the belt height adjuster assembly must be checked; if necessary, replace the belt height adjuster.
Installation instructions: For example tightening specifications, replacing components. Refer to → Chapter "Overview - Front Three-Point Seat Belt".
Front Seat Belt Latch, Removing and Installing
Caution
This procedure contains mandatory replaceable parts. Refer to component overview and parts catalog prior to starting procedure.
Mandatory Replacement Parts
- Bolt - Front Seat Belt Latch to Front Seat (Replace bolt if it was removed because of an accident when the seat belt was buckled)
Removing
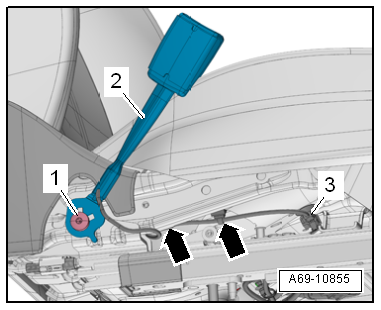
- Move the front seat into its highest position.
- Unscrew the front seat and tip forward with the wires attached. Refer to → Chapter "Front Seat, Removing and Installing".
- Disconnect the connector -3- and free up the wire -arrows-.
- Remove bolt -1- and remove belt latch -2-.
Installing
Install in reverse order of removal and note the following:
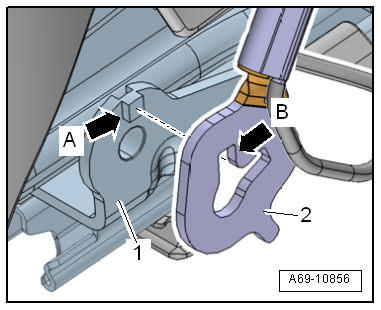
- Position the seat belt latch -2- so that the cut-out -arrow B- lines up with the tab -arrow A- on the seat pan -1-.
Information for installation: For example, tightening specifications, replacing body parts. Refer to → Chapter "Overview - Front Seat Belt Latch" and → Chapter "Overview - Front Seat".
Rear Seat Belt Latch, Removing and Installing
Special tools and workshop equipment required
- Drill
- Protective Eyewear
Caution
This procedure contains mandatory replaceable parts. Refer to component overview and parts catalog prior to starting procedure.
Mandatory Replacement Parts
- Nut - Seat Belt Latch to Floor (Replace bolt if it was removed because of an accident when the seat belt was buckled)
Removing
- Remove the rear bench seat. Refer to → Chapter "Bench Seat/Single Seat, Removing and Installing".
Right Seat Belt Latch with Rear Center Belt End Fitting
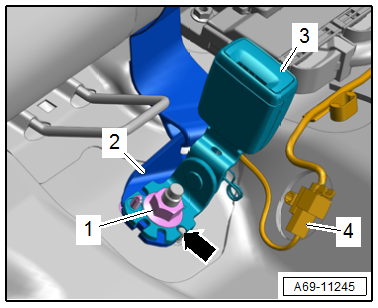
- Free up and disconnect the connector -4- for the seat belt switch.
- Remove the nut -1-.
- Remove the belt end fitting -2- with the seat belt latch -3-.
- Remove the clip and remove the seat belt latch.
- -arrow-: locating pin on floor panel
Center and Left Seat Belt Latch
- Free up and disconnect the connector -1- for the seat belt switch.
- Remove the nut -4-.
- Remove the seat belt latches -2 and 3-.
- -arrow-: Locating pin on floor panel
Seat Belt Latches, Separating from Each Other
- Free up the wires for the seat belt switch.
 WARNING
Risk of eye injury.
Wear protective eyewear!
- Drill out the rivet.
Installing
Install in reverse order of removal and note the following:
- The locating pin -arrow- on the floor panel must be positioned in the seat belt latch opening.
Installation instructions: For example tightening specifications, replacing components. Refer to → Chapter "Overview - Rear Seat Belt Latch".
READ NEXT:
 Child Seat Anchors
Overview - Front Child Seat Anchors
1 - Child Seat Anchor
Front passenger seat only
Bolted to the seat pan
Check after an accident. Refer to
→ Chapter "Child Seat Anchors, Check
Airbag System
Component Location Overview - Airbag System
1 - Pedestrian Protection Trigger 2 -G599-
Overview. Refer to
→ Chapter "Overview - Pedestrian Protection".
2 - Front Passen
Airbag Control Module
Overview - Airbag Control Module
1 - Center Tunnel
2 - Nut
9 Nm
Quantity: 4
The thread must be paint and contaminant free, nut and ground pins serve
as ground connection for
SEE MORE:
Tire pressure monitoring
system
General notes
Each tire, including the spare (if provided),
should be checked monthly when cold and inflated
to the inflation pressure recommended by the
vehicle manufacturer on the vehicle placard or
tire inflation pressure label. (If your vehicle has
tires of a different size than the size indica
Windshield
Overview - Windshield
1 -
Windshield
Removing and installing. Refer to
→ Chapter "Windshield, Removing and Installing".
Distance to roof: Dimension -c- = 2.5 mm
Distance to A-pillars: Dimension -e- =
greater than 3 mm; center if necessary
2 -
Adhesive Bead
Observe
