Audi A4: Ribbed Belt Pulley without Freewheel, Removing and Installing
Special tools and workshop equipment required
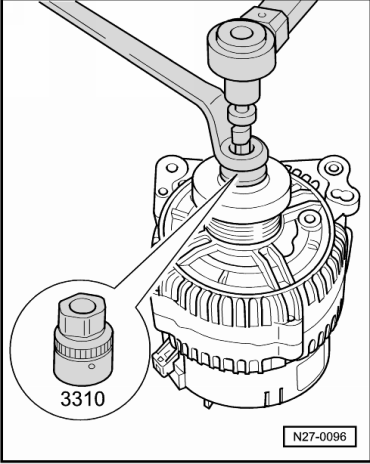
- Generator Belt Socket -3310-
- Inner hex socket 8 mm or TORX T50
Removing
- Remove the generator if necessary. Refer to → Electrical Equipment; Rep. Gr.27; Generator; Generator, Removing and Installing.
- For some engine types the removal can be performed with the generator still installed, here only the ribbed belt must have the tension released and be removed.
- If present, press the protective cap off the generator pulley.
- Counterhold nut using Generator Belt Socket -3310- and rotate generator shaft clockwise to loosen it.
- Remove ribbed belt pulley.
Installing
Install in reverse order of removal. Note the following:
- Turn the generator shaft counterclockwise to tighten.
- Clip protective cap onto generator pulley.
Tightening specification
.png)
Ribbed Belt Pulley with Freewheel, Removing and Installing
General Information
There are different ribbed belt pulley with freewheel.
Before removing check which special tool must be used for the removal of the ribbed belt pulley with freewheel.
 Caution
The length of the ribbed belt is different depending on the ribbed belt pulley with freewheel installed.
Check which ribbed belt pulley with freewheel is installed and make sure that the correct ribbed belt will be installed. For the ribbed belt allocation. Refer to the Parts Catalog.
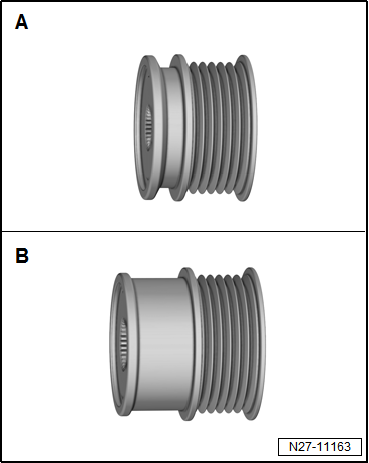
Characteristics of the Ribbed Belt Pulley with Freewheel
-A- small ribbed belt pulley with freewheel, special tool to be used Puller - Bevel Gear -T10474- or Multi-Tooth Adapter -3400-
-B- large ribbed belt pulley with freewheel, special tool to be used Multi-Tooth Adapter -3400-
 Note
Note
The ribbed belt for the large ribbed belt pulley with freewheel must be larger because it has a larger diameter.
Special tools and workshop equipment required
- Puller - Bevel Gear -T10474-
- Multi-Tooth Adapter -3400-
- Torque Wrench 1332 40-200Nm -VAG1332-
- Inner Hex Socket 8 mm or TORX T50
Removing
- Remove the generator if necessary. Refer to → Electrical Equipment; Rep. Gr.27; Generator; Generator, Removing and Installing.
- For some engine types the removal can be performed with the generator still installed, here only the ribbed belt must have the tension released and be removed.
- Clamp the generator in a vise at the mounting points.
- If equipped, remove the protective cap from the decoupling belt pulley with freewheel.
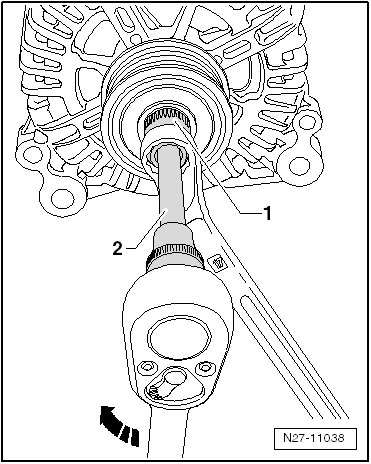
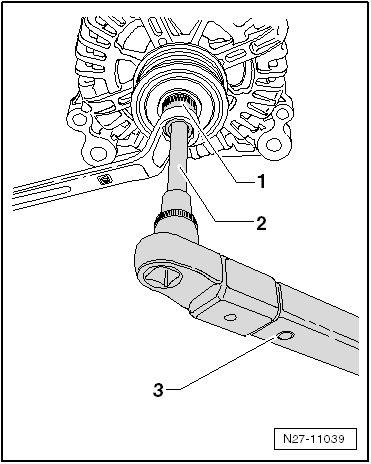
- Install the Multi-Tooth Adapter -T10474- or Multi-Tooth Adapter -3400--1- in the belt pulley and attach a wrench.
- Place a suitable tool -2- in the generator shaft.
- Turn the generator shaft clockwise in direction of -arrow- to loosen and while doing so counterhold with the wrench.
- Hold the ribbed belt pulley with freewheel in place by hand and turn it at the generator shaft until the ribbed belt pulley with freewheel can be removed.
Installing
Install in reverse order of removal. Note the following:
The Torque Wrench 1332 40-200Nm -VAG1332- must be rearranged for installing the decoupling belt pulley with freewheel as follows:
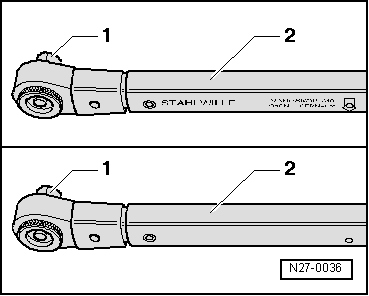
- Release the insert -1- and remove it from the handle part -2-.
- Turn the handle part -2- of the torque wrench 180º and reinsert the socket.
- Set the rotation direction of the torque wrench socket to "left".
- Next, screw the ribbed belt pulley with freewheel by hand onto the generator shaft until stop.
- Install the Multi-Tooth Adapter -T10474--1- ribbed belt pulley with freewheel and attach the wrench.
- Place a suitable tool -2- in the generator shaft.
- Turn the generator shaft using the Torque Wrench 1332 40-200Nm -VAG1332--3- counter clockwise to tighten the ribbed belt pulley with freewheel.
- Clip protective cap onto generator pulley.
Tightening Specification
.png)
Ribbed Belt Pulley with Freewheel, Checking
Procedure
- The ribbed belt pulley with freewheel is removed. Refer to → Chapter "Ribbed Belt Pulley with Freewheel, Removing and Installing".
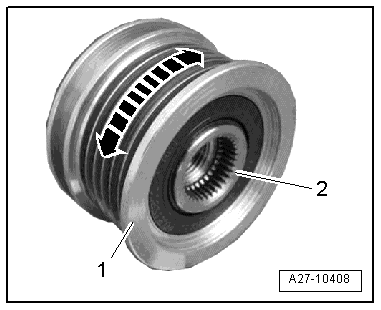
- Hold the inner ring -2- on the ribbed belt pulley with one hand using the thumb and index finger and the outer ring -1- with the other hand using the thumb and index finger.
- Hold the inner ring tight and turn the outer ring in the rotation direction of the generator.
- If the free-running hub is intact, the outer does not turn.
- Hold the inner ring tight and turn the outer ring opposite the rotation direction of the generator.
- If the free-running hub in intact, the outer ring turns with slight resistance.
Replace the ribbed belt pulley if the free-running hub does not function as described.
READ NEXT:
 Special Tools
Special tools and workshop equipment required
Analog/Digital Multimeter -FLU83III-
Puller - Bevel Gear -T10474-
Torque Wrench 1332 40-200Nm -VAG1332-
Inner Hex Socket 8 mm or TORX T50
B
Windshield Wiper/Washer System
Washer Fluid Hoses
Washer Fluid Line Hose Connections, Disconnecting and Connecting
Various hose couplings are used to connect the hoses to the
washer fluid pumps and spray jets or as coupling points
Exterior Lights, Switches
HID Headlamp Usage and Safety Precautions
Never replace bulbs if you are not familiar with the
procedures, safety precautions and tools.
WARNING
Danger to life due to high voltage.
For wor
SEE MORE:
Steering Gear, Removing and Installing
Special tools and workshop equipment required
Torque Wrench 1331 5-50Nm -VAG1331-
Torque Wrench 1332 40-200Nm -VAG1332-
Engine and Gearbox Jack -VAS6931-
Ball Joint Splitter -VAS251805-, not illustrated
Locating Pin -T40334-
Support Brace -T40335-
Caution
This procedure contains man
A/C Refrigerant High Pressure Switch -F23-
Note
Switch pressures, removing and installing switches as well
as switch arrangement and version. Refer to vehicle specific
refrigerant circuit
→ Heating, Ventilation and Air Conditioning; Rep. Gr.87; System
Overview - Refrigerant Circuit (vehicle-specific
repair manua
