Audi A4: Front Three-Point Seat Belt, Removing and Installing
 Caution
This procedure contains mandatory replaceable parts. Refer to component overview and parts catalog prior to starting procedure.
Mandatory Replacement Parts
- Bolt - Automatic Belt Retractor with Electric Seat Belt Tensioner to Pillar (Replace bolt if it was removed because of an accident when the seat belt was buckled)
- Bolt - Automatic Belt Retractor without Electric Seat Belt Tensioner to Pillar (Replace bolt if it was removed because of an accident when the seat belt was buckled)
Removing
 WARNING
Risk of injury due to involuntary deployment.
- Pay attention to the safety precautions when working with pyrotechnic components. Refer to → Chapter "Safety Precautions when Working with Pyrotechnic Components".
- Observe the disposal regulations for pyrotechnical components. Refer to → Chapter "Airbag, Belt Tensioner and Battery Cut-Out Units, Storing, Transporting and Disposing (Pyrotechnic Components)".
- Move the front seat all the way forward into its highest position.
- Disconnect the battery ground cable with the ignition turned on. Refer to → Electrical Equipment; Rep. Gr.27; Battery; Battery, Disconnecting and Connecting.
- Remove the front belt end fitting. Refer to → Chapter "Front Belt End Fitting, Removing and Installing".
- Remove the B-pillar upper trim panel and guide the seat belt webbing out. Refer to → Chapter "B-Pillar Upper Trim Panel, Removing and Installing".
- Remove the B-pillar lower trim panel. Refer to → Chapter "B-Pillar Lower Trim Panel, Removing and Installing".
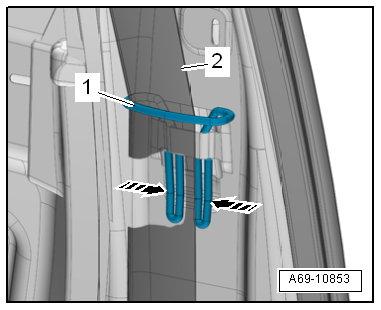
- Push the bracket together in the direction of -arrows- and remove the belt guide -1- upward.
- Guide out the seat belt -2- and remove the seat belt guide.
- Remove the bolt -1-.
- Remove the seat belt guide -2- and seat belt webbing.

Version 1
WARNING
Risk of injury due to involuntary deployment.
Before handling pyrotechnic components (For example, disconnecting the connector), the person handling it must "discharge static electricity". For example, this can be done by briefly touching the door striker.
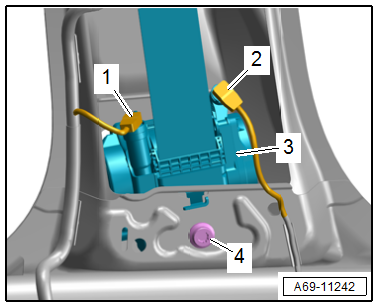
- Pull the connector lock out, then disconnect the connectors -1 and 2- for the seat belt tensioner igniter and seat belt force limiter.
- Remove the bolt -4- and then remove the automatic belt retractor -3- from the mount.
Version 2
WARNING
Risk of injury due to involuntary deployment.
Before handling pyrotechnic components (For example, disconnecting the connector), the person handling it must "discharge static electricity". For example, this can be done by briefly touching the door striker.
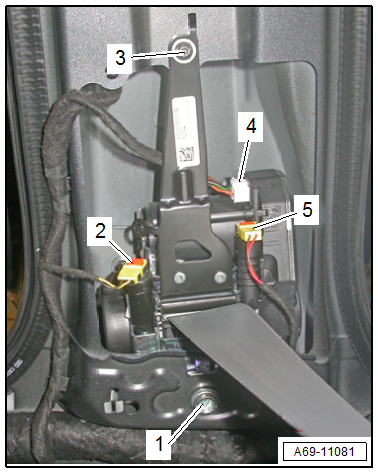
- Pull the connector lock out, then disconnect the connectors -2 and 5- for the seat belt igniter and seat belt force limiter.
- Push the release to disconnect the seat belt tensioner control module connector -4-.
- Remove the bolts -1 and 3- and then remove the automatic belt retractor from the mount.
Installing
WARNING
Risk of injury due to involuntary deployment.
- Pay attention to the safety precautions when working with pyrotechnic components. Refer to → Chapter "Safety Precautions when Working with Pyrotechnic Components".
- Before handling pyrotechnic components (For example, connecting a connector), the person handling it must "discharge static electricity". For example, this can be done by briefly touching the door striker.
Install in reverse order of removal and note the following:
- If parts of the seat belt system are removed due to an accident, replace the belt system bolts.
 Note
Note
- Make sure the connectors are pushed in all the way and that they engage audibly.
- Equipped on some models: The Left Front Seat Belt Tensioner Control Module -J854-/ Right Front Seat Belt Tensioner Control Module -J855- must be adapted using the Vehicle Diagnostic Tester after replacing the automatic belt retractor with electric seat belt tensioner.
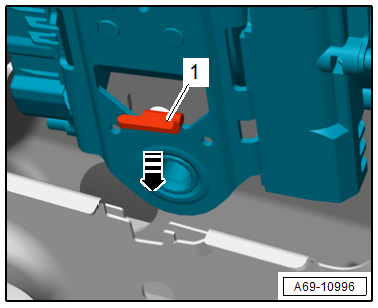
- Insert the automatic belt retractor with the anti-twist mechanism -1- in the mount -arrow- and tighten the bolt.
WARNING
Repairing pyrotechnic components (For example the airbag and seat belt tensioner) incorrectly increases the risk of injuries due to unintentional deployments when the battery is connected.
- The ignition must be on when connecting the battery.
- Make sure that no one is inside the vehicle at the time when the battery is connected.
- Connect the battery ground cable with the ignition switched on. Refer to → Electrical Equipment; Rep. Gr.27; Battery; Battery, Disconnecting and Connecting.
Installation instructions: For example tightening specifications, replacing components. Refer to → Chapter "Overview - Front Three-Point Seat Belt".
READ NEXT:
 Rear Three-Point Seat Belt, Removing and Installing
Outer Rear Three-Point Seat Belt, Removing and Installing, Sedan
Caution
This procedure contains mandatory replaceable parts.
Refer to component overview and parts catalog prior to
starting
Rear Seat Belt Guide, Removing and Installing
Seat Belt Guide in Rear Seat Backrest, Removing and Installing
Special tools and workshop equipment required
Trim Removal Wedge -3409-
Removing
- Remove the center rear belt end fitting. Refer
Front Seat Belt Guide, Removing and Installing
Removing
- Remove the B-pillar lower trim panel and bracket for the upper
B-pillar trim panel. Refer to
→ Chapter "B-Pillar Lower Trim Panel, Removing and Installing".
- Push the br
SEE MORE:
Managing favorites
Applies to: vehicles with telephone
You can store contacts for all connected mobile
devices as shortcuts in the favorites list.
Selecting favorites using the MMI
Applies to: MMI: Select on the home screen:
PHONE > Favorites.
Opening favorites using the multifunction
steering wheel
Select in
Camera-based traffic sign recognition
Description
Applies to: vehicles with camera-based traffic sign recognition
Fig. 104 Instrument cluster: traffic sign recognition
The traffic sign recognition shows the traffic
signs detected by the front camera in the instrument
cluster display and in the head-up display*.
Data from the navigat
