Audi A4: Power Sunroof Control Module -J245-, Removing and Installing
Removing
- Switch off the ignition.
- Remove the left and right sun visors. Refer to → Body Interior; Rep. Gr.68; Equipment; Sun Visor, Removing and Installing.
- Remove the center support for the sun visor. Refer to → Body Interior; Rep. Gr.68; Vehicle Equipment; Sun Visor Center Support, Removing and Installing.
- Remove the front interior lamp/reading lamp. Refer to → Electrical Equipment; Rep. Gr.96; Controls; Front Interior Lamp/Reading Lamp, Removing and Installing.
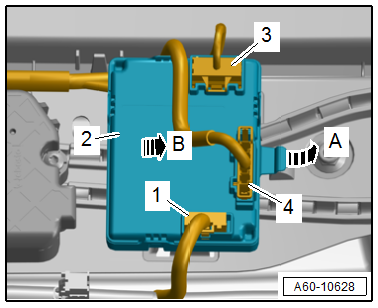
- Disconnect the connectors -1, 2 and 4-.
- Release the tab in the direction of -arrow A- and push the Power Sunroof Control Module -J245--2- to the right side of the vehicle and out of the bracket in the direction of -arrow B-.
Installing
Install in reverse order of removal and note the following:
- Perform an adaptation. Refer to → Chapter "Power Sunroof Control Module -J245-, Programming".
Power Sunroof Control Module -J245-, Programming
Sunroof Motor -V1-, Programming
After installing the Sunroof Motor -V1-, an adaptation must be performed.
 NOTICE
Moving the slotted guide rail guide increases the risk of damaging the sliding sunroof components.
- Move the slotted guide rail guide only when the glass panel is installed.
- Connect the Vehicle Diagnostic Tester.
- Switch the ignition on.
- Select and start the Diagnostic operating mode.
- Select the Test plan tab.
- Select the Select individual test button and select the following tree structure consecutively:
- Body
- Body Assembly
- 01 - OBD-capable systems
- CA - Power Sunroof Control Module J245
- CA - Power Sunroof Control Module J245 Functions
- CA - Basic Setting
- CA - Power Sunroof Control Module J245, no sliding sunroof basic setting
- Start the selected program and follow the instructions on the Vehicle Diagnostic Tester display.
Power Sunroof Control Module -J245-, Activating
If the Power Sunroof Control Module -J245- was replaced, it must be activated after installing.
- Connect the Vehicle Diagnostic Tester.
- Switch the ignition on.
- Select and start the Diagnostic operating mode.
- Select the Test plan tab.
- Select the Select individual test button and select the following tree structure consecutively:
- Body
- Body Assembly
- 01 - OBD-capable systems
- CA - Power Sunroof Control Module J245
- CA - Power Sunroof Control Module J245 Functions
- CA - Control module, replacing
- Start the selected program and follow the instructions on the Vehicle Diagnostic Tester display.
Sunroof Motor -V1-, Removing and Installing
Removing
- Sliding sunroof glass panel (front) is closed.
- Switch off the ignition.
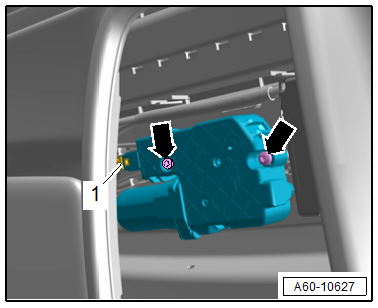
- Remove the front interior lamp/reading lamp. Refer to → Electrical Equipment; Rep. Gr.96; Controls; Front Interior Lamp/Reading Lamp, Removing and Installing.
- Remove the bolts -arrows- and the Sunroof Motor -V1-.
- Disconnect the connector -1-.
Installing
Install in reverse order of removal and note the following:
- Perform an adaptation. Refer to → Chapter "Power Sunroof Control Module -J245-, Programming".
Tightening Specifications
- Refer to → Chapter "Overview - Sliding Sunroof"
Boot, Removing and Installing
TIP
The procedure only refers to the Sedan.
Removing
- Tilt the glass panel open.
- Slide the sun shade all the way to the rear.
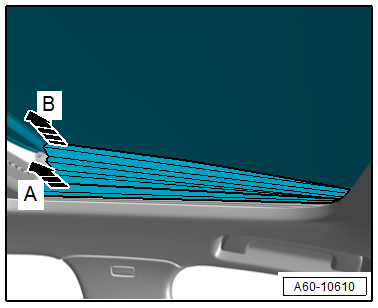
- First grasp the bottom of the boot at the rear and pull it toward the center of the vehicle -arrow A-.
- Then detach the top of the boot from the glass panel -arrow B-.
Installing
Install in reverse order of removal.
Rubber Trim, Removing and Installing
 Caution
This procedure contains mandatory replaceable parts. Refer to component overview and parts catalog prior to starting procedure.
Mandatory Replacement Parts
- Screw - Rubber Trim to Front Glass Panel
TIP
The procedure only refers to the Avant.
Removing
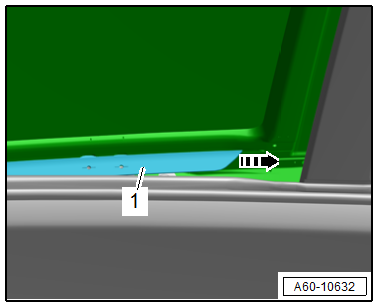
- Open the glass panel far enough until it is lifted at the front and rear.
- Pull the rubber trim -1- toward the rear -arrow- and remove it.
Installing
Install in reverse order of removal.
READ NEXT:
 Sunroof Seals, Removing and Installing
Sunroof Seals, Removing and Installing, Sedan
Removing
- Remove the glass panel. Refer to
→ Chapter "Glass Panel, Removing and Installing, Sedan".
- Remove the seal -2- from the glas
Wind Deflector, Removing and Installing
Wind Deflector, Removing and Installing, Sedan
Removing
- Move the glass panel toward the rear.
- Slightly lift the tab on the bearing -1-
for the wind deflector -2- using a
screwdriver in
Water Drain Hoses
Overview - Water Drain Hoses
Overview - Front Water Drain Hoses
1 -
Grommet
Push all the way into the body using a soap solution
2 -
Front Water Drain Hose
Cleaning. Refer to
SEE MORE:
Rear Bumper Cover Mount, Removing and Installing
Bumper Cover Mount, Removing and Installing, Upper
Removing
- Remove the rear bumper cover. Refer to
→ Chapter "Bumper Cover, Removing and Installing".
- Remove the bolts -arrows-.
- Remove the upper mount -1-.
Installing
Install in reverse order of removal.
Tightening Speci
Side assist
Description
Applies to: vehicles with side assist
Fig. 121 Driving situations and displays in the exterior mirror
General information
Side assist monitors the blind spot and traffic behind
your vehicle and provides assistance when
you are changing lanes. If the system detects an
object approachin
