Audi A4: Wind Deflector, Removing and Installing
Wind Deflector, Removing and Installing, Sedan
Removing
- Move the glass panel toward the rear.
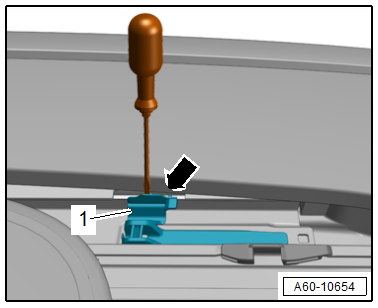
- Slightly lift the tab on the bearing -1- for the wind deflector -2- using a screwdriver in the direction of -arrow A-.
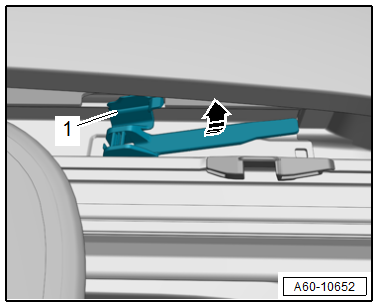
- Push the wind deflector bearing all the way to the rear in the direction of -arrow B-.
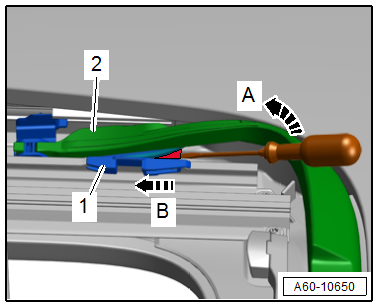
- Pivot the wind deflector upward in the direction of -arrow- and disengage it from the bearing.
Installing
Install in reverse order of removal and note the following:
- Engage the wind deflector bearing into the sunroof frame.
Wind Deflector, Removing and Installing, Avant
Removing
- Move the front glass panel completely toward the rear.
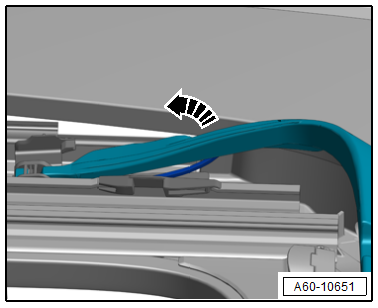
- Starting at the side, disengage the lower molding on the wind deflector net from the sliding sunroof frame -arrow-.
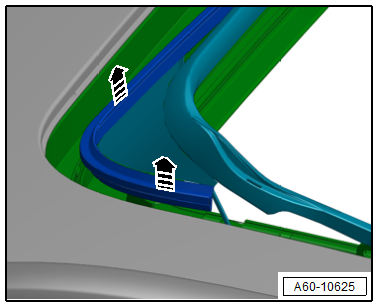
- Push the wind deflector spring on the left and right sides downward in the direction of -arrow- and disengage it from the wind deflector.
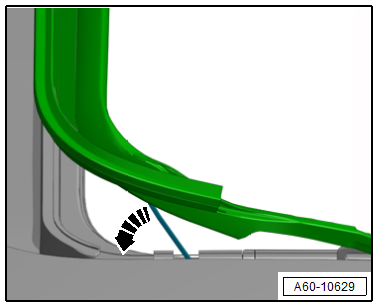
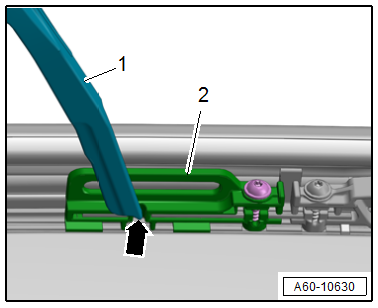
- Position the wind deflector frame -1- on the left and right sides in the bearing -2- so that it is above the cut-out -arrow-.
- Pivot the frame in this position upward and remove it sideways from the bearing.
Installing
Install in reverse order of removal and note the following:
- First mount the wind deflector frame on the bearing.
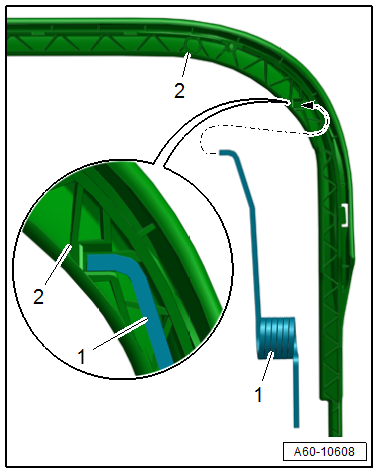
- Carefully insert the spring -1- into the cut-out on the frame -2--arrow-.
Wind Deflector Bearing, Removing and Installing
Wind Deflector Bearing, Removing and Installing, Sedan
Removing
- Remove the wind deflector. Refer to → Chapter "Wind Deflector, Removing and Installing, Sedan".
- Push the left and right bearing -1- at the cut-out -arrow- in the sunroof frame.
- Unclip the left and right bearing from the rail on the outside using a screwdriver.
- Guide the left and right bearing -1- out through the cut-out in the sunroof frame in the direction of -arrow-.
Installing
Install in reverse order of removal.
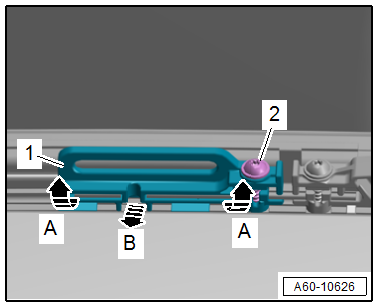
Wind Deflector Bearing, Removing and Installing, Avant
Removing
- Open the front glass panel.
- Remove the bolt -2-.
- Lift the retaining tabs slightly -arrows A-.
- Pull the wind deflector bearing -1- to the side and out of the sunroof frame -arrow B-.
- Pivot the wind deflector bearing 90º and disengage it from the wind deflector.
Installing
Install in reverse order of removal.
Tightening Specifications
- Refer to → Chapter "Overview - Wind Deflector, Avant"
Wind Deflector Spring, Removing and Installing
Removing
- Remove the wind deflector. Refer to → Chapter "Wind Deflector, Removing and Installing, Avant".
- Remove the spring -2- from the ends -arrows- of the wind deflector -1-.
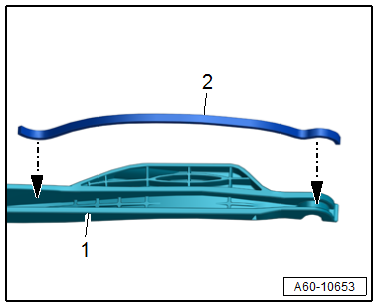
Installing
Install in reverse order of removal and note the following:
- Insert the new springs according to their shape -arrows-.
READ NEXT:
 Water Drain Hoses
Overview - Water Drain Hoses
Overview - Front Water Drain Hoses
1 -
Grommet
Push all the way into the body using a soap solution
2 -
Front Water Drain Hose
Cleaning. Refer to
Front Bumper
Overview - Bumper Cover
1 -
Towing Eye Cover
2 -
Bumper Cover
Removing and installing. Refer to
→ Chapter "Bumper Cover, Removing and Installing".
Adjusting. Refer to
SEE MORE:
Subframe, Lowering
Special tools and workshop equipment required
Torque Wrench 1331 5-50Nm -VAG1331-
Torque Wrench 1332 40-200Nm -VAG1332-
Tensioning Straps -T10038-
Engine and Gearbox Jack -VAS6931-
Locating Pins -T40327-
Procedure
Note
During installation, all cable ties must be installed at the
same
Vehicle Interior Trim Panels
Component Location Overview - Vehicle Interior Trim Panels
Component Location Overview - Vehicle Interior Trim Panels, A3 Sedan
1 - D-Pillar Trim Panel
Overview. Refer to
→ Chapter "Overview - D-Pillar Trim Panel".
2 - C-Pillar Trim Panel
Overview. Refer to
→&nbs
