Audi A4: Sunroof Seals, Removing and Installing
Sunroof Seals, Removing and Installing, Sedan
Removing
- Remove the glass panel. Refer to → Chapter "Glass Panel, Removing and Installing, Sedan".
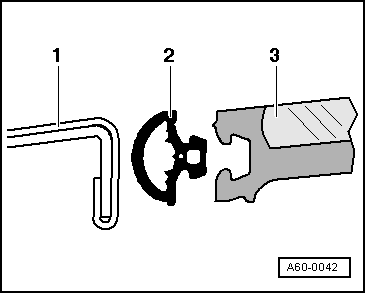
- Remove the seal -2- from the glass panel -3-.
- 1 - Roof
Installing
- Starting in the center, press the new seal on the rear panel edge into the groove on the glass panel.
TIP
Coat the edge of the panel with a soap solution to make it easier to install the seal.
Sunroof Seals, Removing and Installing, Avant
Special tools and workshop equipment required
- Roller -3356-
- Wiring Harness Repair Set - Hot Air Blower -VAS1978/14A-
- Cleaning Solution -D 009 401 04-
- Applicator -D 009 500 25-
- Bonding Agent -D 355 205 A2-
Roof Opening Seal, Removing
- Remove the front and rear glass panel. Refer to → Chapter "Glass Panel, Removing and Installing".
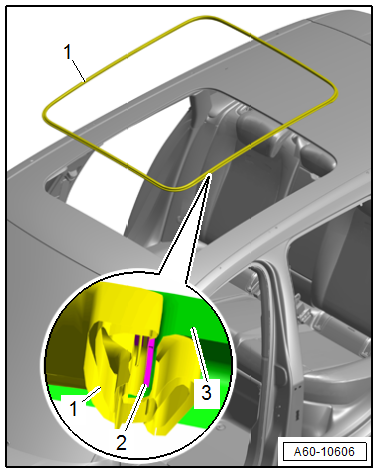
- Remove the roof opening seal -1- and warm it up if necessary using the -VAS1978/14A-.
Installing
- The vehicle and the seal must be at room temperature.
- The adhesive surfaces must be free of dirt and grease.
- If the Bonding Agent -D 355 205 A2- dries longer than 3 hours, then it must be primed again.
- Do not stretch the seal when installing it.
- Clean the adhesive surface using the Cleaning Solution -D 009 401 04-.
- Apply Bonding Agent -D 355 205 A2- on the adhesive surface using the Applicator -D 009 500 25- and let dry.
- Starting at the back, push the seal -1- in the roof center onto the body seam -3-. While doing so, remove the adhesive strip protective film -2-.
- The seal joint must be at the rear in the center of the roof.
- Press the seal onto the roof edge by going over it twice with the -3356-.
Further installation is the reverse order of removal.
Rear Glass Panel Seal, Removing:
- Remove the rear glass panel. Refer to → Chapter "Glass Panel, Removing and Installing, Rear, Avant".
- Remove the seal -2- from the glass panel -1-.
Installing
- Starting in the corners, carefully press the new seal -2- evenly into the groove on the glass panel -3-.
- 1 - Roof
TIP
Coat the edge of the panel with a soap solution to make it easier to install the seal.
Sunroof Shade, Removing and Installing
TIP
The procedure only refers to the Avant.
Special tools and workshop equipment required
- Locking Pin (3 pc.) -T40011-
Removing
- Move the sunroof shade all the way to the rear.
- Remove the sunroof frame. Refer to → Chapter "Sunroof Frame, Removing and Installing, Avant".
- Remove the rear glass panel. Refer to → Chapter "Glass Panel, Removing and Installing, Rear, Avant".
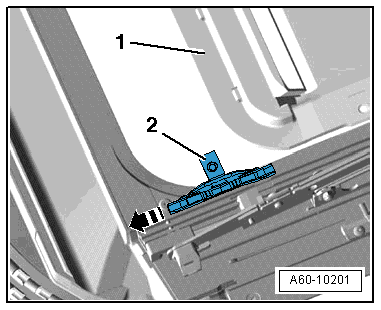
- Using the shade emergency release, position the shade guide so that the gliding piece -1- is centered at both markings -arrows- on the sunroof frame.
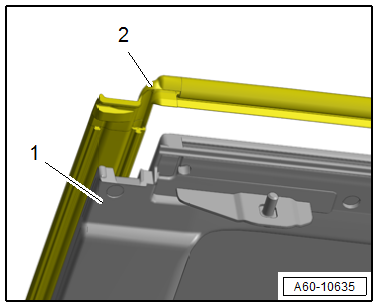
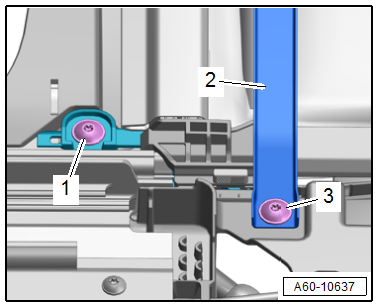
- Remove the left and right bolts -1 and 3-.
- Remove the cross bar -2-.
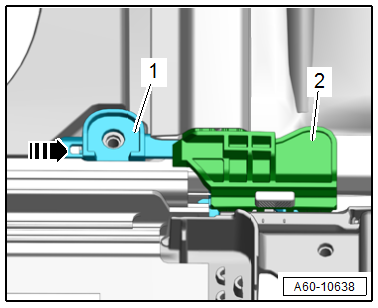
- Slide the left and right guide -1- toward the rear -arrow- and remove the sunroof shade rail -2-.
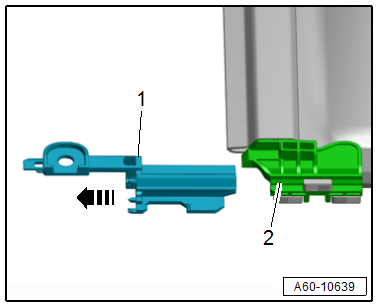
- Remove the guide in the direction of -1- from the sunroof shade rail -2--arrow-.
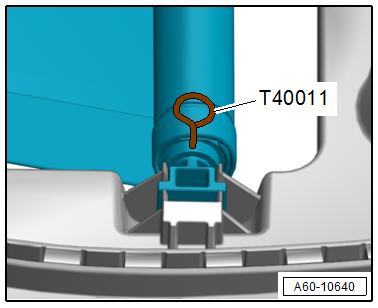
- Insert the -T40011- into the left securing hole on the sunroof shade by turning the shade back and forth slightly, if necessary.
- Release the tab -arrow- using a screwdriver and remove the shade.

Installing
- The sunroof shade must be rolled up.
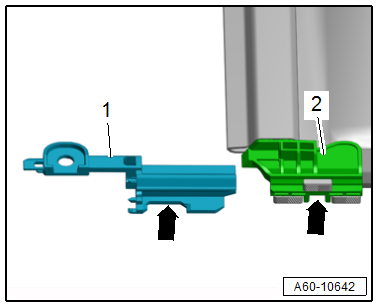
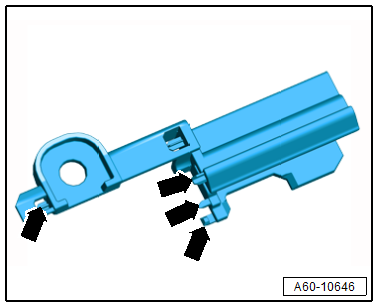
- Insert the guide -1- into the rail end piece -2- for the sunroof shade.
- The cut-outs -arrows- on both components must lay over each other.
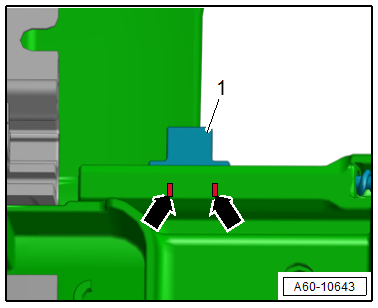
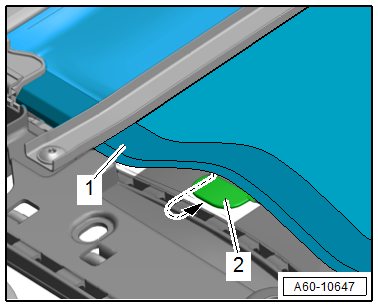
- Check if the cable guide -1- for the sunroof shade cable is between the markings -arrows- on the sunroof frame.
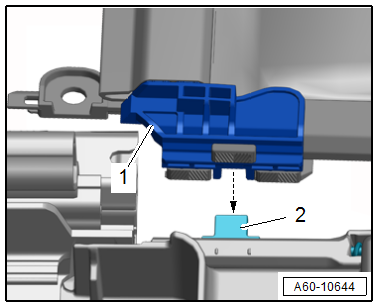
- Insert the sunroof shade with the guide into the sunroof frame.
- The guide -2- on the sunroof shade cable must engage in the cut-out on the end piece -1- for the rail -arrow-.
- Slide the guide -1- forward -arrow-.
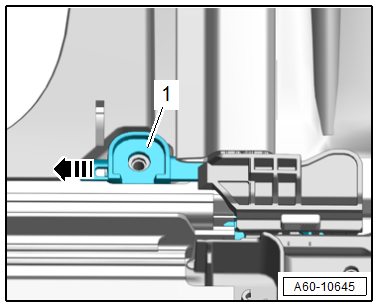
- Check if all guide tabs -arrows- are engaged in their respective counterpart on the sunroof frame.
- Position the cross bar -2- on the sunroof frame and tighten the left and right screws -1 and 3-.
If the axle in the sunroof shade shaft is unrolled, it is possible to re-establish the pretension by doing the following.
- Turn the axle of the unrolled sunroof shade until it is possible to feel a slight resistance.
- Then turn the axle with the end piece 12 turns while holding the shaft secure, and then use the -T40011- to secure it from unrolling.
Continuation
- Insert the sunroof shade axle into the guide on the sunroof frame.
- Remove the -T40011- from the shaft just after inserting it into the sunroof frame.
- Make sure that the side sunroof shade reinforcement -1- is engaged in the guide tab -2- for the frame section -arrow-.
Further installation is performed in reverse order of removal, while noting the following:
After installing the sunroof shade, an adaptation must be performed.
- Connect the Vehicle Diagnostic Tester.
- Switch the ignition on.
- Select and start the Diagnostic operating mode.
- Select the Test plan tab.
- Select the Select individual test button and select the following tree structure consecutively:
- Body
- Body Assembly
- 01 - OBD-capable systems
- CA - Power Sunroof Control Module J245
- CA - Power Sunroof Control Module J245 Functions
- CA - Basic Setting
- CA - Roof Shade Control Module J394, no roof shade basic setting
- Start the selected program and follow the instructions on the Vehicle Diagnostic Tester display.
Tightening Specifications
- Refer to → Chapter "Overview - Sunroof Shade"
Sunroof Shade Motor -V260-, Removing and Installing
TIP
The procedure only refers to the Avant.
Removing
- Remove the C-pillar trim panel on the driver side. Refer to → Body Interior; Rep. Gr.70; Vehicle Interior Trim Panels; C-Pillar Trim Panel, Removing and Installing.
- Remove the roof end strip. Refer to → Body Interior; Rep. Gr.70; Roof Trim Panels; Roof End Strip, Removing and Installing.
- Remove the D-pillar trim panels. Refer to → Body Interior; Rep. Gr.70; Vehicle Interior Trim Panels; D-Pillar Trim Panel, Removing and Installing.
- Open the sun shade completely.
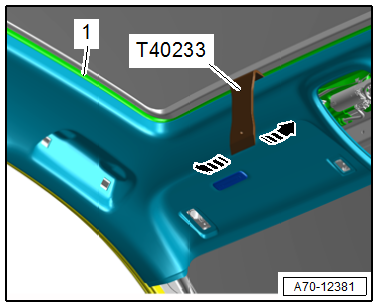
- To avoid dirtying the headliner, clean the Removal Wedge -T40233-.
- Push the -T40233- between the frame -1- for the sliding sunroof and the headliner.
- Using the -T40233-, loosen the headliner all the way around the frame for the sliding sunroof -arrows-.
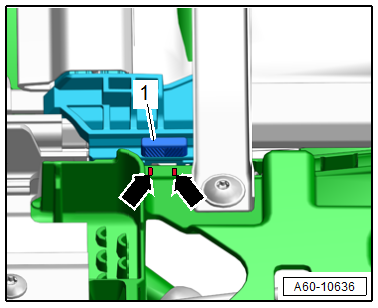
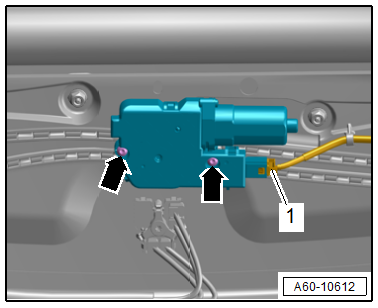
- Disconnect the connector -1-.
- Remove the bolts -arrows- and remove the Sunroof Shade Motor -V260-.
Installing
Install in reverse order of removal.
Tightening Specifications
- Refer to → Chapter "Overview - Sunroof Shade"
Sun Shade, Removing and Installing
 Caution
This procedure contains mandatory replaceable parts. Refer to component overview and parts catalog prior to starting procedure.
Mandatory Replacement Parts
- Screw - Gliding Piece to Sun Shade
- The following components must be replaced after removal. Refer to → Chapter "Overview - Sliding Sunroof, Sedan".
TIP
The procedure only refers to the Sedan.
Removing
- Remove the glass panel. Refer to → Chapter "Glass Panel, Removing and Installing, Sedan".
- Remove the screw -2- for the gliding piece -3-.

- Slide the sun shade -1- a little toward the rear.
- Remove the front gliding piece -2- forward -arrow-.
- Remove the rear gliding piece toward the rear.
- Remove the sun shade upward.
Installing
Install in reverse order of removal.
Tightening Specifications
- Refer to → Chapter "Overview - Sliding Sunroof, Sedan"
Gliding Piece, Removing and Installing
TIP
The procedure only refers to the Avant.
Special tools and workshop equipment required
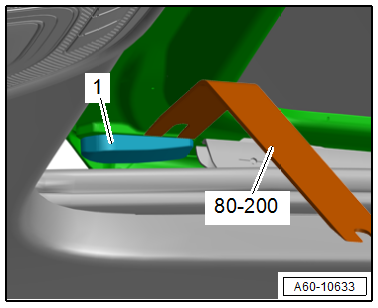
- Pry Lever -80-200-
Removing
- Open the glass panel far enough until the gliding piece is accessible.
- Pry out the gliding piece -1- using the -80-200-.
Installing
Install in reverse order of removal and note the following:
- Carefully press the gliding piece retaining strips into the mount on the glass panel.
- Perform an adaptation. Refer to → Chapter "Power Sunroof Control Module -J245-, Programming".
READ NEXT:
 Wind Deflector, Removing and Installing
Wind Deflector, Removing and Installing, Sedan
Removing
- Move the glass panel toward the rear.
- Slightly lift the tab on the bearing -1-
for the wind deflector -2- using a
screwdriver in
Water Drain Hoses
Overview - Water Drain Hoses
Overview - Front Water Drain Hoses
1 -
Grommet
Push all the way into the body using a soap solution
2 -
Front Water Drain Hose
Cleaning. Refer to
SEE MORE:
Fender, Removing and Installing
Special tools and workshop equipment
required
Pop Rivet Nut Pliers -VAS5072A-
Drill
Pop rivets. Refer to the Parts Catalog.
Follow the safety precautions. Refer to
→ Body Interior; Rep. Gr.00; Safety Precautions; Safety
Precautions when Working on Pyrotechnic Components.
Remo
Tool Descriptions
Crimping Pliers with Insert
The Crimping Pliers without Insert -VAS1978/1- with Crimping
Pliers - Insert 2 -VAS1978/2- is a component of the Wiring
Harness Repair Set -VAS1978- and is used to crimp the connector
during the wiring harness repair.
Note
The Wiring Harness Repair - Crimpi
