Audi A4: Leaking or Damaged Components except A/C Compressor, Reservoir or Receiver/Dryer
The refrigerant circuit was completely empty (for example with larger leak or cracked hose)
 Note
Note
- In the event of only a minor leak with slow escape of refrigerant (e.g. at a small leakage point), the amount of refrigerant oil lost and the amount of moisture penetrating is not sufficient to influence operation of the air conditioner.
- The operations marked * are only to be implemented in case of a major leak (e.g. following an accident).
Electrically-Driven A/C Compressor
- Remove the faulty component. Refer to → Heating, Ventilation and Air Conditioning; Rep. Gr.87; System Overview - Refrigerant Circuit (vehicle-specific repair manual).
- Remove the electrically driven A/C compressor and flush. Refer to → Chapter "Electrically Driven A/C Compressor, Rinsing (Remove Refrigerant Oil)" *.
- Clean the refrigerant circuit (flush with Refrigerant R134a). Refer to → Chapter "Refrigerant Circuit, Cleaning (Flushing), with Refrigerant R134a" *.
- Fill the A/C compressor or the refrigerant circuit with completely with refrigerant oil to the specified capacity.
Mechanically Driven A/C Compressor
- Remove the faulty component. Refer to → Heating, Ventilation and Air Conditioning; Rep. Gr.87; System Overview - Refrigerant Circuit (vehicle-specific repair manual).
- Remove the A/C compressor. Refer to → Heating, Ventilation and Air Conditioning; Rep. Gr.87; A/C Compressor (vehicle-specific repair manual) *
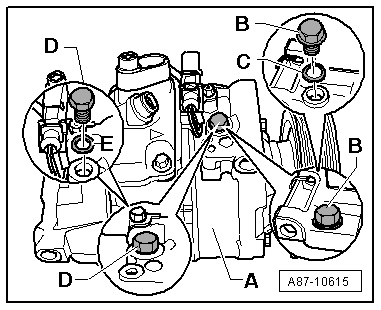
- Remove the oil drain plug -B-/-D- from the A/C compressor -A- *
Note
- There are different versions of the oil drain plug -B-/-D- and seal -C-/-E- (depending on the A/C compressor manufacturer).
- Pay close attention to the tightening specification for the oil drain plug -B-/-D- (depending on the A/C compressor manufacturer and the oil drain plug version). Refer to → Heating, Ventilation and Air Conditioning; Rep. Gr.87; A/C Compressor (vehicle-specific repair manual).
- A/C compressors made by "Denso" and "Nippondenso" have an oil drain plug -D-, for example, with a seal -E- installed on it; To replace. Refer to the Parts Catalog.
- A/C compressors made by "Sanden" or "Zexel" have an oil drain plug -B-, for example, with an O-ring -C- already installed. To replace. Refer to the Parts Catalog.
- To accelerate drainage of refrigerant oil, rotate the A/C compressor by way of clutch plate of A/C clutch, for example.
- Drain the old refrigerant oil from the A/C compressor.
All
Note
- Then fill A/C compressor with quantity of fresh refrigerant oil corresponding to quantity of refrigerant oil in replacement A/C compressor. Refer to → Chapter "Approved Refrigerant Oils and Capacities" *
- Use different refrigerant oils and quantities for the various compressors. Refer to → Chapter "Approved Refrigerant Oils and Capacities".
- To ensure compressor lubrication on start-up, at least 40 cm3 of refrigerant oil must be poured into the compressor. The remainder can be added to the new reservoir or receiver/dryer. Refer to → Chapter "Approved Refrigerant Oils and Capacities".
- If dirt has penetrated into the compressor with the refrigerant circuit open (for example after an accident), compressor is to be replaced.
- Clean refrigerant circuit (flush with refrigerant R134a. Refer to → Chapter "Refrigerant Circuit, Cleaning (Flushing), with Refrigerant R134a" or blow through with compressed air and nitrogen. Refer to → Chapter "Refrigerant Circuit, Flushing with Compressed Air and Nitrogen" *.
- Replace dryer cartridge *, receiver/dryer * or accumulator * and restrictor. Refer to → Heating, Ventilation and Air Conditioning; Rep. Gr.87; System Overview - Refrigerant Circuit (vehicle-specific repair manual).
- Assemble, evacuate and recharge refrigerant circuit.
Leaking or Damaged Components except A/C Compressor, Reservoir or Receiver/Dryer
Refrigerant circuit still contains refrigerant (for example, with minor leak)
- Discharge the refrigerant circuit.
- Remove the malfunctioning component, flush with compressed air, collect escaping refrigerant oil.
- The new component is to be filled with the amount of refrigerant oil flushed out (positive 20 cm3 for evaporator, positive 10 cm3 for condenser, refrigerant lines and refrigerant hoses) as fresh refrigerant oil fill.
- Replace the restrictor. Refer to → Heating, Ventilation and Air Conditioning; Rep. Gr.87; System Overview - Refrigerant Circuit (vehicle-specific repair manual).
- Assemble, evacuate and charge the refrigerant circuit.
READ NEXT:
 Compressor, Replacing without the Need for Flushing Refrigerant Circuit
Note
Cleaning the refrigerant circuit means flushing with
refrigerant R134a. Refer to
→ Chapter "Refrigerant Circuit, Cleaning (Flushing), with
Refrigerant R134a".
If a faulty A/C
Compressor, Replacing on Account of Leakage or Internal Damage
Vehicles with a High Voltage System (Hybrid Vehicles)
Extremely Dangerous Due to High-Voltage
The high-voltage system is under high-voltage. Death or serious
bodily injury by electric shock.
- I
Receiver/Dryer or Accumulator and Restrictor, Replacing after Cleaning
Refrigerant Circuit
Note
Cleaning the refrigerant circuit means flushing it with
refrigerant R134a. Refer to
→ Chapter "Refrigerant Circuit, Cleaning (Flushing), with
Refrigerant R134a" or blowing throu
SEE MORE:
Wind Deflector, Removing and Installing
Wind Deflector, Removing and Installing, Sedan
Removing
- Move the glass panel toward the rear.
- Slightly lift the tab on the bearing -1-
for the wind deflector -2- using a
screwdriver in the direction of -arrow A-.
- Push the wind deflector bearing all the way to the rear in the
Door Lock Cable, Removing and Installing
NOTICE
Risk of damaging the operating cable by deforming it.
- Never sharply bend or kink the operating cable.
Removing
- Remove the door window guide rail. Refer to
→ Chapter "Door Window Guide Rail, Removing and Installing".
- Remove the bolts -arrows-.
- Push t
