Audi A4: Door Lock Cable, Removing and Installing
 NOTICE
Risk of damaging the operating cable by deforming it.
- Never sharply bend or kink the operating cable.
Removing
- Remove the door window guide rail. Refer to → Chapter "Door Window Guide Rail, Removing and Installing".
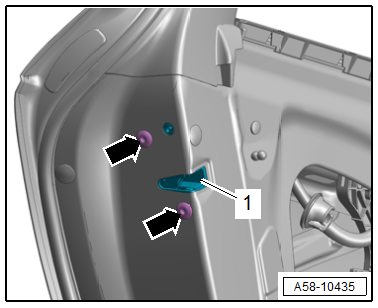
- Remove the bolts -arrows-.
- Push the door lock -1- downward.
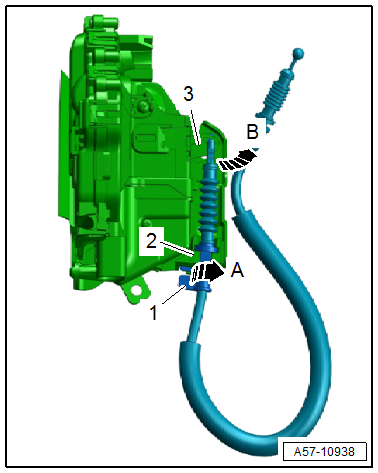
- Turn the operating cable on the lever -1- 90º in the direction of -arrow A- and remove it from the cable bracket -2-.
- Rotate the operating cable on the door lock release lever -3- in the direction of -arrow B-.
- The operating cable must be aligned with the opening on the release lever.
- Disengage the operating cable from the release lever.
- Remove the mounting bracket. Refer to → Chapter "Mounting Bracket, Removing and Installing".
Installing
Install in reverse order of removal.
Tightening Specifications
- Refer to → Chapter "Overview - Door Handle and Door Lock"
Housing, Removing and Installing
Removing
- Remove the door handle trim. Refer to → Chapter "Door Handle Trim, Removing and Installing".
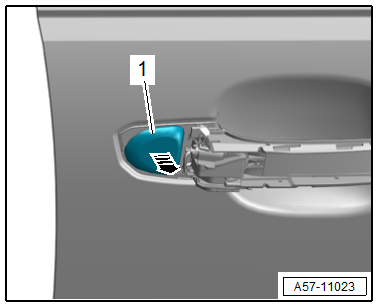
- Remove the housing -1- from the mounting bracket in the direction of -arrow-.
Installing
Install in reverse order of removal.
Door Lock, Removing and Installing
NOTICE
Risk of damaging the operating cable by deforming it.
- Never sharply bend or kink the operating cable.
Removing
- Remove the door window guide rail. Refer to → Chapter "Door Window Guide Rail, Removing and Installing".
- Remove the bolts -arrows-.
- Push the door lock -1- downward.
- Disconnect the connector.
- Turn the operating cable on the lever -1- 90º in the direction of -arrow A- and remove it from the cable bracket -2-.
- Rotate the operating cable on the door lock release lever -3- in the direction of -arrow B-.
- The operating cable must be aligned with the opening on the release lever.
- Disengage the operating cable from the release lever.
- Remove the door lock from the door.
Installing
Install in reverse order of removal.
Tightening Specifications
- Refer to → Chapter "Overview - Door Handle and Door Lock"
Striker, Removing and Installing
Removing
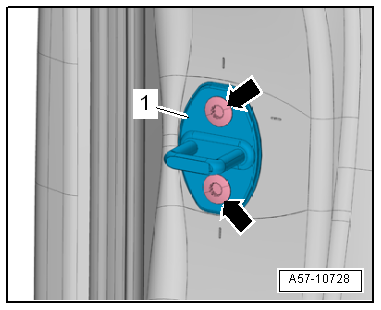
- Remove the bolts -arrows- and remove the striker -1-.
Installing
Install in reverse order of removal and note the following:
- Adjust the striker. Refer to → Chapter "Striker, Adjusting".
Tightening Specifications
- Refer to → Chapter "Overview - Door Handle and Door Lock"
Door Opener Operating Cable, Removing and Installing
NOTICE
Risk of damaging the operating cable by deforming it.
- Never sharply bend or kink the operating cable.
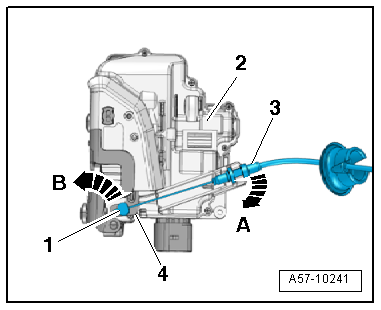
Removing
- Remove the door window guide rail. Refer to → Chapter "Door Window Guide Rail, Removing and Installing".
- Remove the bolts -arrows-.
- Push the door lock -1- downward.
- Disengage the release cable -3- from the door lock support bracket -2--arrow A-.
- Turn the nipple -1- 90º in the direction of -arrow B- and remove it from the door opener release lever -4-.
Installing
Install in reverse order of removal.
Tightening Specifications
- Refer to → Chapter "Overview - Door Handle and Door Lock"
Door Inner Cover, Removing and Installing
Special tools and workshop equipment required
- Wedge Set -T10383-
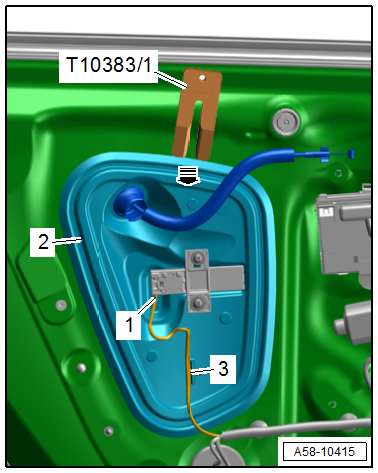
- Wedge 1 -T10383/1-
Removing
- Remove the rear door trim panel. Refer to → Body Interior; Rep. Gr.70; Rear Door Trim Panels; Rear Door Trim Panel, Removing and Installing.
- If equipped, disconnect the connector -1- and free up the wiring harness -3-.
- Pry the door inner cover -2- out of the inner door panel -arrow- using the -T10383/1-.
Installing
Install in reverse order of removal and note the following:
- Push on the door inner cover until it engages audibly.
- The door inner cover must be installed flush.
READ NEXT:
 Window Guide, Removing and Installing
Removing
- Remove the window frame trim panel. Refer to
→ Body Interior; Rep. Gr.70; Rear Door Trim Panels; Window Frame
Trim Panel, Removing and Installing.
- Remove the B
Sliding Sunroof
Overview - Sliding Sunroof
Overview - Sliding Sunroof, Sedan
1 -
Screw
3 Nm
Quantity: 2
2 -
Sunroof Motor -V1-
Removing and installing. Refer to
→ Chapter "Sunroof Mo
SEE MORE:
Steering Wheel
Overview - Steering Wheel
Overview - Steering Wheel, Three-Spoke Steering Wheel
1 - Bolt
Tightening specification. Refer to
→ Communication; Rep. Gr.91; Multifunction Steering Wheel; Overview -
Multifunction Steering Wheel.
2 - Tiptronic Downshift Button -E
Steering
Description
Electromechanical steering supports the driver's
steering movements by electronically adapting
the power steering depending on the vehicle
speed. The settings depend on the selected Audi
drive select* mode.
Dynamic steering
Applies to: vehicles with dynamic steering
The driving dynamic
