Audi A4: Sliding Sunroof
Overview - Sliding Sunroof
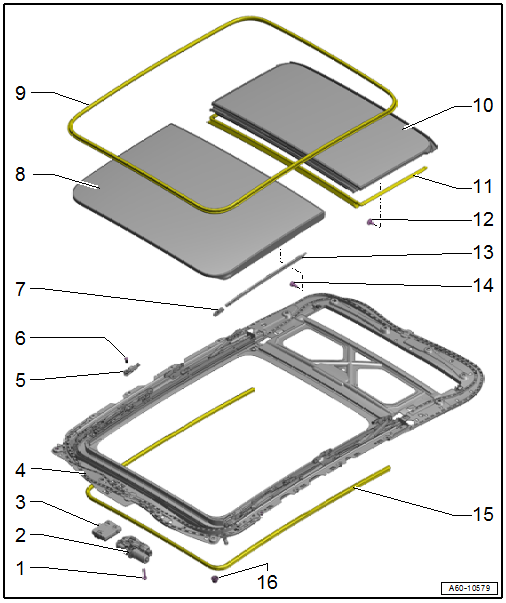
Overview - Sliding Sunroof, Sedan

1 - Screw
- 3 Nm
- Quantity: 2
2 - Sunroof Motor -V1-
- Removing and installing. Refer to → Chapter "Sunroof Motor -V1-, Removing and Installing".
- Perform the adaptation after installing. Refer to → Chapter "Power Sunroof Control Module -J245-, Programming".
3 - Power Sunroof Control Module -J245-
- Removing and installing. Refer to → Chapter "Power Sunroof Control Module -J245-, Removing and Installing".
- Perform the adaptation after installing. Refer to → Chapter "Power Sunroof Control Module -J245-, Programming".
4 - Sunroof Frame
- Removing and installing. Refer to → Chapter "Sunroof Frame, Removing and Installing, Sedan".
- Perform the adaptation after installing. Refer to → Chapter "Power Sunroof Control Module -J245-, Programming".
5 - Foam Seal
- Bonded to the sunroof frame
- Replace after removing
6 - Sun Shade
- Removing and installing. Refer to → Chapter "Sun Shade, Removing and Installing".
7 - Boot
- Removing and installing. Refer to → Chapter "Boot, Removing and Installing".
8 - Glass Panel
- Removing and installing. Refer to → Chapter "Glass Panel, Removing and Installing, Sedan".
- Adjusting. Refer to → Chapter "Glass Panel, Adjusting, Sedan".
- Perform the adaptation after installing. Refer to → Chapter "Power Sunroof Control Module -J245-, Programming".
9 - Sliding Sunroof Seal
- Removing and installing. Refer to → Chapter "Sunroof Seals, Removing and Installing, Sedan".
- Perform the adaptation after installing. Refer to → Chapter "Power Sunroof Control Module -J245-, Programming".
10 - Screw
- 3 Nm
- Replace after removing
- Self-locking
- Quantity: 6
11 - Rubber Buffer
- Installed on the sun shade
12 - Screw
- 1.5 Nm
- Replace after removing
- Self-locking
- Quantity: 4
13 - Gliding Piece
- For the sun shade
- Removing and installing. Refer to → Chapter "Sun Shade, Removing and Installing".
14 - Nut
- 8 Nm
- Quantity: 12
- Tightening sequence.
15 - Rubber Buffer
Overview - Sliding Sunroof, Avant
1 - Screw
- 3 Nm
- Quantity: 2
2 - Sunroof Motor -V1-
- Removing and installing. Refer to → Chapter "Sunroof Motor -V1-, Removing and Installing".
- Perform the adaptation after installing. Refer to → Chapter "Power Sunroof Control Module -J245-, Programming".
3 - Power Sunroof Control Module -J245-
- Removing and installing. Refer to → Chapter "Power Sunroof Control Module -J245-, Removing and Installing".
- Perform the adaptation after installing. Refer to → Chapter "Power Sunroof Control Module -J245-, Programming".
4 - Sunroof Frame
- Removing and installing. Refer to → Chapter "Sunroof Frame, Removing and Installing, Avant".
- Perform the adaptation after installing. Refer to → Chapter "Power Sunroof Control Module -J245-, Programming".
5 - Guide
- For the front glass panel
- Perform the adaptation after installing. Refer to → Chapter "Power Sunroof Control Module -J245-, Programming".
6 - Screw
- 1 Nm
- Thread cutting
- Quantity: 2
- Position and install by hand
7 - Gliding Piece
- Removing and installing. Refer to → Chapter "Gliding Piece, Removing and Installing".
8 - Front Glass Panel
- Removing and installing. Refer to → Chapter "Glass Panel, Removing and Installing, Front, Avant".
- Adjusting. Refer to → Chapter "Glass Panel, Adjusting".
- Perform the adaptation after installing. Refer to → Chapter "Power Sunroof Control Module -J245-, Programming".
9 - Roof Opening Seal
- Removing and installing. Refer to → Chapter "Sunroof Seals, Removing and Installing".
10 - Rear Glass Panel
- Removing and installing. Refer to → Chapter "Glass Panel, Removing and Installing, Rear, Avant".
- Adjusting. Refer to → Chapter "Glass Panel, Adjusting".
- Perform the adaptation after installing. Refer to → Chapter "Power Sunroof Control Module -J245-, Programming".
11 - Seal
- For the rear glass panel
- Removing and installing. Refer to → Chapter "Sunroof Seals, Removing and Installing".
12 - Screw
- 7 Nm
- Replace after removing
- Self-locking
- Quantity: 4
13 - Rubber Trim
- On the front glass panel
- Removing and installing. Refer to → Chapter "Rubber Trim, Removing and Installing".
14 - Screw
- 7 Nm
- Replace after removing
- Self-locking
- Quantity: 8
15 - Inner Seal
- Attached from the inside onto the sunroof frame
16 - Nut
- 8 Nm
- Tightening sequence.
- Quantity: 18
Overview - Sunroof Shade
TIP
The overview only refers to the Avant.
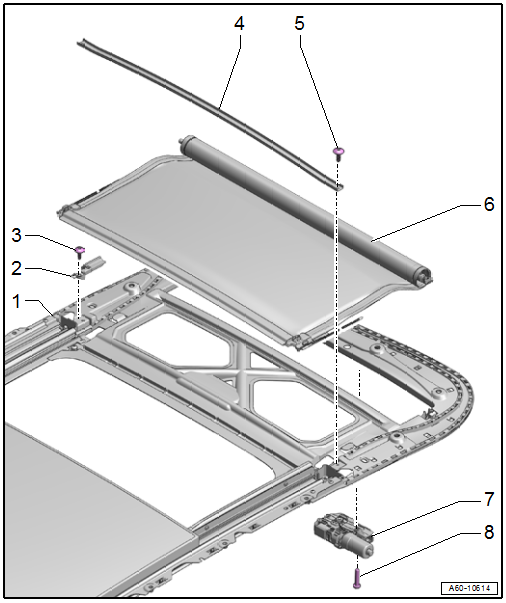
1 - Sunroof Frame
2 - Guide
- For sunroof shade
- Removing and installing. Refer to → Chapter "Sunroof Shade, Removing and Installing".
3 - Bolt
- 2.5 Nm
- Thread cutting
- Quantity: 2
- Position and install by hand
4 - Cross Bar
5 - Bolt
- 2.5 Nm
- Thread cutting
- Quantity: 2
- Position and install by hand
6 - Sunroof Shade
- Removing and installing. Refer to → Chapter "Sunroof Shade, Removing and Installing".
7 - Sunroof Shade Motor -V260-
- Removing and installing. Refer to → Chapter "Sunroof Shade Motor -V260-, Removing and Installing".
8 - Bolt
- 3 Nm
- Quantity: 2
Overview - Wind Deflector
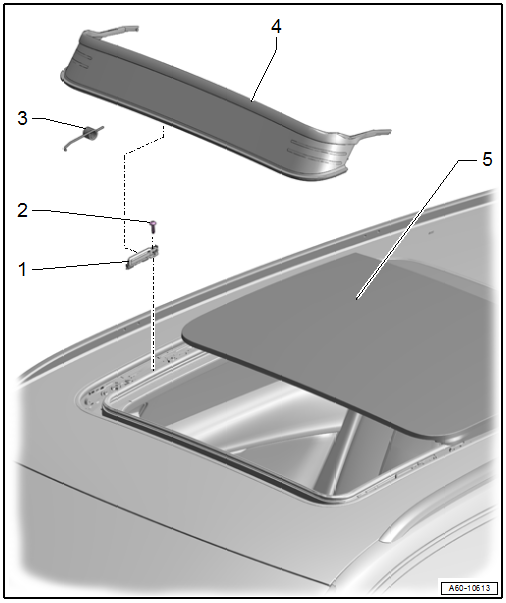
Overview - Wind Deflector, Sedan
1 - Sunroof Frame
2 - Sealing Lip
3 - Stop Buffer
4 - Wind Deflector
- Removing and installing. Refer to → Chapter "Wind Deflector, Removing and Installing, Sedan".
5 - Spring
- For wind deflector
6 - Bearing
- For wind deflector
- Removing and installing. Refer to → Chapter "Wind Deflector Bearing, Removing and Installing, Sedan".
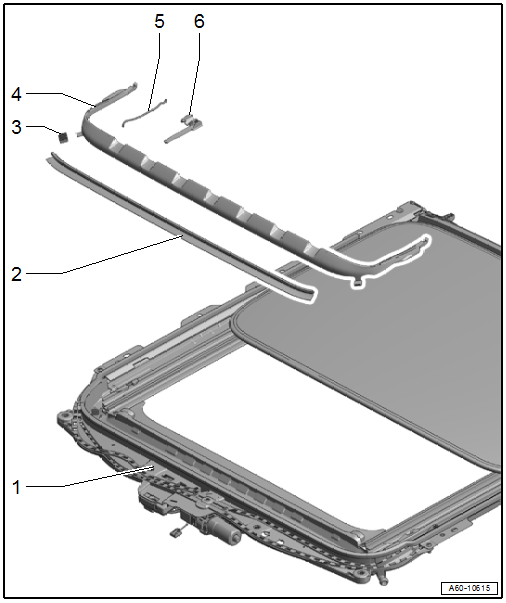
Overview - Wind Deflector, Avant
1 - Bearing
- For wind deflector
- Removing and installing. Refer to → Chapter "Wind Deflector Bearing, Removing and Installing, Avant".
2 - Bolt
- 1 Nm
- Thread cutting
- Quantity: 2
- Position and install by hand
3 - Spring
- For wind deflector
- Removing and installing. Refer to → Chapter "Wind Deflector Spring, Removing and Installing".
4 - Wind Deflector
- Removing and installing. Refer to → Chapter "Wind Deflector, Removing and Installing, Avant".
5 - Front Glass Panel
READ NEXT:
 Sunroof Frame, Removing and Installing
Sunroof Frame, Removing and Installing, Sedan
Caution
This procedure contains mandatory replaceable parts.
Refer to component overview and parts catalog prior to
starting procedure.
Mandato
Glass Panel, Removing and Installing
Glass Panel, Removing and Installing, Sedan
Caution
This procedure contains mandatory replaceable parts.
Refer to component overview and parts catalog prior to
starting procedure.
Mandatory
Glass Panel, Adjusting
Glass Panel, Adjusting, Sedan
Adjustment Dimensions
1 -
Front Glass Panel
Dimension -a- = 0 - 1 mm
Dimension -b- = 0 + 1 mm
Dimension -c- = 0 mm (flush)
2 -
Roof
Height Adjust
SEE MORE:
Engine, Installing
Special tools and workshop equipment required
Clutch Module Assembly Aid -T40169-
Clutch Module Transportation Lock -T40170-
as well as when removing with listed special tools
Engine Support Bridge - Spindle -10-222A/11-
Shop Crane -VAS6100-
Engine Sling -2024A-
Torque Wrench 1332 Insert - R
Rearview camera and
peripheral cameras
Introduction
Applies to: vehicles with rearview camera/peripheral cameras
Fig. 126 Orientation line display when parking
Depending on the vehicle equipment, a rearview
camera or multiple peripheral cameras may be
available.
The rearview camera helps you to park or maneuver
using the orientation li
