Audi A4: Glass Panel, Removing and Installing
Glass Panel, Removing and Installing, Sedan
 Caution
This procedure contains mandatory replaceable parts. Refer to component overview and parts catalog prior to starting procedure.
Mandatory Replacement Parts
- Screw - Glass Panel
- The following components must be replaced after removal. Refer to → Chapter "Overview - Sliding Sunroof, Sedan".
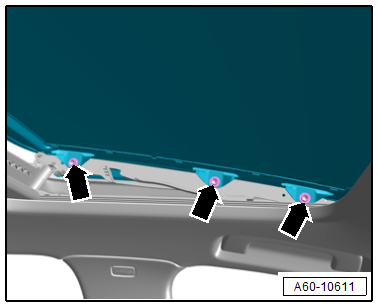
Removing
- Slide the sun shade all the way to the rear.
- Tilt open the glass panel.
- Remove the left and right boot. Refer to → Chapter "Boot, Removing and Installing".
- Remove the left and right bolts -arrows-.
- Remove the glass panel upward.
Installing
- Remove any locking fluid residue from the threaded hole using a thread tap.
- Install the glass panel bolts but do not tighten them yet.
- Adjust the glass panel (refer to → Chapter "Glass Panel, Adjusting, Sedan") and then tighten the bolts.
Further installation is performed in reverse order of removal, while noting the following:
- Perform an adaptation. Refer to → Chapter "Power Sunroof Control Module -J245-, Programming".
Tightening Specifications
- Refer to → Chapter "Overview - Sliding Sunroof, Sedan"
Glass Panel, Removing and Installing, Front, Avant
Caution
This procedure contains mandatory replaceable parts. Refer to component overview and parts catalog prior to starting procedure.
Mandatory Replacement Parts
- Screw - Front Glass Panel
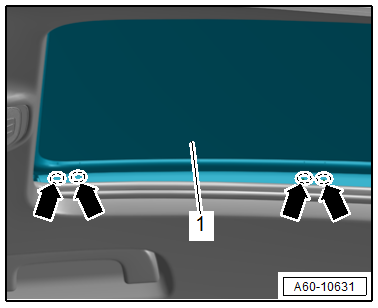
Removing
 NOTICE
Moving the slotted guide rail guide increases the risk of damaging the sliding sunroof components.
- Move the slotted guide rail guide only when the glass panel is installed.
- Open the glass panel far enough until it is lifted at the front and rear.
- Remove the right and left bolts -arrows- through the openings in the side rubber trim on the glass panel.
- Remove the front glass panel -1-.
Installing
- Remove any locking fluid residue from the threaded hole using a thread tap.
- Install the front glass panel bolts, but do not tighten.
- Adjust the front glass panel (refer to → Chapter "Glass Panel, Adjusting"), then tighten the bolts.
Further installation is performed in reverse order of removal, while noting the following:
- Perform an adaptation. Refer to → Chapter "Power Sunroof Control Module -J245-, Programming".
Tightening Specifications
- Refer to → Chapter "Overview - Sliding Sunroof, Avant"
Glass Panel, Removing and Installing, Rear, Avant
Caution
This procedure contains mandatory replaceable parts. Refer to component overview and parts catalog prior to starting procedure.
Mandatory Replacement Parts
- Screw - Rear Glass Panel
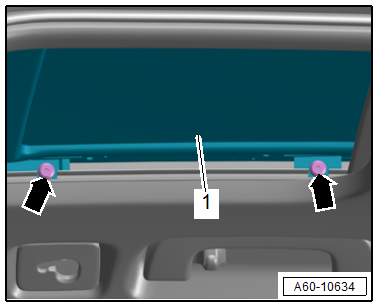
Removing
- Open the front glass panel.
- Remove the inner seal in the rear area from the roof frame toward the inside.
- Remove the left and right bolts -arrows-.
- Lift out the rear glass panel -1-.
Installing
Install in reverse order of removal and note the following:
- Remove any locking fluid residue from the threaded hole using a thread tap.
- Install the rear glass panel bolts, but do not tighten.
- Adjust the rear glass panel (refer to → Chapter "Glass Panel, Adjusting"), then tighten the bolts.
- Perform an adaptation. Refer to → Chapter "Power Sunroof Control Module -J245-, Programming".
Tightening Specifications
- Refer to → Chapter "Overview - Sliding Sunroof, Avant"
READ NEXT:
 Glass Panel, Adjusting
Glass Panel, Adjusting, Sedan
Adjustment Dimensions
1 -
Front Glass Panel
Dimension -a- = 0 - 1 mm
Dimension -b- = 0 + 1 mm
Dimension -c- = 0 mm (flush)
2 -
Roof
Height Adjust
Power Sunroof Control Module -J245-, Removing and Installing
Removing
- Switch off the ignition.
- Remove the left and right sun visors. Refer to
→ Body Interior; Rep. Gr.68; Equipment; Sun Visor, Removing and
Installing.
- Remo
Sunroof Seals, Removing and Installing
Sunroof Seals, Removing and Installing, Sedan
Removing
- Remove the glass panel. Refer to
→ Chapter "Glass Panel, Removing and Installing, Sedan".
- Remove the seal -2- from the glas
SEE MORE:
ESD Work Surface -VAS6613-
The electro-static discharge ESD Work Surface -VAS6613-
protect electronic components from getting damaged by an
electro-static charge.
This makes is possible to perform repairs on sensitive
electronic components on an open mat.
For more information as to what work can be performed on the
ES
Transmission, Transporting
Special tools and workshop equipment required
Shop Crane -VAS6100-
Lifting Tackle -3033-
Hook And Support Tool -3311- with Hook And Support Tool -
Bolt -3311/1-
Retaining Strap -T40155-
Caution
Risk of damaging the transmission by mixing ATF and
transmission fluid (MTF) through the
