Audi A4: Sunroof Frame, Removing and Installing
Sunroof Frame, Removing and Installing, Sedan
 Caution
This procedure contains mandatory replaceable parts. Refer to component overview and parts catalog prior to starting procedure.
Mandatory Replacement Parts
- Foam Seal - for Sunroof Frame
- To complete the procedure, a second technician is required to be at the following position.
Removing
- Remove the headliner. Refer to → Body Interior; Rep. Gr.70; Roof Trim Panels; Headliner, Removing and Installing.
- Disconnect the connector -1- from the Power Sunroof Control Module -J245-.
- Remove the front and rear water drain hoses from the sunroof frame. Refer to → Chapter "Water Drain Hoses, Removing and Installing".
- Mark the installation position of the sunroof frame to the roof for reinstallation.
- Before removing the nuts, both technicians must hold the sunroof frame at the front and back.
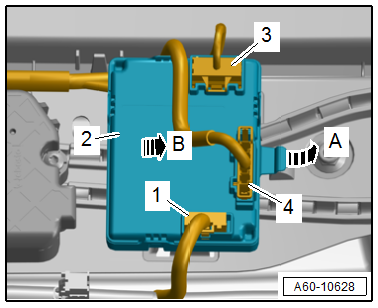
- Remove the nuts -1, 2, 4 and 6-.
- Remove the nuts -3 and 5- and then remove the sunroof frame to the rear lid.
Installing
- When inserting the sunroof frame, pay attention to the sliding sunroof seal in the roof opening.
- Have the two people assisting bring the sunroof frame into its installation position and install the nuts -3 and 5- until they stop.
- Align the sunroof frame with the markings made during removal.
- Tighten the nuts in the following sequence: -1 through 6-.
Further installation is performed in reverse order of removal, while noting the following:
- Perform an adaptation. Refer to → Chapter "Power Sunroof Control Module -J245-, Programming".
Tightening Specifications
- Refer to → Chapter "Overview - Sliding Sunroof, Sedan"
Sunroof Frame, Removing and Installing, Avant
- To complete the procedure, a second technician is required to be at the following position.
Removing
- Remove the headliner. Refer to → Body Interior; Rep. Gr.70; Roof Trim Panels; Headliner, Removing and Installing.
- Disconnect the connector -1- from the Power Sunroof Control Module -J245-.
- Remove the front and rear water drain hoses from the sunroof frame. Refer to → Chapter "Water Drain Hoses, Removing and Installing".
- Mark the installation position of the sunroof frame to the roof for reinstallation.
- Before removing the nuts, both technicians must hold the sunroof frame at the front and back.
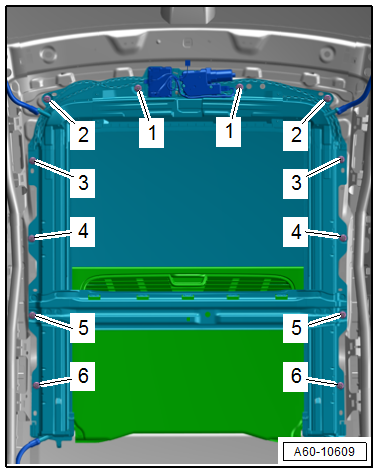
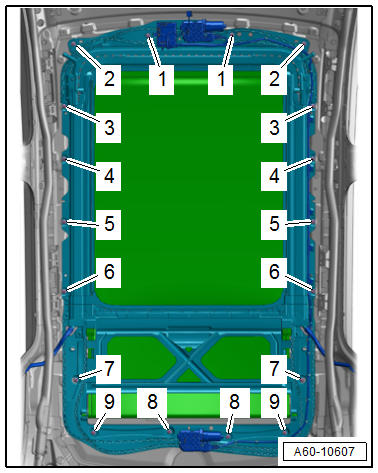
- Remove the nuts -1, 2, 4, 5, 6, 8 and 9-.
- Remove the nuts -3 and 7- and then remove the sunroof frame to the rear lid.
Installing
- When inserting the sunroof frame, pay attention to the sliding sunroof seal in the roof opening.
- Have the two people assisting bring the sunroof frame into its installation position and install the nuts -3 and 7- until they stop.
- Align the sunroof frame with the markings made during removal.
- Tighten the nuts in the sequence -1 through 9-.
Further installation is performed in reverse order of removal, while noting the following:
- Perform an adaptation. Refer to → Chapter "Power Sunroof Control Module -J245-, Programming".
Tightening Specifications
- Refer to → Chapter "Overview - Sliding Sunroof, Avant"
READ NEXT:
 Glass Panel, Removing and Installing
Glass Panel, Removing and Installing, Sedan
Caution
This procedure contains mandatory replaceable parts.
Refer to component overview and parts catalog prior to
starting procedure.
Mandatory
Glass Panel, Adjusting
Glass Panel, Adjusting, Sedan
Adjustment Dimensions
1 -
Front Glass Panel
Dimension -a- = 0 - 1 mm
Dimension -b- = 0 + 1 mm
Dimension -c- = 0 mm (flush)
2 -
Roof
Height Adjust
Power Sunroof Control Module -J245-, Removing and Installing
Removing
- Switch off the ignition.
- Remove the left and right sun visors. Refer to
→ Body Interior; Rep. Gr.68; Equipment; Sun Visor, Removing and
Installing.
- Remo
SEE MORE:
Injection System
Component Location Overview - Injection System
Component Location Overview - Engine Compartment
1 - Oxygen Sensor after Catalytic Converter -G130- with Heater for
Oxygen Sensor 1 after Catalytic Converter -Z29-
Component location. Refer to
→ Fig. "Component Location Oxygen Senso
General information
Safety precautions
WARNING
As the driver, you are always completely responsible
for all driving tasks. The assist
systems cannot replace the driver's attention.
Give your full attention to driving the
vehicle, and be ready to intervene in the
traffic situation at all times.
Activate the assi
