Audi A4: Rear Side Window, Removing and Installing
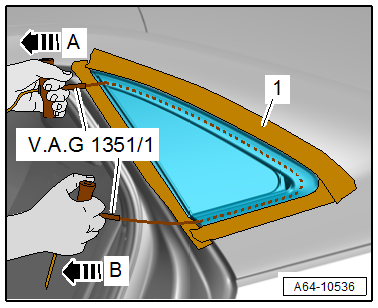
Undamaged Side Window, Removing, Sedan
Special tools and workshop equipment required
- Wedge Set -T10383-
- Wedge 1 -T10383/1-
- Cutting Tool for Bonded Windows -VAS6452-
- Bonded Window Tool Kit - Pull Handle -VAG1351/1-
- Follow repair instructions. Refer to → Chapter "Repair Information".
- To complete the procedure, a second technician is required to be at the following position.
Removing
- In the window cutting area, protect the side panel and roof against paint damage with adhesive tape -1-.
- Slide protective film from the -VAS6452- into the vehicle interior between the cutting wire and trim panels.
 CAUTION
Risk of injury to the hands and eyes from glass fragments.
Getting cut is possible.
- Wear protective eyewear.
- Wear safety gloves.
- Place the cutting wire around the side window by lifting the molding slightly using the -T10383/1-.
- Have a second technician hold the protective film from the -VAS6452- between the cutting wire and roof trim panel or C-/D-pillar trim panel.
- Attach the -VAG1351/1- to both ends of the cutting wire.
- Pull the cutting wire forward in the -direction of arrow A- with light sawing motions and cut through the adhesive bead on the bottom of the side panel and on the roof frame. This will first cut through the locating pin on the side window.
- Pull the cutting wire downward in the -direction of arrow B- through the adhesive bead.
- Remove the side window from the side window frame.
- Remove the separated centering pin from the securing hole.
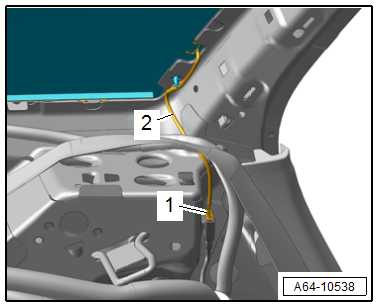
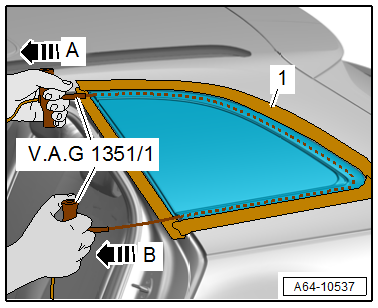
Undamaged Side Window, Removing, Avant
Special tools and workshop equipment required
- Wedge Set -T10383-
- Wedge 1 -T10383/1-
- Cutting Tool for Bonded Windows -VAS6452-
- Bonded Window Tool Kit - Pull Handles -VAG1351/1-
- Follow repair instructions. Refer to → Chapter "Repair Information".
- To complete the procedure, a second technician is required to be at the following position.
Removing
- Remove the C-pillar trim panel. Refer to → Body Interior; Rep. Gr.70; Vehicle Interior Trim Panels; C-Pillar Trim Panel, Removing and Installing.
- Disconnect connector -1- and free up wiring harness -2-.
- In the window cutting area, protect the side panel and roof against paint damage with adhesive tape -1-.
- Slide protective film from the -VAS6452- into the vehicle interior between the cutting wire and trim panels.
CAUTION
Risk of injury to the hands and eyes from glass fragments.
Getting cut is possible.
- Wear protective eyewear.
- Wear safety gloves.
- Place the cutting wire around the side window by lifting the molding slightly using the -T10383/1-.
- Have a second technician hold the protective film from the -VAS6452- between the cutting wire and roof trim panel or D-pillar trim panel.
- Attach the -VAG1351/1- to both ends of the cutting wire.
- Pull the cutting wire forward in the direction of -arrow A- with light sawing motions and cut through the adhesive bead on the bottom of the side panel and on the roof frame. This will first cut through the locating pin on the side window.
- Pull the cutting wire downward in the direction of -arrow B- through the adhesive bead.
- Remove the side window from the side window frame.
- Remove the separated centering pin from the securing hole.
Damaged Side Window, Removing
Special tools and workshop equipment required
- Window Cutter -VAG1561A-
- Blade Offset -VAG1561/10-
- Follow repair instructions. Refer to → Chapter "Repair Information".
CAUTION
Risk of injury to the hands and eyes from glass fragments.
Getting cut is possible.
- Wear protective eyewear.
- Wear safety gloves.
- Protect the body and vehicle interior from glass splinters.
- Tape off the flange all the way around with fabric-reinforced adhesive tape.
- Remove the glass pieces up to the adhesive sealant.
- Cut through the adhesive sealant (with glass remnants) in the opening for the window using a -VAG1561A- and -VAG1561/10- (with stopper roll).
- Remove the separated centering pin from the securing hole.
Side Window, Installing
- Follow repair instructions. Refer to → Chapter "Repair Information".
- Required Tools and Materials for Removal and Installation. Refer to → Chapter "Required Tools and Materials for Removal and Installation".
- Prepare the new window glass for installation. Refer to → Chapter "New Window Glass, Preparing for Installation".
- Prepare the undamaged window glass for installing. Refer to → Chapter "Undamaged Window Glass, Preparing for Installation".
- Prepare the body flange for installation. Refer to → Chapter "Body Flange, Preparing for Installation".
- Use One-Part Window Adhesive -DH 009 100 03- (small cartridge). If more than one window glass must be installed, the Two-Part Window Adhesive Kit -D 004 660 M2- can also be used.
- Apply adhesive sealant all around near the molding.
- With an undamaged window that has been removed, apply adhesive sealant on the remaining bead.
- Insert the new window glass into the opening for the window, press it onto the C-pillar first with the locating pins and then onto the D-pillar with the locating pin.
- For a window without a locating pin, align the window lengthwise to the edge on the side panel and then insert it into the opening for the window.
- Secure the window in window opening with adhesive tape.
- Observe minimum curing times. Refer to → Chapter "Minimum Curing Times for Bonded Windows".
Further installation is the reverse order of removal.
READ NEXT:
 Door Windows
Overview - Front Door Window
1 -
Window Regulator
Overview. Refer to
→ Chapter "Overview - Window Regulator".
2 -
Door Window
Removing and installing. Refer to
→&n
Radiator Grille/Front Trim
Overview - Radiator Grille
1 -
Emblem
Overview. Refer to
→ Chapter "Overview - Name Badges and Emblems".
2 -
Cover
For the front camera
3 -
Radiator Grill
SEE MORE:
A/C System Repair Information
Air conditioning systems designed for refrigerant R12 are
only to be filled with refrigerant R134a if certain requirements
are fulfilled. Refer to
→ Chapter "Refrigerant Circuit, Converting R12 to R134a and
Servicing" and Repair manual: Air Conditioner with
R12 Parts 2 and 3. This repa
Garage door opener
Description
Applies to: vehicles with garage door opener
With the garage door opener, you can activate
systems such as the garage doors, security systems
or house lights from inside your vehicle.
These functions are operated in the MMI. Multiple
receivers can be programmed, which can control
the
