Audi A4: Radiator Grille/Front Trim
Audi A4 (B9) 2016-2026 Service Manual / Body / Body Exterior / Exterior Equipment / Radiator Grille/Front Trim
Overview - Radiator Grille
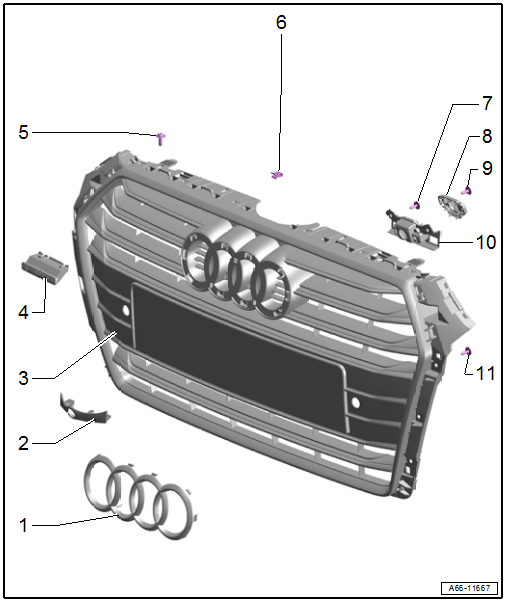
1 - Emblem
- Overview. Refer to → Chapter "Overview - Name Badges and Emblems".
2 - Cover
- For the front camera
3 - Radiator Grille
- Removing and installing. Refer to → Chapter "Radiator Grille, Removing and Installing".
4 - Quattro Name Badge
- Overview. Refer to → Chapter "Overview - Name Badges and Emblems".
5 - Bolt
- 6 Nm
- Quantity: 4
6 - Clip
- Quantity: 2
7 - Bolt
- Quantity: 2
- Tightening specification. Refer to → Communication; Rep. Gr.91; Peripheral Camera; Component Location Overview - Peripheral Camera.
8 - Bracket
- For the front camera mount
9 - Bolt
- Quantity: 2
- Tightening specification. Refer to → Communication; Rep. Gr.91; Peripheral Camera; Component Location Overview - Peripheral Camera.
10 - Mount
- For the front camera
- Removing and installing. Refer to → Communication; Rep. Gr.91; Peripheral Camera; Component Location Overview - Peripheral Camera.
11 - Bolt
- 1.5 Nm
- Quantity: 6
Radiator Grille, Removing and Installing
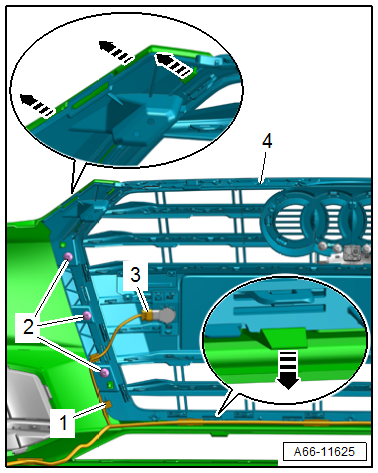
Removing
- Remove the center air intake grille. Refer to → Chapter "Air Intake Grille, Removing and Installing, Center".
- Disconnect the connector -3- and free up the wiring harness -1-.
- Remove the bolts -2-.
- Release the tabs and retainers in the direction of -arrows-.
- Remove the radiator grille -4- from the bumper cover.
Installing
Install in reverse order of removal.
Tightening Specifications
- Refer to → Chapter "Overview - Radiator Grille"
READ NEXT:
 Spoiler
Overview - Spoiler
1 -
Adhesive Tape
2 -
Front Foam Seal
3 -
Nut
4 Nm
Quantity: 4
4 -
Foam Seal
For the securing pin
Quantity: 3
5 -
Foam Se
Moldings, Trims, Extensions and Trim Panels
Overview - Trim Molding and Covers
Overview - Trim Molding
1 -
Front Door
2 -
Front Door Trim Molding
Removing and installing. Refer to
→ Chapter "Trim Molding, Removin
Trim Molding, Removing and Installing
Trim Molding, Removing and Installing, Front Door
Removing
- Using a small screwdriver -2-, pry
the trim molding -1- out of the
clip at the opening in the direction of
-arrow-.
- Carefull
SEE MORE:
Refrigerant Circuit
Refrigerant Circuit with Expansion Valve and Evaporator
The following illustration shows only the principle of a
refrigerant circuit, the design of the refrigerant circuit in
the respective vehicle can be found in the vehicle-specific
repair manual. Refer to
→ Heating, Ventilation and Air
Brake fluid
Fig. 161 Motor compartment: cap on brake fluid reservoir
Observe the safety precautions General
information.
Checking the brake fluid level
The brake fluid reservoir is located under a cover
on the driver's side.
Park the vehicle on a level surface.
Lift the cover fig. 158 at both
openings and
© 2019-2026 Copyright www.audia4b9.com
