Audi A4: Moldings, Trims, Extensions and Trim Panels
Overview - Trim Molding and Covers
Overview - Trim Molding
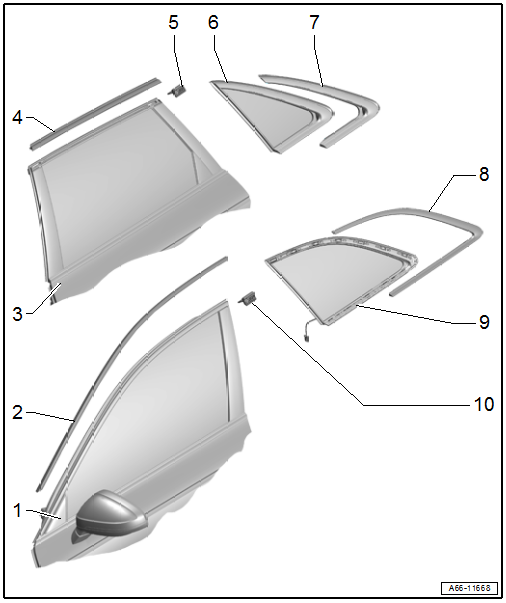
1 - Front Door
2 - Front Door Trim Molding
- Removing and installing. Refer to → Chapter "Trim Molding, Removing and Installing, Front Door".
3 - Rear Door
4 - Rear Door Trim Molding
- Removing and installing. Refer to → Chapter "Trim Molding, Removing and Installing, Rear Door".
5 - Clip
- With "rear door" label
6 - Side Window, Sedan
7 - Side Window Trim Molding, Sedan
- Removing and installing. Refer to → Chapter "Trim Molding, Removing and Installing, Side Window".
8 - Side Window Trim Molding, Avant
- Removing and installing. Refer to → Chapter "Trim Molding, Removing and Installing, Side Window".
9 - Side Window, Avant
10 - Clip
- With "front door" label
Overview - Wheel Housing Liner Covers
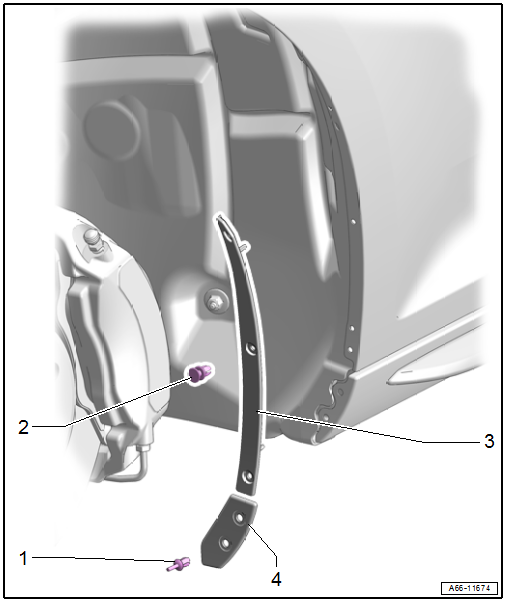
1 - Expanding Rivet
- Quantity: 2
2 - Expanding Rivet
- Quantity: 3
3 - Fender Cover
- For the wheel housing liner
- Removing and installing.
4 - Side Sill Cover
- For the wheel housing liner
- Removing and installing.
Overview - Sill Panel Trim
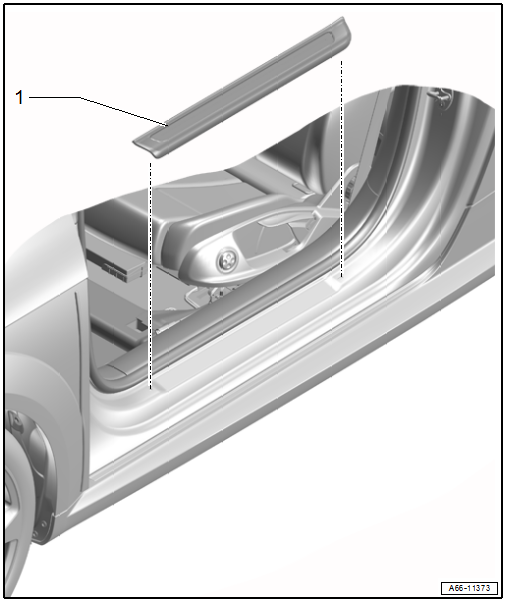
1 - Front Sill Panel Trim
- There are different versions. Refer to the Parts Catalog.
- Sill panel trim without illumination must be replaced after removal
- Sill panel trim with illumination is to be reused after removal
- Removing and installing. Refer to → Chapter "Sill Panel Trim, Removing and Installing".
Overview - Side Sill Trim Panel
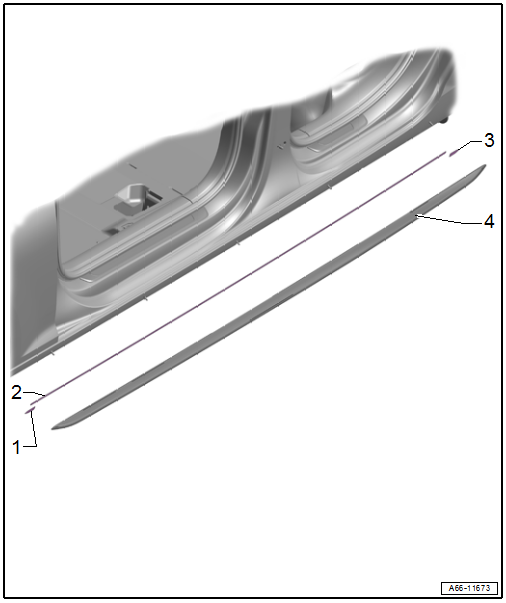
1 - Adhesive Tape
2 - Adhesive Tape
3 - Adhesive Tape
4 - Side Sill Trim Panel
- There are different versions. Refer to the Parts Catalog.
- Removing and installing. Refer to → Chapter "Side Sill Trim Panel, Removing and Installing".
Overview - Drip Rail
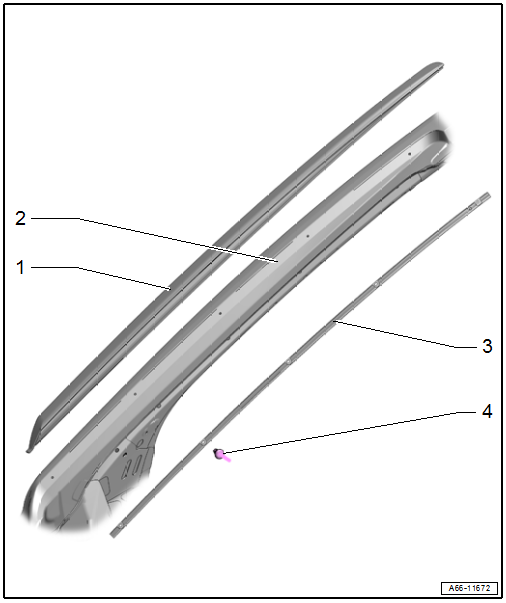
1 - Drip Rail
- Removing and installing. Refer to → Chapter "Drip Rail, Removing and Installing".
2 - A-Pillar
3 - Clamping Strip
- Removing and installing. Refer to → Chapter "Drip Rail, Removing and Installing".
4 - Pop Rivet
- Quantity: 5
- There must not be any burrs on the rivet head when riveting
Overview - A-Pillar Trim
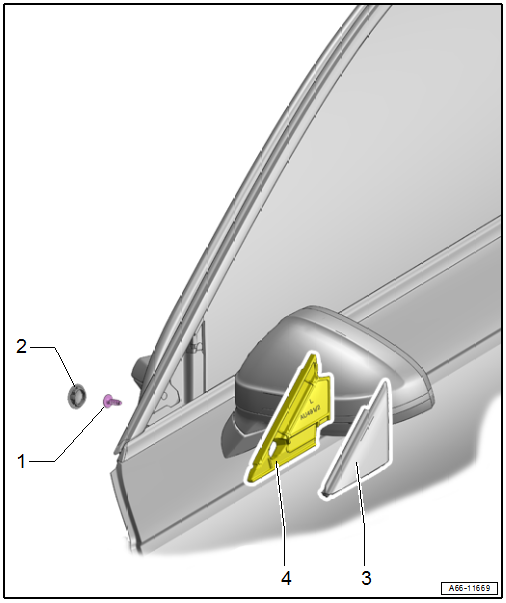
1 - Bolt
- 2.5 Nm
2 - Cover
3 - A-Pillar Trim
- Removing and installing. Refer to → Chapter "A-Pillar Trim, Removing and Installing".
4 - Seal
- A-Pillar Trim
Overview - B-Pillar Trim
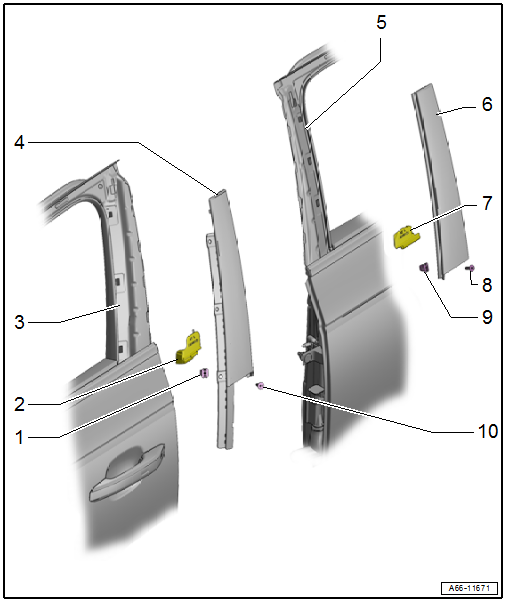
1 - Clip Nut
- Quantity: 3
2 - Sealing Piece
- For the front door B-pillar trim
3 - Front Door
4 - Front Door B-Pillar Trim
- Removing and installing. Refer to → Chapter "B-Pillar Door Trim, Removing and Installing, Front".
5 - Rear Door
6 - Rear Door B-Pillar Trim
- Removing and installing. Refer to → Chapter "B-Pillar Door Trim, Removing and Installing, Rear".
7 - Sealing Piece
- For the rear door B-pillar trim
8 - Bolt
- 2.5 Nm
- Quantity: 3
9 - Clip Nut
- Quantity: 3
10 - Bolt
- 2.5 Nm
- Quantity: 3
Overview - C-Pillar Trim
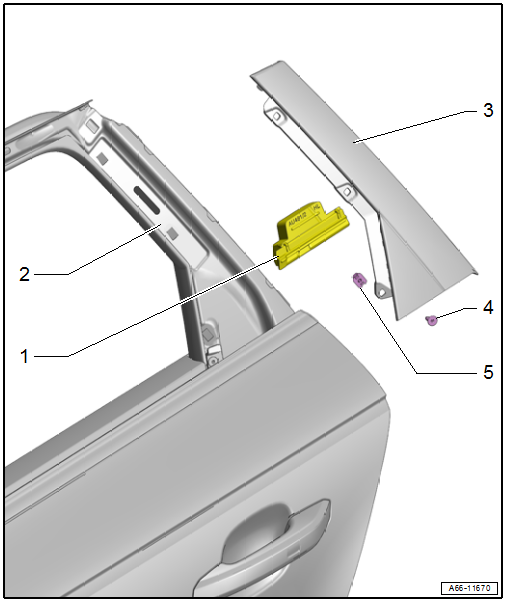
1 - Sealing Piece
- For the rear door C-pillar trim
2 - Rear Door
3 - Door C-Pillar Trim
- Removing and installing. Refer to → Chapter "Door C-Pillar Trim, Removing and Installing".
4 - Bolt
- 2.5 Nm
- Quantity: 3
5 - Clip Nut
- Quantity: 3
Overview - Heat Shield
Front Heat Shields

1 - Clip
- Quantity: 3
2 - Right Heat Shield
- For the front longitudinal member
- Removing and installing. Refer to → Chapter "Front Heat Shield for Longitudinal Member, Removing and Installing".
3 - Bolt
- 8 Nm
4 - Lock Washer
- Quantity: 3
5 - Right Heat Shield
- For the rear longitudinal member
- Removing and installing. Refer to → Chapter "Rear Heat Shield for Longitudinal Member, Removing and Installing".
6 - Lock Washer
- Quantity: 4
7 - Heat Shield
- For the plenum chamber bulkhead
- Removing and installing. Refer to → Chapter "Plenum Chamber Bulkhead Heat Shield, Removing and Installing".
8 - Lock Washer
- Quantity: 6
9 - Heat Shield
- In the front at the top for the tunnel
- Removing and installing. Refer to → Chapter "Upper Front Heat Shield for Tunnel, Removing and Installing".
10 - Nut
- 2 Nm
- Quantity: 4
11 - Left Heat Shield
- For the rear longitudinal member
- Removing and installing. Refer to → Chapter "Rear Heat Shield for Longitudinal Member, Removing and Installing".
12 - Lock Washer
- Quantity: 2
13 - Clip
- Quantity: 3
14 - Left Heat Shield
- For the front longitudinal member
- Removing and installing. Refer to → Chapter "Front Heat Shield for Longitudinal Member, Removing and Installing".
15 - Lock Washer
Rear Heat Shields
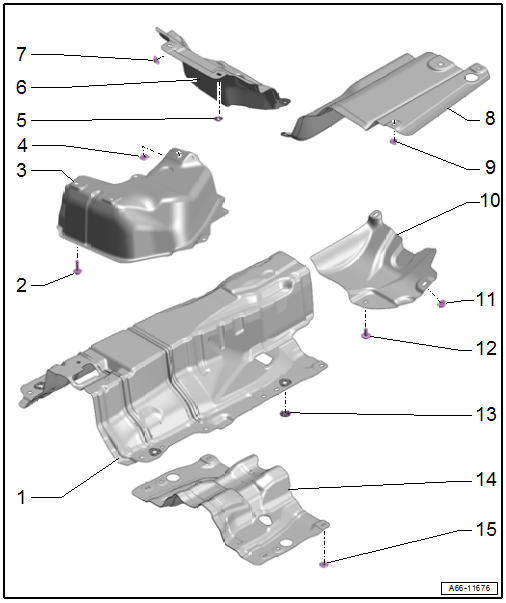
1 - Heat Shield
- For the transmission tunnel
- Removing and installing. Refer to → Chapter "Transmission Tunnel Heat Shield, Removing and Installing".
2 - Bolt
- 20 Nm
3 - Heat Shield
- For the center exhaust system; versions with FWD
- Removing and installing. Refer to → Chapter "Center Exhaust System Heat Shield, Removing and Installing, FWD Version".
4 - Nut
- 2 Nm
5 - Nut
- 2 Nm
- Quantity: 2
6 - Heat Shield
- For the spare tire well
- Removing and installing. Refer to → Chapter "Spare Tire Well Heat Shield, Removing and Installing".
7 - Nut
- 2 Nm
8 - Heat Shield
- For the rear muffler
- Removing and installing. Refer to → Chapter "Rear Muffler Heat Shield, Removing and Installing".
9 - Nut
- 2 Nm
- Quantity: 4
10 - Heat Shield
- For the center exhaust system; versions with AWD
- Removing and installing. Refer to → Chapter "Center Exhaust System Heat Shield, Removing and Installing, AWD Version".
11 - Nut
- Quantity: 2
- Tightening specification and sequence. Refer to → Fig. "Heat Shield - Tightening Specification and Sequence, Version with AWD".
12 - Bolt
- Tightening specification and sequence. Refer to → Fig. "Heat Shield - Tightening Specification and Sequence, Version with AWD".
13 - Lock Washer
- Quantity: 4
14 - Heat Shield
- For the drive axle
- Removing and installing. Refer to → Chapter "Driveshaft Heat Shield, Removing and Installing".
15 - Nut
- 2 Nm
- Quantity: 4
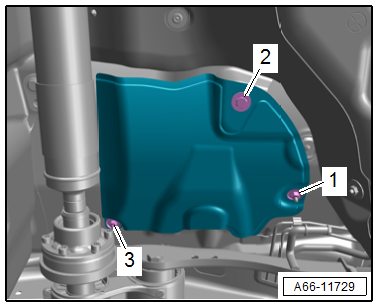
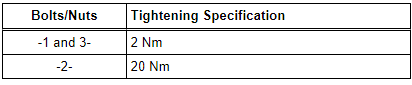
Heat Shield - Tightening Specification and Sequence, Version with AWD
- Tighten the bolts and nuts in the order shown.
READ NEXT:
 Trim Molding, Removing and Installing
Trim Molding, Removing and Installing, Front Door
Removing
- Using a small screwdriver -2-, pry
the trim molding -1- out of the
clip at the opening in the direction of
-arrow-.
- Carefull
Sill Panel Trim, Removing and Installing
Special tools and workshop equipment
required
Roller -3356-
Trim Removal Wedge -3409-
Wiring Harness Repair Set - Hot Air Blower -VAS1978/14A-
Cleaning Solution -D 009 401 04-
Applicator -D 009 500
Door B-Pillar Trim, Removing and Installing
B-Pillar Door Trim, Removing and Installing, Front
Removing
- Move the door window into the "open" position.
- Remove the window frame trim panel. Refer to
→ Body Interior; Rep.
SEE MORE:
Voltage Regulator, Bosch Generator from 2001, Removing and Installing
Removing
- Remove the generator. Refer to
→ Electrical Equipment; Rep. Gr.27; Generator; Generator,
Removing and Installing.
- Remove the bolt -1- and the
nuts -3- and
-4-.
- Remove the cover -2- on the
rear side of the generator.
- Remove the bolts -arrows
Rear Lid, Adjusting
Adjustment Dimensions
Adjustment Dimensions, Sedan
A -
Rear Lid to Top of Side Panel
Gap dimension = 3.5 mm
B -
Rear Lid to Side Panel
Gap dimension = 3.5 mm
C -
Rear Lid to Side Panel
Gap dimension = 3.5 mm
D -
Rear Lid to Rear Lid End
Gap dimensi
