Audi A4: Sill Panel Trim, Removing and Installing
Special tools and workshop equipment required
- Roller -3356-
- Trim Removal Wedge -3409-
- Wiring Harness Repair Set - Hot Air Blower -VAS1978/14A-
- Cleaning Solution -D 009 401 04-
- Applicator -D 009 500 25-
- Bonding Agent -D 355 205 A2-
 CAUTION
This procedure contains mandatory replaceable parts. Refer to component overview and parts catalog prior to starting procedure.
Mandatory Replacement Parts
- Sill panel trim without illumination must be replaced
Removing
Versions with Illuminated Sill Panel
- Remove the front sill panel. Refer to → Body Interior; Rep. Gr.70; Vehicle Interior Trim Panels; Sill Panel Removing and Installing.
- Push the carpet to the side.
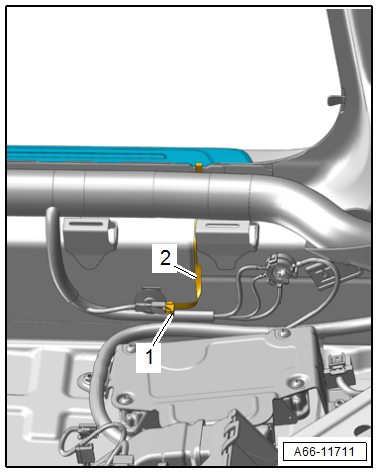
- Disconnect the connector -1- and free up the wiring harness -2-.
Continuation for All Vehicles
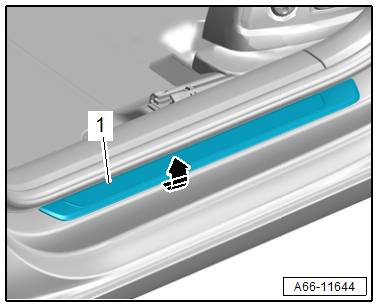
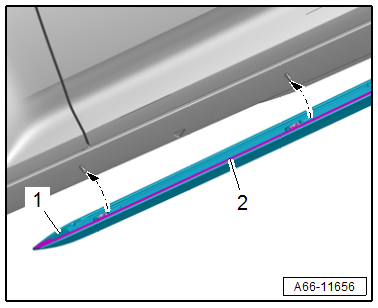
- Carefully warm up the sill panel trim -1- using the -VAS1978/14A-.
- Carefully pry the sill panel trim from the side sill -arrow- using the Trim Removal Wedge -3409-. Do not damage the paint coat while doing so.
Installing
- The vehicle and the trim must be at room temperature.
- The adhesive surfaces must be free of dirt and grease.
- If the Bonding Agent -D 355 205 A2- dries longer than 3 hours, then it must be primed again.
Installation preparation for reinstalling illuminated sill panel trims:
- Remove any adhesive residue completely from the trim.
- Clean the adhesive surface on the plastic side using the Cleaning Solution -D 009 401 04-.
- Apply the Plastic Primer -D 366 PR A1- to the adhesive surface on the cover and let it dry.
- Apply double-sided tape to the same location on the trim. Refer to Parts Catalog
Continuation
- Clean the adhesive surface on the paint side using the Cleaning Solution -D 009 401 04-.
- Apply Bonding Agent -D 355 205 A2- to the adhesive surface on the paint side using the Applicator -D 009 500 25- and let it dry.
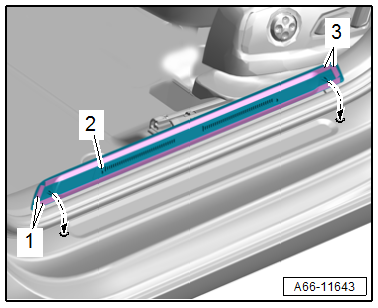
- Remove the protective film from the adhesive tape -1 and 3-.
- Position the sill panel trim -2- over the pins on the side sill -arrows-.
- Push the sill panel trim onto the side sill using the -3356-.
- Vehicle resting time is at least 3.5 hours at room temperature.
Further installation is the reverse order of removal.
Side Sill Trim Panel, Removing and Installing
Special tools and workshop equipment required
- Trim Removal Wedge -3409-
- Wiring Harness Repair Set - Hot Air Blower -VAS1978/14A-
- Cleaning Solution -D 009 401 04-
- Applicator -D 009 500 25-
- Bonding Agent -D 355 205 A2-
Removing
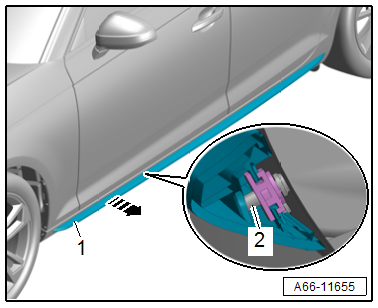
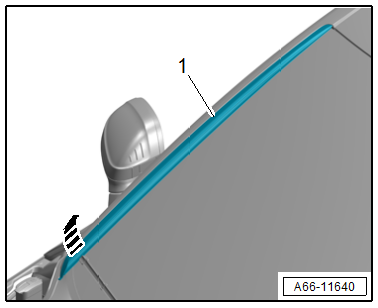
- Carefully warm up the side sill trim panel -1- using the -VAS1978/14A-.
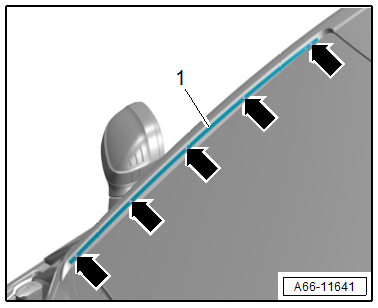
- Use the -3409- to carefully pry the side sill trim panel off the threaded pins -2--arrow-.
- Remove the side sill trim panel and lay it on a soft surface.
Installing
Install in reverse order of removal and note the following:
- Clean the adhesive surface using the Cleaning Solution -D 009 401 04-.
- Apply Bonding Agent -D 355 205 A2- on the adhesive surface using the Applicator -D 009 500 25- and let dry.
- Remove the protective film from the adhesive tape -2-.
- Position the side sill trim panel -1- over the threaded pins -arrows-.
- Press on the entire length of the side sill trim panel.
- Vehicle resting time is at least 3.5 hours at room temperature.
Drip Rail, Removing and Installing
Special tools and workshop equipment required
- Hand drill
- 5 mm drill bit
Drip Rail, Removing
- Starting at the bottom, carefully remove the drip rail -1- upward -arrow-.
Drip Rail Clamping Strip, Removing
- Drill out the rivet heads -arrows- and drive out the rivet shafts.
- Remove the clamping strip -1-.
Installing
Install in reverse order of removal and note the following:
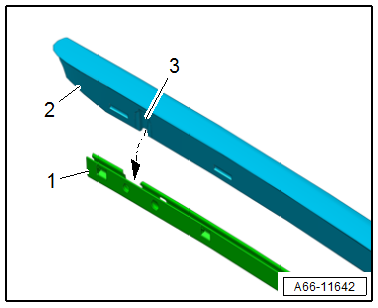
- Start riveting the clamping strip -1- at the topmost hole.
- Starting at the top, insert the drip rail -2- into the clamping strip. The raised section -3- must engage in the cut-out while doing so -arrow-.
- Press the drip rail all the way into the clamping strip.
A-Pillar Trim, Removing and Installing
Removing
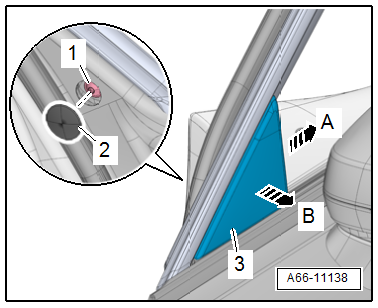
- Remove the cover -2-.
- Remove the bolt -1-.
- Push the A-pillar trim -3- out of the window guide in the direction of -arrow A- and remove it to the side -arrow B-.
Installing
Install in reverse order of removal.
Tightening Specifications
- Refer to → Chapter "Overview - A-Pillar Trim"
READ NEXT:
 Door B-Pillar Trim, Removing and Installing
B-Pillar Door Trim, Removing and Installing, Front
Removing
- Move the door window into the "open" position.
- Remove the window frame trim panel. Refer to
→ Body Interior; Rep.
Floor Heat Shield, Removing and Installing
Plenum Chamber Bulkhead Heat Shield, Removing and Installing
Removing
- Remove the plenum chamber bulkhead. Refer to
→ Chapter "Plenum Chamber Bulkhead, Removing and Installing".
- R
Noise Insulation
Overview - Noise Insulation
1 -
Quick Release
Without fastener
2 -
Plug/Rubber Grommet
Plug for vehicles without parking heater
Rubber grommet for parking heater exhaust pipe
SEE MORE:
Fuses
Replacing fuses
Fig. 181 Driver's side footwell (left-hand drive vehicles):
footrest 1, front passenger's side footwell (right-hand
drive vehicles): cover 2
Fig. 182 Driver's side cockpit (left-hand drive/right-hand
drive vehicles): cover (C), left side of luggage compartment:
cover (D)
Fuses are
A/C Technology Basic Principles
Physical Principles
The four known states of water also apply to air
conditioning system refrigerants.
1 - Gaseous (invisible)
2 - Vapor
3 - Liquid
4 - Solid
When water is heated in a container (heat absorption), water
vapor can be seen to rise. If the vapo
