Audi A4: Floor Heat Shield, Removing and Installing
Plenum Chamber Bulkhead Heat Shield, Removing and Installing
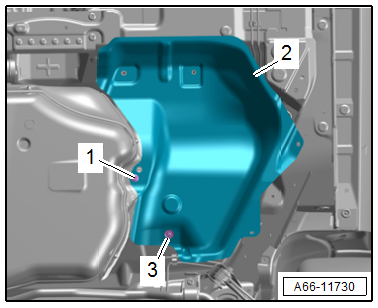
Removing
- Remove the plenum chamber bulkhead. Refer to → Chapter "Plenum Chamber Bulkhead, Removing and Installing".
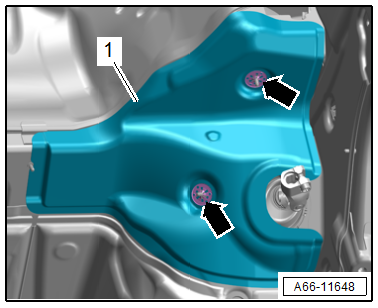
- Remove the lock washers -arrows-.
- Remove the heat shield -1- from the plenum chamber bulkhead -2-.
Installing
Install in reverse order of removal.
Tightening Specifications
- Refer to → Chapter "Overview - Heat Shield"
Rear Heat Shield for Longitudinal Member, Removing and Installing
Removing
- Remove the plenum chamber bulkhead. Refer to → Chapter "Plenum Chamber Bulkhead, Removing and Installing".
- Remove the rear noise insulation. Refer to → Chapter "Noise Insulation, Removing and Installing, Rear".
Right Side of Vehicle
- Remove the front muffler/front exhaust pipe. Refer to → Engine Mechanical; Rep. Gr.26; Exhaust Pipes/Mufflers; Overview - Muffler and → Engine Mechanical; Rep. Gr.26; Emissions Control System; Overview - Emissions Control System.
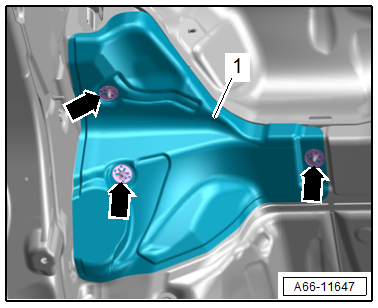
- Remove the lock washers -arrows-.
- Remove the heat shield -1-.
Left Side of Vehicle
- Remove the lock washers -arrows-.
- Remove the heat shield -1-.
Installing
Install in reverse order of removal.
Tightening Specifications
- Refer to → Chapter "Overview - Heat Shield"
Front Heat Shield for Longitudinal Member, Removing and Installing
Removing
- Remove the rear noise insulation. Refer to → Chapter "Noise Insulation, Removing and Installing, Rear".
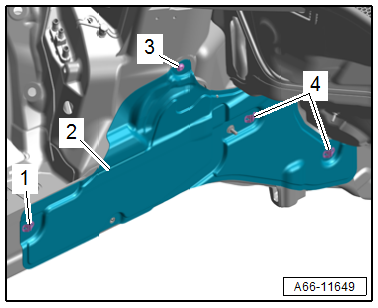
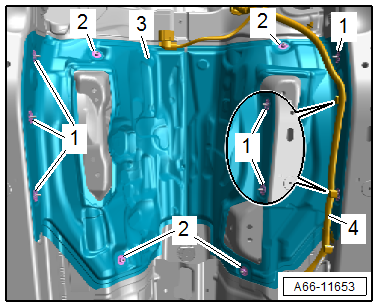
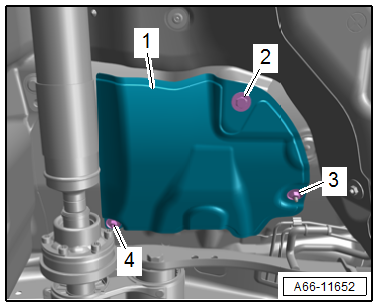
Left Side of Vehicle
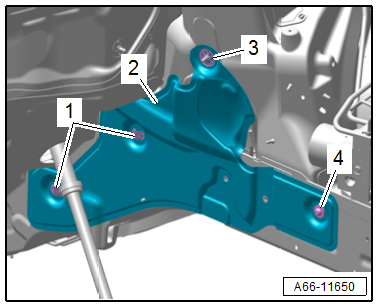
- Remove the bolt -4-.
- Remove the lock washer -3- and clips -1-.
- Remove the heat shield -2-.
Right Side of Vehicle
- Remove the bolt -3-.
- Remove the clips -1 and 4-.
- Remove the heat shield -2-.
Installing
Install in reverse order of removal.
Tightening Specifications
- Refer to → Chapter "Overview - Heat Shield"
Upper Front Heat Shield for Tunnel, Removing and Installing
Special tools and workshop equipment required
- Engine and Gearbox Jack -VAS6931-
- Engine/Gearbox Jack - Gearbox Support -T10337-
Removing
- TFSI vehicles: Remove the front muffler. Refer to → Engine Mechanical; Rep. Gr.26; Exhaust Pipes/Mufflers; Front Muffler, Removing and Installing.
- TDI vehicles: Remove the front exhaust pipe. Refer to → Engine Mechanical; Rep. Gr.26; Exhaust Pipes/Mufflers; Front Exhaust Pipe, Removing and Installing.
- Remove the drive axle. Refer to → Rear Final Drive; Rep. Gr.39; Propshaft; Propshaft, Removing and Installing.
- Place the -T10337- on the -VAS6931- and position it at the bottom of the transmission.
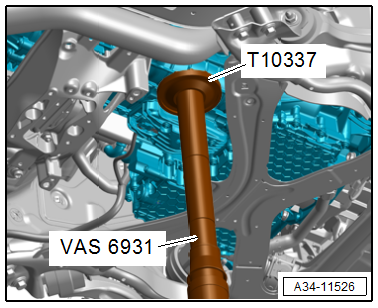
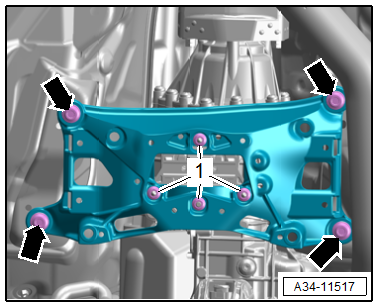
- Remove the tunnel crossmember bolts -arrows-.
TIP
For reasons of clarity, the -T10337- is not shown.
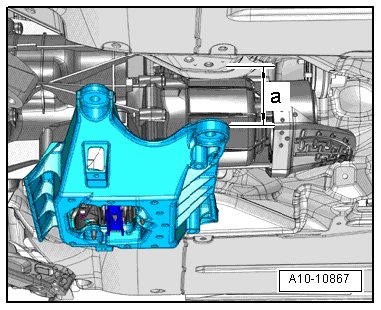
- Lower the engine/transmission assembly by dimension -a- using the -VAS6931-.
- Dimension -a- = maximum 40 mm.
- Free up the wiring harness -4-.
- Remove the lock washers -1-.
- Remove the nuts -2-.
- Remove the heat shield -3-.
Installing
Install in reverse order of removal and note the following:
Tightening Specifications
- Refer to → Chapter "Overview - Heat Shield"
- Refer to → Manual Transmission; Rep. Gr.34; Subframe Mount; Overview - Subframe Mount, → Dual-Clutch Transmission; Rep. Gr.34; Subframe Mount; Overview - Subframe Mount or → Automatic Transmission; Rep. Gr.37; Subframe Mount; Overview - Subframe Mount.
Transmission Tunnel Heat Shield, Removing and Installing
Removing
- TFSI vehicles: Remove the front muffler. Refer to → Engine Mechanical; Rep. Gr.26; Exhaust Pipes/Mufflers; Front Muffler, Removing and Installing.
- TDI vehicles: Remove the front exhaust pipe. Refer to → Engine Mechanical; Rep. Gr.26; Exhaust Pipes/Mufflers; Front Exhaust Pipe, Removing and Installing.
- Remove the driveshaft. Refer to → Rear Final Drive; Rep. Gr.39; Propshaft; Propshaft, Removing and Installing.
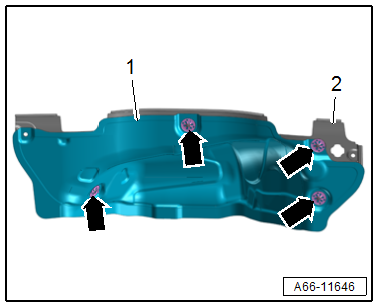
- Remove the nuts -arrows- and bolt -2- for the underbody trim panel -1- in the heat shield area.
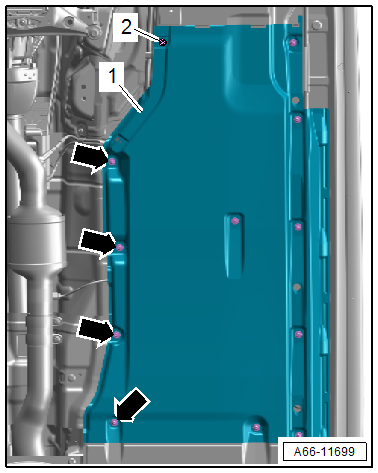
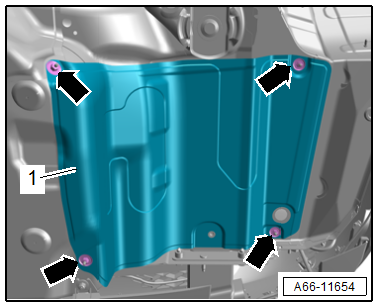
- Remove the lock washers -arrows-.
- Remove the heat shield -1-.
Installing
Install in reverse order of removal.
Tightening Specifications
- Refer to → Chapter "Overview - Heat Shield"
Driveshaft Heat Shield, Removing and Installing
Removing
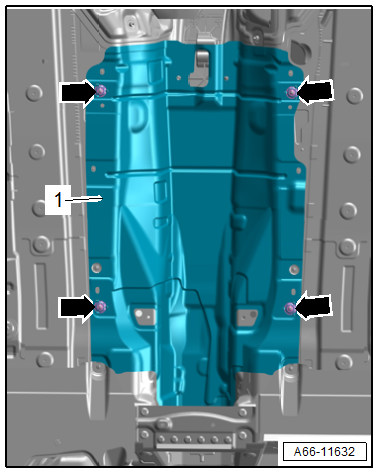
- Remove the nuts -arrows-.
- Remove the exhaust system clamping sleeve. Refer to → Engine Mechanical; Rep. Gr.26; Exhaust Pipes/Mufflers; Overview - Muffler and → Engine Mechanical; Rep. Gr.26; Emissions Control System; Overview - Emissions Control System.
- Remove the heat shield -1- toward the front.
Installing
Install in reverse order of removal.
Tightening Specifications
- Refer to → Chapter "Overview - Heat Shield"
Center Exhaust System Heat Shield, Removing and Installing, FWD Version
Removing
- Remove the rear section of the exhaust system. Refer to → Engine Mechanical; Rep. Gr.26; Exhaust Pipes/Mufflers; Overview - Mufflers.
- Remove the left rear underbody trim panel. Refer to → Chapter "Underbody Trim Panel, Removing and Installing, Rear".
- Remove the nut -3- and bolt -1-.
- Remove the heat shield -2-.
Installing
Install in reverse order of removal.
Tightening Specifications
- Refer to → Chapter "Overview - Heat Shield"
Center Exhaust System Heat Shield, Removing and Installing, AWD Version
Removing
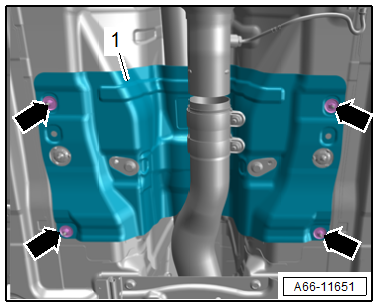
- Remove the rear section of the exhaust system. Refer to → Engine Mechanical; Rep. Gr.26; Exhaust Pipes/Mufflers; Overview - Mufflers.
- Remove the nuts -3 and 4- and bolt -2-.
- Remove the heat shield -1-.
Installing
Install in reverse order of removal.
Tightening Specifications
- Refer to → Fig. "Heat Shield - Tightening Specification and Sequence, Version with AWD"
Spare Tire Well Heat Shield, Removing and Installing
Removing
- Vehicles with diagonal braces: Remove the diagonal braces. Refer to → Chapter "Diagonal Braces, Removing and Installing".
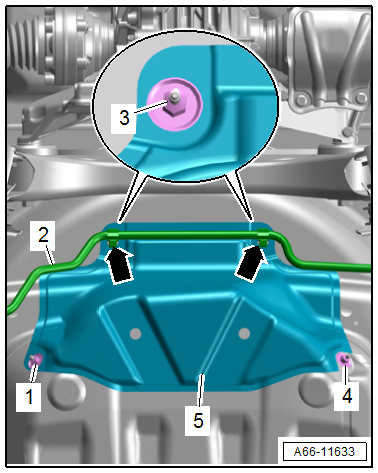
- Remove the nuts -1 and 4-.
- TDI vehicles: Free up the line -2--arrows-.
- TFSI vehicles: Remove the nuts -3-.
- Remove the heat shield -5-.
Installing
Install in reverse order of removal.
Tightening Specifications
- Refer to → Chapter "Overview - Heat Shield"
Rear Muffler Heat Shield, Removing and Installing
Special tools and workshop equipment required
- Engine and Gearbox Jack -VAS6931-
Removing
- Loosen the rear muffler mounting and lower it slightly using the -VAS6931-. Refer to → Engine Mechanical; Rep. Gr.26; Exhaust Pipes/Muffler; Overview - Muffler.
- Remove the nuts -arrows-.
- Remove the heat shield -1-.
Installing
Install in reverse order of removal.
Tightening Specifications
- Refer to → Chapter "Overview - Heat Shield"
READ NEXT:
 Noise Insulation
Overview - Noise Insulation
1 -
Quick Release
Without fastener
2 -
Plug/Rubber Grommet
Plug for vehicles without parking heater
Rubber grommet for parking heater exhaust pipe
Underbody Trim Panel
Overview - Underbody Trim Panels
1 -
Nut
2 Nm
Quantity: 2
2 -
Front Underbody Panel
Removing and installing. Refer to
→ Chapter "Underbody Trim Panel, Removing and In
Underbody Trim Panels, Removing and Installing
Underbody Trim Panel, Removing and Installing, Front
Removing
- Remove the nuts -arrows-.
- Remove the front underbody trim panel -2-
from the center underbody trim panel -1-.
Installing
SEE MORE:
Refresh Charging with Battery Charger -VAS5903-
WARNING
Risk of injury. Follow all warning messages and
safety precautions. Refer to
→ Chapter "Warnings and Safety Precautions".
WARNING
Do not check or charge a Battery -A- when the visual
indicator has "no color or is
bright yellow". Jump starting must not be used!
Th
Voice recognition system
General information
Applies to: vehicles with voice recognition system
You can operate many functions in the vehicle
easily using voice commands.
Using the voice recognition system optimally
Speak clearly and distinctly at a normal volume.
Speak louder when driving faster.
Emphasize the words in
