Audi A4: Underbody Trim Panels, Removing and Installing
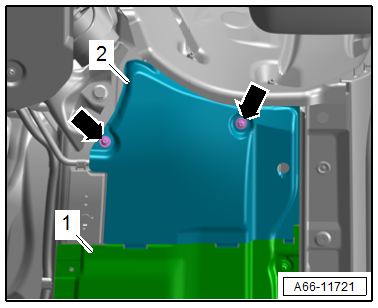
Underbody Trim Panel, Removing and Installing, Front
Removing
- Remove the nuts -arrows-.
- Remove the front underbody trim panel -2- from the center underbody trim panel -1-.
Installing
Install in reverse order of removal.
Tightening Specifications
- Refer to → Chapter "Overview - Underbody Trim Panels"
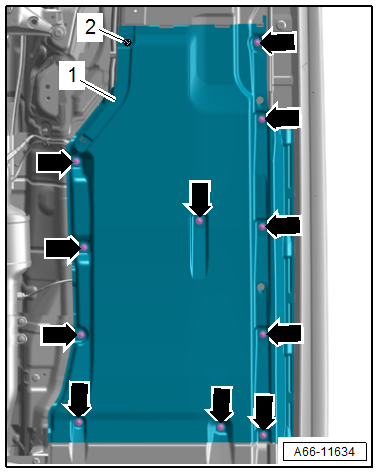
Underbody Trim Panel, Removing and Installing, Center
Removing
- Remove the nuts -arrows- and the bolt -2-.
- Remove the center underbody trim panel -1-.
Installing
Install in reverse order of removal.
Tightening Specifications
- Refer to → Chapter "Overview - Underbody Trim Panels"
Underbody Trim Panel, Removing and Installing, Rear
Removing
- Remove the nuts -2 and 3- and bolts -1-.
- Remove the rear underbody trim panel -4-.

Installing
Install in reverse order of removal.
Tightening Specifications
- Refer to → Chapter "Overview - Underbody Trim Panels"
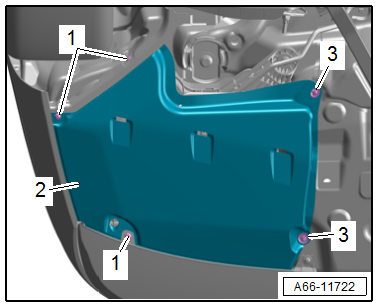
Underbody Trim Panel, Removing and Installing, Side
Removing
- Remove the nuts -3- and bolts -1-.
- Remove the side underbody trim panel -2-.
Installing
Install in reverse order of removal.
Tightening Specifications
- Refer to → Chapter "Overview - Underbody Trim Panels"
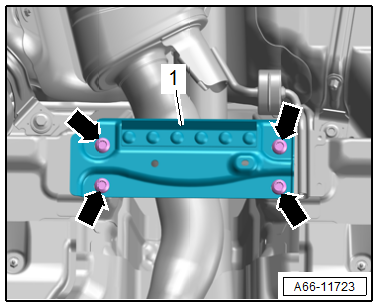
Tunnel Brace, Removing and Installing
Removing
- Remove the bolts -arrows-.
- Remove the tunnel brace -1-.
Installing
Install in reverse order of removal.
Tightening Specifications
- Refer to → Chapter "Overview - Underbody Bracing"
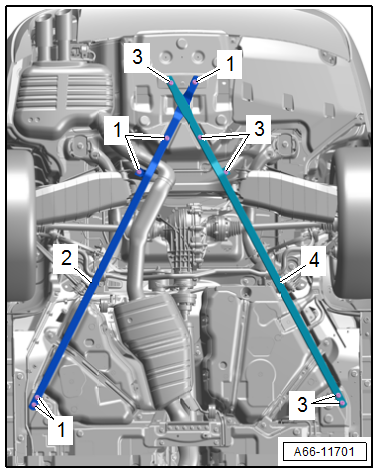
Diagonal Braces, Removing and Installing
 Caution
This procedure contains mandatory replaceable parts. Refer to component overview and parts catalog prior to starting procedure.
Mandatory Replacement Parts
- Bolts - Right Diagonal Brace to Body
- Bolts - Left Diagonal Brace to Body
Removing
 NOTICE
Risk of damaging the thread by using an impact wrench.
- When installing, position the bolts by hand and screw in the first threads.
- Do not loosen or tighten the bolts with an impact wrench.
- Remove the bolts -1 and 3- and remove the diagonal braces -2 and 4-.
Installing
Install in reverse order of removal and note the following:
Tightening Specifications
- Refer to → Chapter "Overview - Underbody Bracing"
READ NEXT:
 Roof Molding/Roof Railing
Overview - Roof Railing
1 -
Nut
Quantity: 4
Insert with locking fluid. Refer to the Parts Catalog.
Tightening specification and sequence. Refer to
→ Fig. "Roof Railing - Tightening
Exterior Rearview Mirror
Overview - Exterior Rearview Mirror
1 -
Mirror Trim
2 -
Bolt
1.5 Nm
3 -
Mirror Adjusting Unit
Removing and installing. Refer to
→ Chapter "Mirror Adjusting
Wheel Housing Liner
Overview - Front Wheel Housing Liner
Overview - Wheel Housing Liner
1 -
Drive Axle Cover
Removing and installing. Refer to
→ Chapter "Drive Axle Cover, Removing and Installing".
SEE MORE:
Playing media
Media sources
The following sources can be selected depending
on the vehicle equipment:
Alexa
USB device
Connect external device: you can connect external
devices via Bluetooth and use the Bluetooth
audio player, or you can connect
an external device directly to the Audi music
interface
Str
Transmission Control
Component Location Overview - Transmission Control
1 - DSG Transmission Mechatronic -J743-
2 - Transmission Fluid Temperature Sensor -G93-
3 - Temperature Sensor In Control Module -G510-
4 - Transmission Control Module -J217-
5 - Transmission Input
