Audi A4: Roof Molding/Roof Railing
Overview - Roof Railing
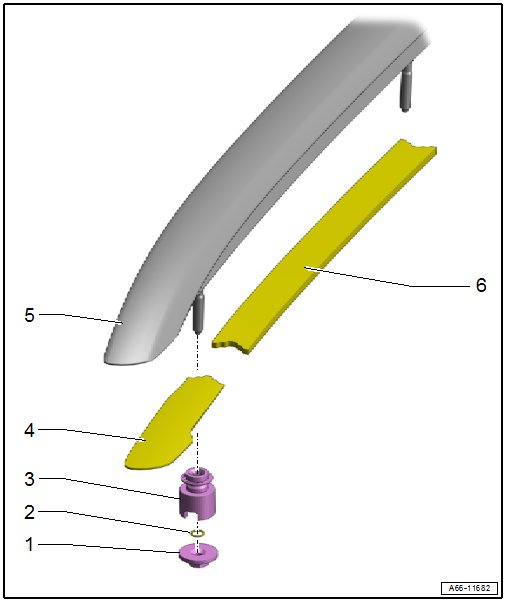
1 - Nut
- Quantity: 4
- Insert with locking fluid. Refer to the Parts Catalog.
- Tightening specification and sequence. Refer to → Fig. "Roof Railing - Tightening Specification and Sequence".
2 - O-Ring
- Replace if damaged
3 - Lifter
- 0.5 Nm
- Quantity: 4
- Removing and installing. Refer to → Chapter "Lifter, Removing and Installing".
- Install with locking compound. Refer to the Parts Catalog for the locking compound.
4 - Seal
5 - Roof Railing
- Removing and installing. Refer to → Chapter "Roof Railing, Removing and Installing".
6 - Seal
- Quantity: 3
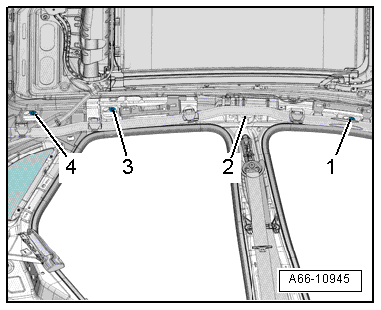
Roof Railing - Tightening Specification and Sequence
- Tighten the nuts to 10 Nm in the sequence -2, 3, 4 and 1-.
Roof Railing, Removing and Installing
Special tools and workshop equipment required
- Body Socket -T40078-
- Locking fluid. Refer to the Parts Catalog.
- Follow the safety precautions. Refer to → Body Interior; Rep. Gr.00; Safety Precautions; Safety Precautions when Working on Pyrotechnic Components.
Removing
 CAUTION
Pyrotechnic components may deploy unintentionally.
Risk of injury.
- Discharge static electricity by briefly touching the door striker.
- Remove the head curtain airbag igniter from the body. The head curtain airbag remains installed. Refer to → Body Interior; Rep. Gr.69; Head Curtain Airbags; Head Curtain Airbag with Igniter, Removing and Installing.
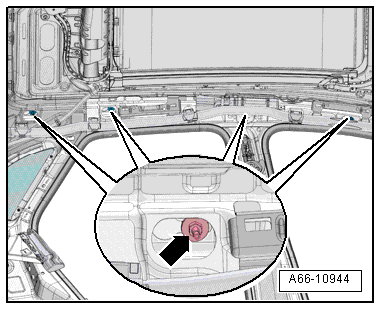
- Remove the nuts -arrow- using the -T40078-.
- Remove the roof railing upward.
Installing
Install in reverse order of removal and note the following:
- Clean the threaded pin threads on the roof railing with a wire brush.
- Check the seal for damage.
- Carefully remove any remaining locking fluid from the nut threads that are installed with locking fluid using a thread tap. Otherwise the threaded pins could lock up when installed and break off when removed again.
- Insert the roof railing with the guide pin into the mount on the vehicle roof.
- Install the nuts with locking fluid and tighten.
Tightening Specifications
- Refer to → Fig. "Roof Railing - Tightening Specification and Sequence"
Lifter, Removing and Installing
Special tools and workshop equipment required
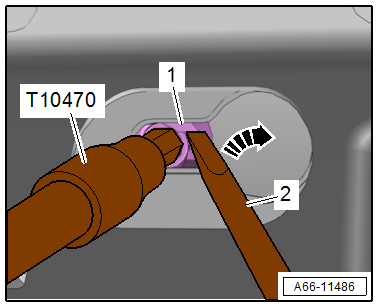
- Socket - Torx T50 -T10470-
 Caution
This procedure contains mandatory replaceable parts. Refer to component overview and parts catalog prior to starting procedure.
Mandatory Replacement Parts
- O-ring - Nut to Lifter
Removing
- Remove the roof railing. Refer to → Chapter "Roof Railing, Removing and Installing".
- Turn the adjusting screw in the lifter -1- several turns using the -T10470- by counterholding with a screwdriver -2-.
- Remove the lifter from the roof opening in the direction of -arrow-.
Installing
Install in reverse order of removal and note the following:
- Clean the adjusting screw threads -3- with a wire brush.
- Remove any residual locking fluid from the threaded hole of the lifter -1- using a thread tap.
- Check the stop washer -2- for damage and replace the lifter, if necessary.
- The stop washer must sit in the groove -arrow-.
- Install the adjusting screw with locking fluid in the lifter.
- Insert the lifter into the roof opening and secure it with the adjusting screw.

READ NEXT:
 Exterior Rearview Mirror
Overview - Exterior Rearview Mirror
1 -
Mirror Trim
2 -
Bolt
1.5 Nm
3 -
Mirror Adjusting Unit
Removing and installing. Refer to
→ Chapter "Mirror Adjusting
Wheel Housing Liner
Overview - Front Wheel Housing Liner
Overview - Wheel Housing Liner
1 -
Drive Axle Cover
Removing and installing. Refer to
→ Chapter "Drive Axle Cover, Removing and Installing".
Name Badges and Emblems
Overview - Name Badges and Emblems
1 -
Emblem
Removing and installing. Refer to
→ Chapter "Radiator Grille Name Badges and Emblems, Removing and
Installing".
2 -
quat
SEE MORE:
Front Center Armrest
Overview - Front Center Armrest
1 - Center Armrest Support Base
Removing and installing. Refer to
→ Chapter "Front Center Armrest, Removing and Installing".
2 - Front Cover
Removing and installing. Refer to
→ Chapter "Center Armrest Upper Section, Removing a
Traffic jam assist
Description
Applies to: vehicles with traffic jam assist
Fig. 116 Turn signal lever: button for traffic jam assist and
Audi active lane assist
Traffic jam assist supports the driver when driving
in traffic jams or in heavy traffic.
In a speed range under 40 mph (65 km/h), the
system can help to
