Audi A4: Driver and Front Passenger Seat Heating Element -Z6-/-Z8-, Removing and Installing
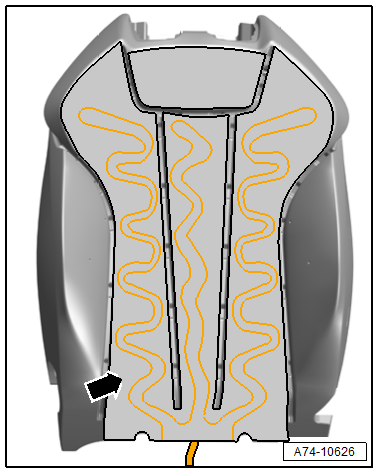
Seat Heating Element, Removing and Installing, Seat Cushion
Procedure
- Separate the cover and cushion. Refer to → Chapter "Seat Pan Cover and Cushion, Separating".
- Clip the wires directly at the heating elements.
 Note
Note
The old heating elements remain on the cushion and will be covered over by the new heating element.
- Align the new heating elements -arrow- on the cushion.
- Remove the protective films from the heating elements in succession, taking care not to damage the heating elements.
- Glue the heating elements so that they align with the old heating elements and are free of wrinkles.
- Route the connecting wires to the individual heating elements in the base of the gaps.
Further installation is the reverse order of removal.
Installation instructions: For example tightening specifications, replacing components. Refer to → Chapter "Overview - Seat Heating Element".
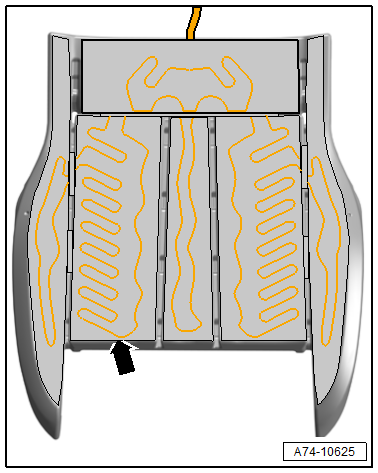
Seat Heating Element, Removing and Installing, Seat Depth Adjuster
Procedure
- Separate the cover and cushion. Refer to → Chapter "Seat Pan Cover and Cushion, Separating".
- Cut the wire directly on the old heating element.
Note
The old seat heating element remains on the cushion and will be covered by the new heating element.
- Align the new heating element -arrow- on the cushion.
- Peel the protective film off the heating element. Be careful not to damage the heating element.
- Glue the heating element so that they align with the old heating element and are not wrinkled.
Further installation is the reverse order of removal.
Installation instructions: For example tightening specifications, replacing components. Refer to → Chapter "Overview - Seat Heating Element".
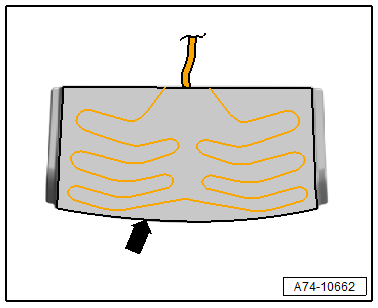
Driver/Front Passenger Backrest Heating Element -Z7-/-Z9-, Removing and Installing
Procedure
- Separate the cover and cushion. Refer to → Chapter "Backrest Cover and Cushion, Separating".
- Cut the wire directly on the old heating element.
Note
The old seat heating element remains on the cushion and will be covered by the new heating element.
- Align the new heating element -arrow- on the cushion.
- Peel the protective film off the heating element one after the other. Be careful not to damage the heating element.
- Glue the heating element so that they align with the old heating element and are not wrinkled.
- Route the connecting wires to the individual heating elements in the base of the gaps.
Further installation is the reverse order of removal.
Installation instructions: For example tightening specifications, replacing components. Refer to → Chapter "Overview - Seat Heating Element".
READ NEXT:
 Rear Seat Covers and Cushions
Overview - Cover and Cushion
Overview - Cover and Cushion, Sport Bench Seat
1 - Seat Frame
With the molded piece
2 - Upholstery Clip
For securing the cover to the cushion
Re
Cover and Cushion, Removing and Installing
Cover and Cushion, Removing and Installing, Bench Seat
Special tools and workshop equipment required
Pry Lever -80-200-
Caution
This procedure contains mandatory replaceable parts.
Refer
Seat Heating Element, Removing and Installing
Removing
- Separate the cover and cushion. Refer to
→ Chapter "Cover and Cushion, Separating, Bench Seat".
- Disconnect the wire -3- directly
from the old heating element -1-.
SEE MORE:
Vehicles with a High Voltage System (Hybrid Vehicles)
Extremely Dangerous Due to High-Voltage
The high-voltage system is under high-voltage. Death or serious
bodily injury by electric shock.
- Individuals with electronic/medical life- and health sustaining
machines in or on their person cannot perform any work on high-voltage
systems. Life- and
Refrigerant Circuit
Refrigerant Circuit with Expansion Valve and Evaporator
The following illustration shows only the principle of a
refrigerant circuit, the design of the refrigerant circuit in
the respective vehicle can be found in the vehicle-specific
repair manual. Refer to
→ Heating, Ventilation and Air
