Audi A4: Rear Seat Covers and Cushions
Audi A4 (B9) 2016-2026 Service Manual / Body / Body Interior / Seat Upholstery, Covers / Rear Seat Covers and Cushions
Overview - Cover and Cushion
Overview - Cover and Cushion, Sport Bench Seat
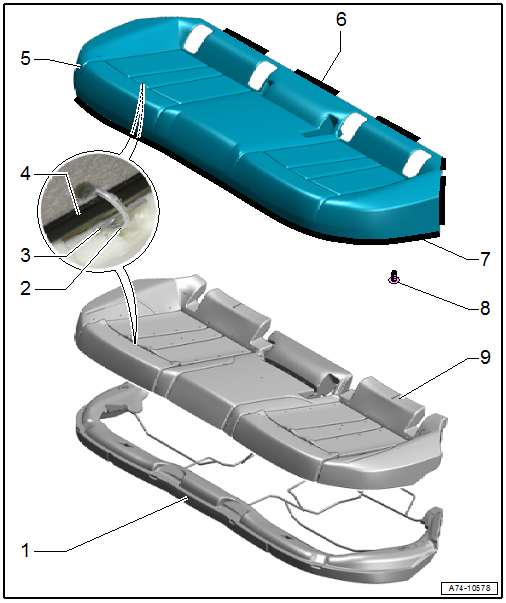
1 - Seat Frame
- With the molded piece
2 - Upholstery Clip
- For securing the cover to the cushion
- Replace
- Install at the same location with Upholstery Clip Pliers -VAG1634-.
3 - Wire
- Covered in foam padding
- For securing the cover to the cushion
4 - Contour Wire
- Sewn into cover
- For securing the cover to the cushion
5 - Cover
- Covers and cushions, removing and installing. Refer to → Chapter "Cover and Cushion, Removing and Installing, Bench Seat".
- Cover and cushion, separating. Refer to → Chapter "Cover and Cushion, Separating, Bench Seat".
- Check that there are no folds after installing
6 - Molding
- Sewn into cover
- For engaging the cover to the seat frame
- Make sure is fits correctly on the seat frame
7 - Clamping Strip
- Sewn into cover
- For attaching the cover to the seat frame
- Strip inward 180º and engage in the groove in the molded piece.
8 - Clip
9 - Cushion
- Covers and cushions, removing and installing. Refer to → Chapter "Cover and Cushion, Removing and Installing, Bench Seat".
- Cover and cushion, separating. Refer to → Chapter "Cover and Cushion, Separating, Bench Seat".
Overview - Cover and Cushion, Fixed Rear Seat Backrest
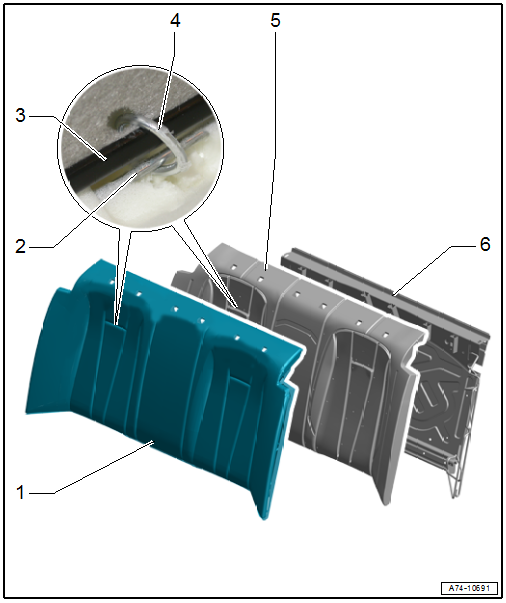
1 - Cover
- Covers and cushions, removing and installing. Refer to → Chapter "Cover and Cushion, Removing and Installing, Fixed Rear Seat Backrest".
- Cover and cushion, separating. Refer to → Chapter "Cover and Cushion, Separating, Bench Seat".
2 - Wire
- Covered in foam padding
- For securing the cover to the cushion
3 - Contour Wire
- Sewn into cover
- For securing the cover to the cushion
4 - Upholstery Clip
- For securing the cover to the cushion
- Replace
- Install at the same location with Upholstery Clip Pliers -VAG1634-.
5 - Cushion
- Covers and cushions, removing and installing. Refer to → Chapter "Cover and Cushion, Removing and Installing, Fixed Rear Seat Backrest".
- Cover and cushion, separating. Refer to → Chapter "Cover and Cushion, Separating, Bench Seat".
6 - Backrest Frame
Overview - Cover and Cushion, Folding Backrest
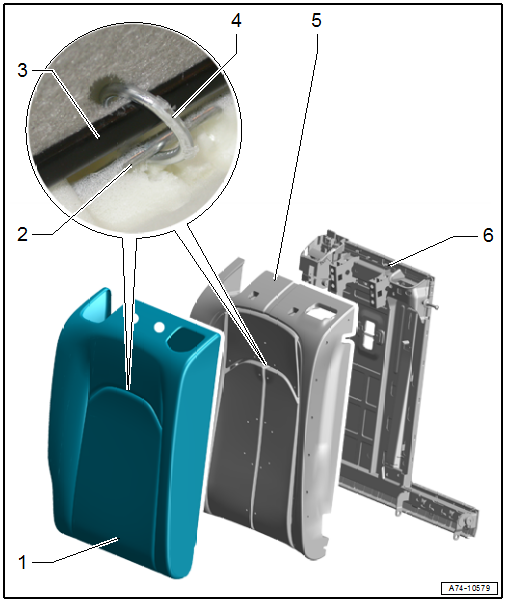
1 - Cover
- Covers and cushions, removing and installing. Refer to → Chapter "Cover and Cushion, Removing and Installing, Folding Backrest".
- Cover and cushion, separating. Refer to → Chapter "Cover and Cushion, Separating, Outer Folding Backrest".
2 - Wire
- Covered in foam padding
- For securing the cover to the cushion
3 - Contour Wire
- Sewn into cover
- For securing the cover to the cushion
4 - Upholstery Clip
- For securing the cover to the cushion
- Replace
- Install at the same location with Upholstery Clip Pliers -VAG1634-.
5 - Cushion
- Covers and cushions, removing and installing. Refer to → Chapter "Cover and Cushion, Removing and Installing, Folding Backrest".
- Cover and cushion, separating. Refer to → Chapter "Cover and Cushion, Separating, Outer Folding Backrest".
6 - Right Folding Backrest
Overview - Seat Heating Element
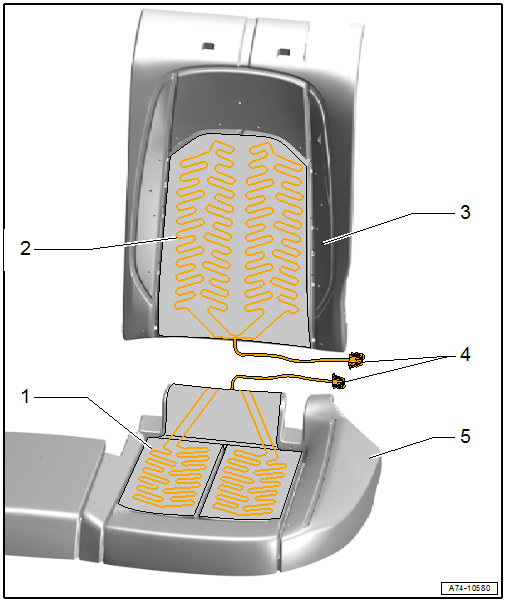
1 - Bench Seat Heating Element
- Left Rear Bench Seat Heating Element -Z10-
- Right Rear Bench Seat Heating Element -Z12-
- Removing and installing. Refer to → Chapter "Seat Heating Element, Removing and Installing".
2 - Backrest Heating Element
- Left Rear Backrest Heating Element -Z11-
- Right Rear Backrest Heating Element -Z13-
- Removing and installing. Refer to → Chapter "Backrest Heating Element, Removing and Installing".
3 - Backrest Cushion
4 - Wires
5 - Seat Cushion
READ NEXT:
 Cover and Cushion, Removing and Installing
Cover and Cushion, Removing and Installing, Bench Seat
Special tools and workshop equipment required
Pry Lever -80-200-
Caution
This procedure contains mandatory replaceable parts.
Refer
Seat Heating Element, Removing and Installing
Removing
- Separate the cover and cushion. Refer to
→ Chapter "Cover and Cushion, Separating, Bench Seat".
- Disconnect the wire -3- directly
from the old heating element -1-.
SEE MORE:
Battery Tester -VAS6161-
General Description:
WARNING
Risk of injury. Follow all warning messages and
safety precautions. Refer to
→ Chapter "Warnings and Safety Precautions".
It is not necessary to disconnect or remove the Battery -A-
when using the Battery Tester -VAS6161-.
The Battery Tester -VAS6161-
A/C Pressure/Temperature Sensor
There are different versions of this sensor with different
functions and with different names. For exact name, allocation
and notes doe the respective function, refer to
→ Heating, Ventilation and Air Conditioning; Rep.
Gr.87; Refrigerant Circuit; System Overview - Refrigerant
C
© 2019-2026 Copyright www.audia4b9.com
