Audi A4: Name Badges and Emblems
Overview - Name Badges and Emblems
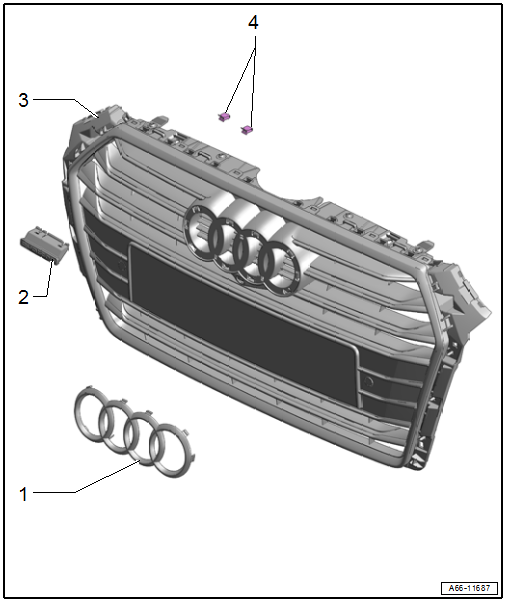
1 - Emblem
- Removing and installing. Refer to → Chapter "Radiator Grille Name Badges and Emblems, Removing and Installing".
2 - quattro Name Badge
- Equipped on some models
- Removing and installing. Refer to → Chapter "Radiator Grille Name Badges and Emblems, Removing and Installing".
3 - Radiator Grille
- Overview. Refer to → Chapter "Overview - Radiator Grille".
4 - Clips
General Information - Name Badges and Emblems, Replacing
Special tools and workshop equipment required
- Roller -3356-
- Cleaning Solution -D 009 401 04-
- Applicator -D 009 500 25-
- Bonding Agent -D 355 205 A2-
- Loosened name badges and emblems must be replaced.
- The vehicle as well as the name badges and emblems must be at room temperature.
- The adhesive surfaces must be free of dirt and grease.
- If the Bonding Agent -D 355 205 A2- dries longer than 3 hours, then it must be primed again.
- Clean the adhesive surfaces using Cleaning Solution -D 009 401 04-.
- Apply Bonding Agent -D 355 205 A2- on the adhesive surface using the Applicator -D 009 500 25- and let dry.
- Warm the adhesive areas to approximately 40 ºC (104 ºF) using a hot air blower.
- After successfully assembling, press on the emblems again with the roller.
Dimensions - Rear Name Badges and Emblems
Dimensions - Rear Name Badges and Emblems, Sedan
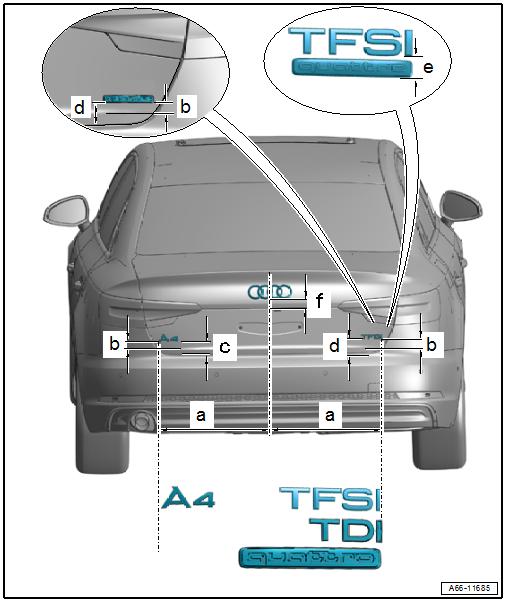
- Dimension -a- = 515 mm
- Dimension -b- = 38 mm
- Dimension -c- = 60 mm
- Dimension -d- = 59 mm
- Dimension -e- = 17.5 mm
- Dimension -f- = 41 mm
Dimensions - Rear Name Badges and Emblems, Avant
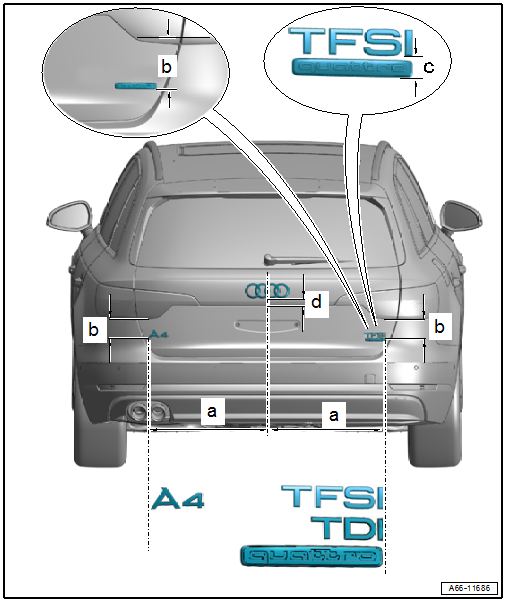
- Dimension -a- = 552 mm
- Dimension -b- = 88 mm
- Dimension -c- = 17.5 mm
- Dimension -d- = 35 mm
Dimensions - Side Name Badges and Emblems
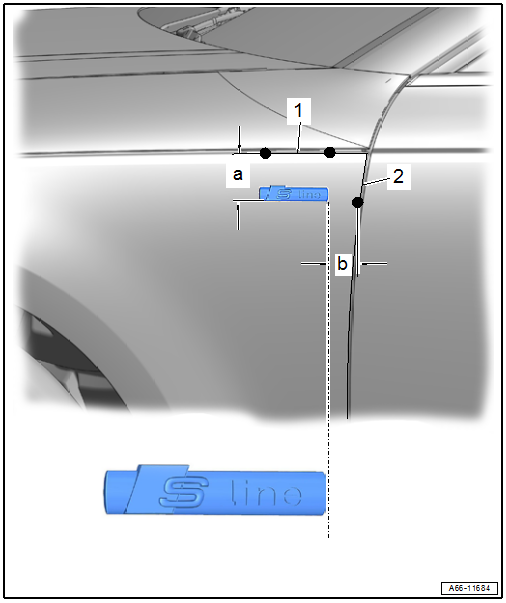
- Dimension -a- = 65 mm
- Dimension -b- = 39 mm
- -1- Cover edge on fender
- -2- Fender rear edge
Radiator Grille Name Badges and Emblems, Removing and Installing
Special tools and workshop equipment required
- Angled Screwdriver -VAS6416-
- General information - name badges and emblems, replacing. Refer to → Chapter "General Information - Name Badges and Emblems, Replacing"
Emblem, Removing
- Remove the front bumper cover. Refer to → Chapter "Bumper Cover, Removing and Installing".
- If equipped, remove the peripheral camera. Refer to → Communication; Rep. Gr.91; Peripheral Camera; Component Location Overview - Peripheral Camera.
- Release the tab -1- at the areas marked with -arrows- by lifting each securing tab -2-.
- Remove the emblem from the radiator grille -3-.
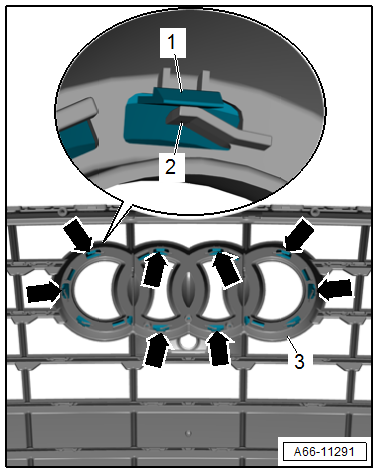
Installing
Install in reverse order of removal and note the following:
- Press on the emblem until it audibly engages.
quattro Name Badge, Removing
Removing
- Remove the lock carrier cover. Refer to → Chapter "Lock Carrier Cover, Removing and Installing".
- Remove the clips -3- using the -VAS6416-.
- Remove the quattro name badge -2- from the radiator grille -1-.
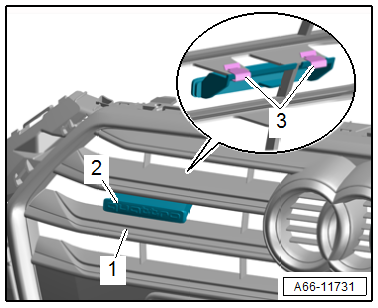
TIP
If the name badge cannot be removed as described, the front bumper cover must be removed. Refer to → Chapter "Bumper Cover, Removing and Installing".
Installing
- Install in reverse order of removal.

