Audi A4: Shock Absorber Leaks
Vehicles with Coil Springs
Shock absorbers are frequently rejected and replaced because of leaks. Examinations on the test stand and on the vehicle have shown that the replacement of a large number of rejected shock absorbers was not justified.
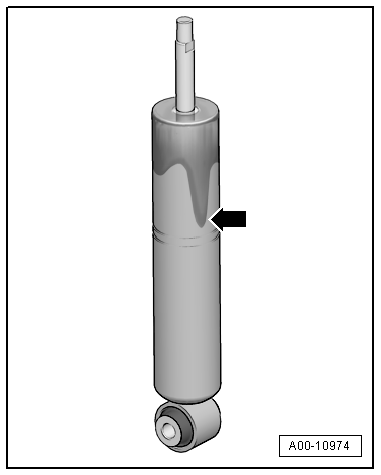
Slight leaking of oil ("sweating") at piston rod seal is no reason to replace a shock absorber. A shock absorber damp with oil is OK under the following circumstances:
 Note
Note
Minor oil excretion is an advantage, since the piston rod oil seal gets lubricated, which thus increases service life. This applies to shock absorbers on the front and rear axles.
- Oil leakage (shaded in illustration -arrow-) is visible, but dull, matte and possibly dry due to dust.
- One-sided oil or dirt film formation, no dripping.
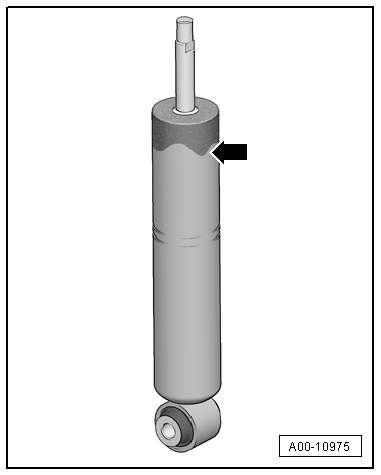
A shock absorber is not OK under the following conditions:
- Dripping -arrow-, completely coated with oil film
- A wet oil film that runs down the pipe indicates a leaky shock absorber. A replacement is required in this instance.
Shock Absorbers, Checking when Removed
Defective shock absorbers are noticeable when driving due to loud rumbling noises - a result of wheel hopping - especially on poor stretches of road. Moreover, they can be recognized by a large loss of oil.
Note
Shock absorbers are maintenance-free, shock absorber oil cannot be filled.
A removed shock absorber can be checked by hand as follows:
- Push the shock absorber together by hand.
- The piston rod must move with even resistance throughout the entire stroke and without jerking.
- Release the piston rod.
- For shock absorbers with sufficient gas pressure, the piston rod returns automatically to its starting position.
Note
- If this is not the case, the shock absorber does not necessarily need to be replaced. As long as there is not a large loss of oil, the effectiveness corresponds to that of a standard shock absorber.
- The damping function is also completely available without gas pressure, as long as there is no large loss of oil. However, this can increase the noise level.
Shock Absorbers, Checking on Shock Tester
Shock absorbers can be checked while installed using the shock tester (shock absorber testing device). The damping effect can be evaluated based on the dial reading or printout.
Special tools and workshop equipment required
- Maha Shock Absorber Tester -VAS1990S-
- Suspension Strut Test Bed -VAS6636-
- Suspension Strut Test Bed -VAS6640-
Test Requirements
- Temperature +10 to 40 ºC (+50 to 104 ºF).
- Driver must be in vehicle.
- Tire pressure OK
- Drive vehicle straight onto center of wheel contact plates.
- Front wheels in straight position.
- Mechanical parking brake not engaged, foot brake not pressed.
Threshold
Shock absorber condition can only be judged as follows:
- Sufficient damping effect
or
- Insufficient damping effect
Note
- Intermediate values for reduced damping performance cannot be read out.
- A prognosis on service life is not permitted.
- Measured values that occur with the involvement of the suspension travel end stops are incorrect.
The following values apply only to the test stands named above. If the specified values are exceeded, the shock absorber function has weakened enough that a replacement is recommended.
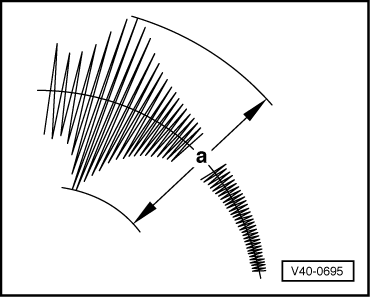
Example:
Threshold = 70
- a = greater than 70: insufficient damping effect
- a = less than 70: sufficient damping effect
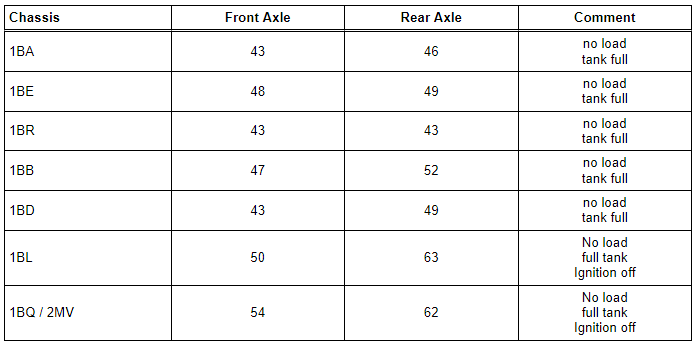
The shock absorber combination installed in the vehicle is indicated by the corresponding PR number on the vehicle data label.
Production Control Number (PR number) explanation. Refer to → Chapter "Production Control Number (PR Number) Explanations".
Threshold "a" in mm
Note
- If the readout value is greater than the threshold "a" (table value): insufficient damping effect ⇒ replace shock absorber.
- If the readout value is less than the threshold "a" (table value): sufficient damping effect ⇒ shock absorber does not need to be replaced.
Guidelines for Clean Working Conditions
- Thoroughly clean connecting points and their surrounding areas before loosening.
- Place removed parts on a clean surface and cover them so that they do not get dirty. Use foil and paper. Only use lint-free cloths.
- Only install clean parts: Remove the replacement parts from their packaging just before installing them.
- Only use greases and sealants that are designated with part numbers.
- Carefully cover or seal opened components if the repair is not performed immediately.
READ NEXT:
 General Information
Caution
There is a risk of damaging the threads in the
vehicle body.
The bolts and nuts at all suspension parts must not
be loosened or tightened with an impact wrench.
Always install th
Wheel Bearing in Curb Weight Position, Lifting Vehicles with Coil Spring
Special tools and workshop equipment required
Engine and Gearbox Jack -VAS6931-
Tensioning Strap -T10038-
Engine/Gearbox Jack Adapter - Wheel Hub Support -T10149-
Note
All bolts on chassi
Disposal
Front Gas-Filled Shock Absorbers, Venting and Draining
Special tools and workshop equipment required
Hand drill
3 mm diameter drill bit.
6 mm diameter drill bit
Oil collecting container
Protecti
SEE MORE:
Mechatronic, Removing and Installing
Special tools and workshop equipment required
Used Oil Collection and Extraction Unit -SMN372500-
Assembly Tool -T40305-
Oil Sump Assembly Pin -T40199-
Electronic Torque Wrench 3-60Nm -VAS6583-
Cover -T40322-
Support -T40321-
Removing
Note
General repair instructions. Refer to
→
Setting the distance
Applies to: vehicles with Audi adaptive cruise control
Fig. 112 Operating lever: setting the distance
When approaching a vehicle driving ahead, the
adaptive cruise control system brakes to match
that vehicle's speed and then adjusts to the set
distance. If the vehicle driving ahead accelerates,
the
