Audi A4: Wheel Bearing in Curb Weight Position, Lifting Vehicles with Coil Spring
Special tools and workshop equipment required
- Engine and Gearbox Jack -VAS6931-
- Tensioning Strap -T10038-
- Engine/Gearbox Jack Adapter - Wheel Hub Support -T10149-
 Note
Note
All bolts on chassis components with bonded rubber bushings must be tightened in curb weight position. Refer to → Chapter "Vehicles with Coil Springs, Checking the Curb Weight Position for Axle Alignment".
- Bonded rubber bushings have a limited range of rotation. Axle components with bonded rubber bushings must be brought into the position they will be in when driving before they are tightened (curb weight position).
- Otherwise, the bonded rubber bushing will have tension, which will reduce the service life.
- By raising the corresponding suspension using the -VAS6931- and -T10149-, this position can be simulated on the hoist.
Procedure
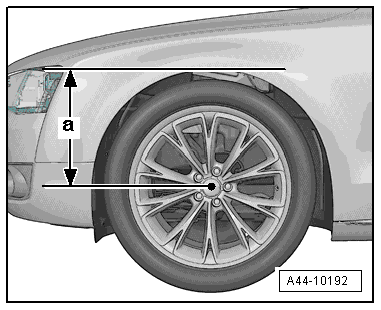
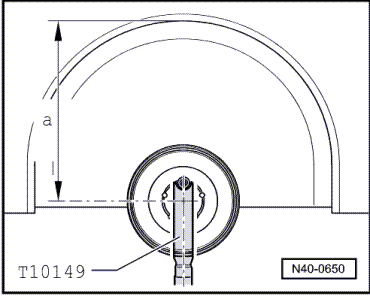
- Before starting the procedure, determine the measurement -a-, for example using a tape measure, from the center of the wheel to the lower edge of the fender/wheel housing.
Note
The measurement must be taken in curb weight position.
- Note the measurement. This will be needed when tightening the bolts/nuts.
- Remove the wheel. Refer to → Chapter "Wheels and Tires".
- Turn the wheel hub, until a wheel bolt hole is at the top.
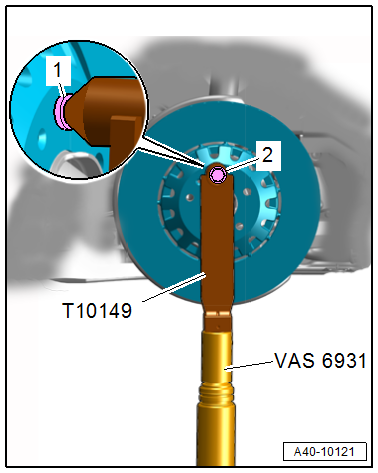
- Install the -T10149- with a wheel bolt -2- on the wheel hub.
Note
Ignore item -1-.
Note
Tightening of the applicable bolts/nuts must only occur if the dimension between the center of the wheel hub and the lower edge of the fender/wheel housing that was measured before starting the procedure has been attained.
 WARNING
Risk of accident!
A vehicle that is not secured can slide off the hoist.
- Insert the -T10149- in the -VAS6931- and lift the wheel bearing housing slightly.
- Before the respective suspension is lifted up to the curb weight position, the vehicle must be tied down using the -T10038- on the -VAS6931-.
- Lift the wheel bearing housing, until the dimension -a- has been reached.
WARNING
Risk of accident!
- Do not lift or lower the vehicle when the -VAS6931- is under the vehicle.
- Do not leave the -VAS6931- under the vehicle any longer than necessary.
- Tighten the applicable bolts and nuts.
- Lower the wheel bearing housing.
- Move the -VAS6931- to the side
- Remove the -T10149-.
Tightening Specifications
- Refer to → Chapter "Wheels and Tires"
READ NEXT:
 Disposal
Front Gas-Filled Shock Absorbers, Venting and Draining
Special tools and workshop equipment required
Hand drill
3 mm diameter drill bit.
6 mm diameter drill bit
Oil collecting container
Protecti
SEE MORE:
Refrigerant Circuit, Discharging with Service Station
Work procedure may vary depending on the type of tools
selected (the tool-specific operating instructions should
therefore be followed).
The refrigerant circuit is to be discharged if parts of the
refrigerant circuit are to be removed, if there is any doubt
about the quantity of refrigerant i
Steering Gear, Removing and Installing
Special tools and workshop equipment required
Torque Wrench 1331 5-50Nm -VAG1331-
Torque Wrench 1332 40-200Nm -VAG1332-
Engine and Gearbox Jack -VAS6931-
Ball Joint Splitter -VAS251805-, not illustrated
Locating Pin -T40334-
Support Brace -T40335-
Caution
This procedure contains man
