Audi A4: Exterior Rearview Mirror
Overview - Exterior Rearview Mirror
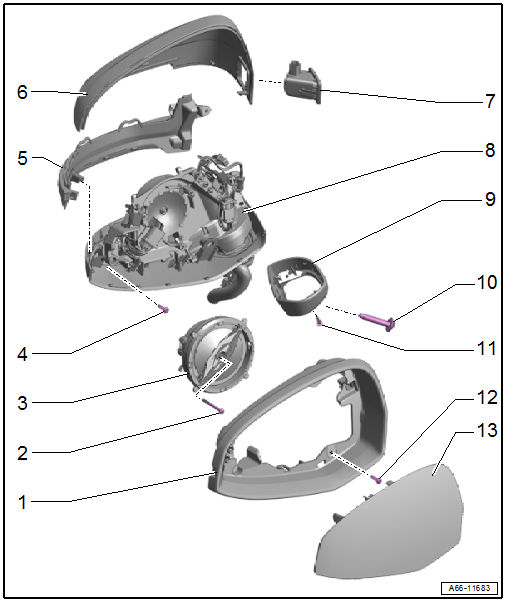
1 - Mirror Trim
2 - Bolt
- 1.5 Nm
3 - Mirror Adjusting Unit
- Removing and installing. Refer to → Chapter "Mirror Adjusting Unit, Removing and Installing".
4 - Bolt
- Tightening specification. Refer to → Electrical Equipment; Rep. Gr.94; Exterior Rearview Mirror Lamps; Overview - Exterior Rearview Mirror Lamps.
5 - Exterior Rearview Mirror Turn Signal
- Overview. Refer to → Electrical Equipment; Rep. Gr.94; Exterior Rearview Mirror Lamps; Overview - Exterior Rearview Mirror Lamps.
6 - Mirror Cap
7 - Lane Change Assistance Warning Lamp in Exterior Rearview Mirror
- Overview. Refer to → Electrical Equipment; Rep. Gr.96; Lane Change Assistance; Overview - Lane Change Assistance.
8 - Exterior Rearview Mirror
- Removing and installing. Refer to → Chapter "Exterior Rearview Mirror, Removing and Installing".
9 - Mirror Base Cover
- Removing and installing. Refer to → Chapter "Exterior Rearview Mirror, Removing and Installing".
10 - Bolt
- 12 Nm
11 - Bolt
- 1.5 Nm
- Quantity: 2
12 - Bolt
- 1.5 Nm
- Quantity: 4
13 - Mirror Glass
- Removing and installing. Refer to → Chapter "Mirror Glass, Removing and Installing".
Exterior Rearview Mirror, Removing and Installing
Removing
- Move the door window into the "closed" position.
- Remove the bass speaker. Refer to → Communication; Rep. Gr.91; Sound System; Component Location Overview - Sound System.
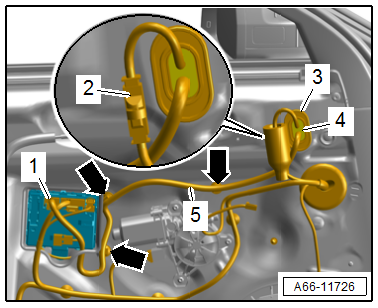
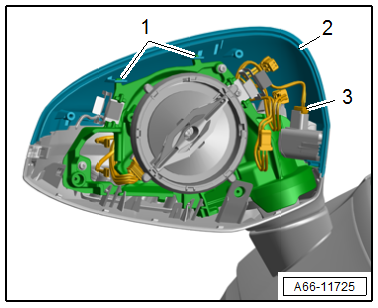
- Disconnect the connector -1- and free up the wiring harness -5--arrows-.
- Equipped on some models: Push the protective cover to the side and disconnect the connector -2-.
- Pry out the grommets -3 and 4-.
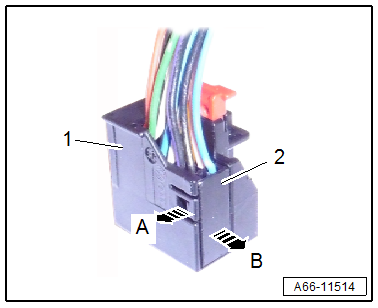
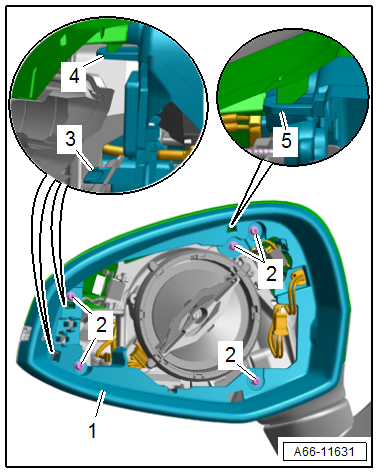
- Release the catch in the direction of -arrow A- and remove the connector -2- from the connector housing -1- in the direction of -arrow B-.
- Pry out the grommet -2-.
- Remove the nuts -1-.
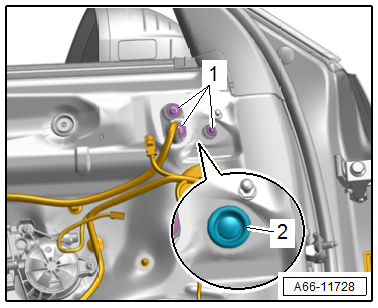
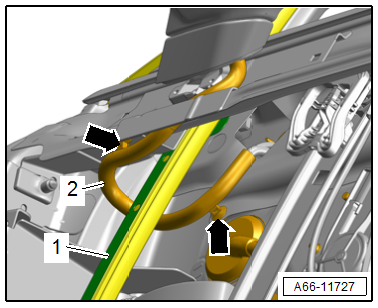
- Remove the wire holder -arrows- from the door shell and free up the wiring harness -2-.
- Remove the mirror adjustment unit mount and guide the wiring harness with the grommet outward through the door shell and behind the guide rail -1- at the same time.
Cover, Removing
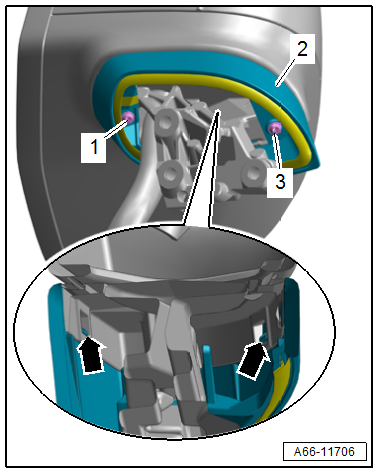
- Remove the bolts -1 and 3-.
- Release the retainers -arrows- and remove the mirror base cover -2-.
Installing
Install in reverse order of removal and note the following:
- Route the wiring harness -2- behind the door window guide rail -1- and secure the cable holder -arrows- on the door shell.
Tightening Specifications
- Refer to → Chapter "Overview - Exterior Rearview Mirror"
Mirror Glass, Removing and Installing
Special tools and workshop equipment required
- Double Suction Lifter -VAG1344-
- Safety Gloves
Removing
 CAUTION
Risk of injury to the hands and eyes from glass fragments.
Getting cut is possible.
- Wear protective eyewear.
- Wear safety gloves.
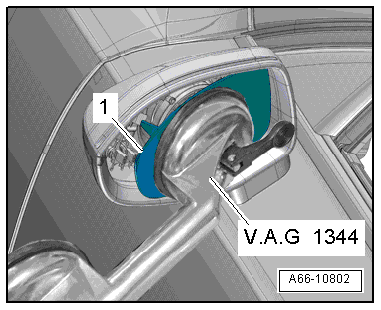
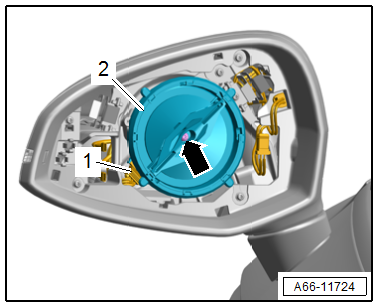
- Position the -VAG1344- in the center of the mirror glass -1-.
- Remove the mirror glass from the mirror adjusting unit using the - VAG1344-.
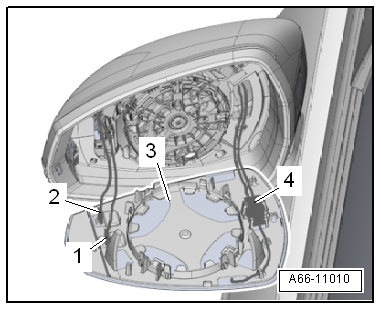
- Disconnect the connectors -1 and 2- for the mirror heating on the back of the mirror glass -3-.
- If equipped, unclip the connector -4- from the bracket and disconnect it.
Installing
Install in reverse order of removal and note the following:
- Position the mirror glass on the mirror adjusting unit and press it on. While doing so, only press down on the center of the mirror.
Mirror Adjusting Unit, Removing and Installing
Removing
- Remove the mirror glass. Refer to → Chapter "Mirror Glass, Removing and Installing".
- Remove the bolt -arrow-.
- Disengage the mirror adjustment unit -2- on the outside from the mount.
- Disconnect the connector -1-.
- Remove the mirror adjusting unit.
Installing
Install in reverse order of removal.
Tightening Specifications
- Refer to → Chapter "Overview - Exterior Rearview Mirror"
Mirror Cap, Removing and Installing
Removing
- Remove the mirror trim. Refer to → Chapter "Mirror Trim, Removing and Installing".
- Release the retainers -1- and remove the mirror cap -2- forward in the direction of travel.
- Equipped on some models: disconnect the connector -3-.
Installing
Install in reverse order of removal.
Tightening Specifications
- Refer to → Chapter "Overview - Exterior Rearview Mirror"
Mirror Trim, Removing and Installing
Removing
- Remove the mirror glass. Refer to → Chapter "Mirror Glass, Removing and Installing".
- Remove the bolts -2-.
- Remove the mirror trim -1- toward the rear in the direction of travel by releasing the retainers -3, 4 and 5- using a screwdriver.
- Guide the connectors out of the mount.
Installing
Install in reverse order of removal and note the following:
- The mirror trim must audibly engage.
Tightening Specifications
- Refer to → Chapter "Overview - Exterior Rearview Mirror"
READ NEXT:
 Wheel Housing Liner
Overview - Front Wheel Housing Liner
Overview - Wheel Housing Liner
1 -
Drive Axle Cover
Removing and installing. Refer to
→ Chapter "Drive Axle Cover, Removing and Installing".
Name Badges and Emblems
Overview - Name Badges and Emblems
1 -
Emblem
Removing and installing. Refer to
→ Chapter "Radiator Grille Name Badges and Emblems, Removing and
Installing".
2 -
quat
Trailer Hitch
Overview - Trailer Hitch
1 -
Information Label
On the left side of the body at the rear
2 -
Towing Recognition Control Module -J345-
Removing and installing. Refer to
→&nb
SEE MORE:
A/C System Operation
General Information
The temperature in the passenger compartment depends on the
amount of heat radiated through the windows and conducted by the
metal parts of the body. In hot weather it is possible to
achieve a more comfortable temperature for the passengers by
pumping off some of the heat.
As
Special Tools
Special tools and workshop equipment required
Shock Absorber Set -T10001-
Tensioning Strap -T10038-
Tripod Joint Tool -T10065-
Engine/Gearbox Jack Adapter - Wheel Hub Support -T10149-
Hydraulic Press - Bushing Assembly Tool Kit -T10230-
Socket AF 24 mm -T10361A-
Triple Roll
