Audi A4: Noise Insulation
Overview - Noise Insulation

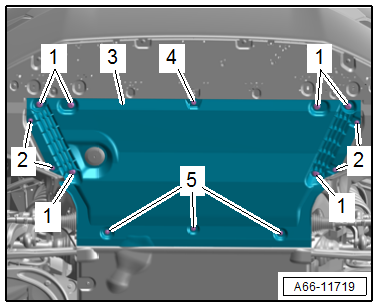
1 - Quick Release
- Without fastener
2 - Plug/Rubber Grommet
- Plug for vehicles without parking heater
- Rubber grommet for parking heater exhaust pipe
3 - Bolt
- 12 Nm
- Quantity: 2
4 - Rear Noise Insulation
- Removing and installing. Refer to → Chapter "Noise Insulation, Removing and Installing, Rear".
5 - Air Guide
- Removing and installing. Refer to → Chapter "Noise Insulation, Removing and Installing, Rear".
6 - Expanding Rivet
- Quantity: 2
7 - Quick Release
- Without fastener
- Quantity: 5
8 - Front Noise Insulation
- There are different versions. Refer to the Parts Catalog.
- Removing and installing. Refer to → Chapter "Noise Insulation, Removing and Installing, Front".
9 - Expanding Rivet
10 - Fastener
- Quantity: 7
11 - Quick Release
- Quantity: 7
12 - Bolt
- 20 Nm
- Quantity: 4
Noise Insulation, Removing and Installing
Noise Insulation, Removing and Installing, Front
Removing
- Remove the bolts -1-.
- Loosen the quick-release fasteners -2, 4 and 5-.
- Remove the front noise insulation -3-.
Installing
Install in reverse order of removal and note the following:
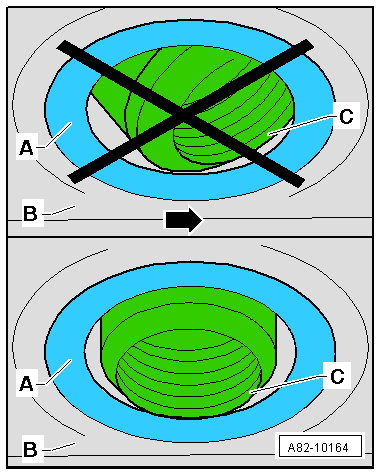
Vehicles with Parking Heater
- The rubber grommet -A- must rest without tension in the noise insulation -B-.
- The exhaust pipe -C- must be flush with the rubber grommet or it can protrude out slightly.
- The exhaust pipe opening must be perpendicular to the noise insulation and must not point in the direction of travel -arrow-.
Tightening Specifications
- Refer to → Chapter "Overview - Noise Insulation"
Noise Insulation, Removing and Installing, Rear
Removing
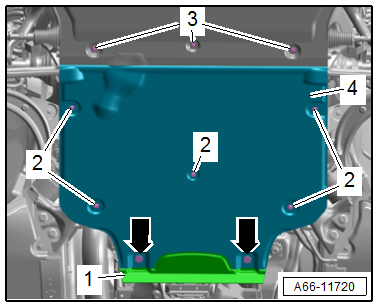
- Remove the expanding rivets -arrows-.
- Disengage the quick releases -2 and 3-.
- Remove the rear noise insulation -4- and air guide -1-.
Installing
Install in reverse order of removal.
READ NEXT:
 Underbody Trim Panel
Overview - Underbody Trim Panels
1 -
Nut
2 Nm
Quantity: 2
2 -
Front Underbody Panel
Removing and installing. Refer to
→ Chapter "Underbody Trim Panel, Removing and In
Underbody Trim Panels, Removing and Installing
Underbody Trim Panel, Removing and Installing, Front
Removing
- Remove the nuts -arrows-.
- Remove the front underbody trim panel -2-
from the center underbody trim panel -1-.
Installing
Roof Molding/Roof Railing
Overview - Roof Railing
1 -
Nut
Quantity: 4
Insert with locking fluid. Refer to the Parts Catalog.
Tightening specification and sequence. Refer to
→ Fig. "Roof Railing - Tightening
SEE MORE:
Overview - Transverse Link
Upper Transverse Link
1 - Wheel Bearing Housing
2 - Bolt
70 Nm + 180º
Replace after removing
3 - Front Upper Transverse Link
Removing and installing. Refer to
→ Chapter "Front Upper Transverse Link, Removing and Installing".
Installation position. Refer
A/C System Operation
General Information
The temperature in the passenger compartment depends on the
amount of heat radiated through the windows and conducted by the
metal parts of the body. In hot weather it is possible to
achieve a more comfortable temperature for the passengers by
pumping off some of the heat.
As
