Audi A4: Door B-Pillar Trim, Removing and Installing
B-Pillar Door Trim, Removing and Installing, Front
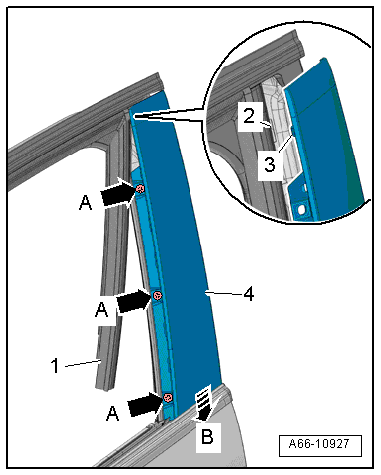
Removing
- Move the door window into the "open" position.
- Remove the window frame trim panel. Refer to → Body Interior; Rep. Gr.70; Front Door Trim Panels; Window Frame Trim Panel, Removing and Installing.
- Remove the seal -1- from the rear window guide near the B-pillar trim.
- Remove the bolts -arrows A-.
- Push the B-pillar trim -4- downward in the direction of -arrow B-. This will disengage the tab -3- from the body opening -2-.
- Push the B-pillar trim toward the outside until it disengages.
- Remove the B-pillar trim upward.
Installing
Install in reverse order of removal.
Tightening Specifications
- Refer to → Chapter "Overview - B-Pillar Trim"
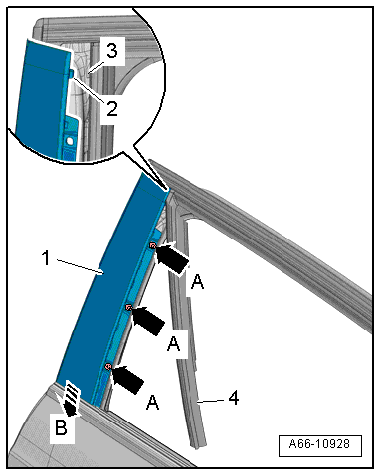
B-Pillar Door Trim, Removing and Installing, Rear
Removing
- Move the door window into the "open" position.
- Remove the window frame trim panel. Refer to → Body Interior; Rep. Gr.70; Rear Door Trim Panels; Window Frame Trim Panel, Removing and Installing.
- Remove the seal -4- near the B-pillar trim just far enough from the front window guide so that the bolts are accessible.
- Remove the bolts -arrows A-.
- Push the B-pillar trim -1- downward in the direction of -arrow B-. This will disengage the tab -2- from the body opening -3-.
- Push the B-pillar trim toward the outside until it disengages.
- Remove the B-pillar trim upward and out of the door opening.
Installing
Install in reverse order of removal.
Tightening Specifications
- Refer to → Chapter "Overview - B-Pillar Trim"
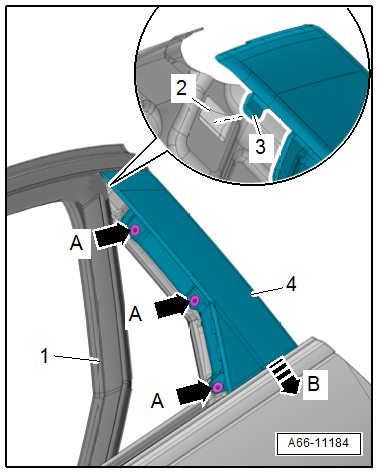
Door C-Pillar Trim, Removing and Installing
Removing
- Move the door window into the "open" position.
- Remove the window frame trim panel. Refer to → Body Interior; Rep. Gr.70; Rear Door Trim Panels; Window Frame Trim Panel, Removing and Installing.
- Remove the window guide -1- just far enough from the C-pillar trim -4- until the bolts are accessible.
- Remove the bolts -arrows A-.
- Push the C-pillar trim downward in the direction of -arrow B-. This will disengage the tab -3- from the opening in the body -2-.
- Pull the C-pillar trim toward the rear from the holder and upward from the door.
Installing
Install in reverse order of removal.
Tightening Specifications
- Refer to → Chapter "Overview - C-Pillar Trim"
READ NEXT:
 Floor Heat Shield, Removing and Installing
Plenum Chamber Bulkhead Heat Shield, Removing and Installing
Removing
- Remove the plenum chamber bulkhead. Refer to
→ Chapter "Plenum Chamber Bulkhead, Removing and Installing".
- R
Noise Insulation
Overview - Noise Insulation
1 -
Quick Release
Without fastener
2 -
Plug/Rubber Grommet
Plug for vehicles without parking heater
Rubber grommet for parking heater exhaust pipe
Underbody Trim Panel
Overview - Underbody Trim Panels
1 -
Nut
2 Nm
Quantity: 2
2 -
Front Underbody Panel
Removing and installing. Refer to
→ Chapter "Underbody Trim Panel, Removing and In
SEE MORE:
Transmission, Transporting
Special tools and workshop equipment required
Shop Crane -VAS6100-
Lifting Tackle -3033-
Hook And Support Tool -3311- with Hook And Support Tool -
Bolt -3311/1-
Retaining Strap -T40155-
Caution
Risk of damaging the transmission by mixing ATF and
transmission fluid (MTF) through the
Audi adaptive cruise
control
General information
Applies to: vehicles with Audi adaptive cruise control
Depending on vehicle equipment, Audi adaptive
cruise control may consist of the following functions:
Within the limits of the system, the adaptive
speed and distance control assists the driver in
controlling the speed and the
