Audi A4: Spoiler
Overview - Spoiler
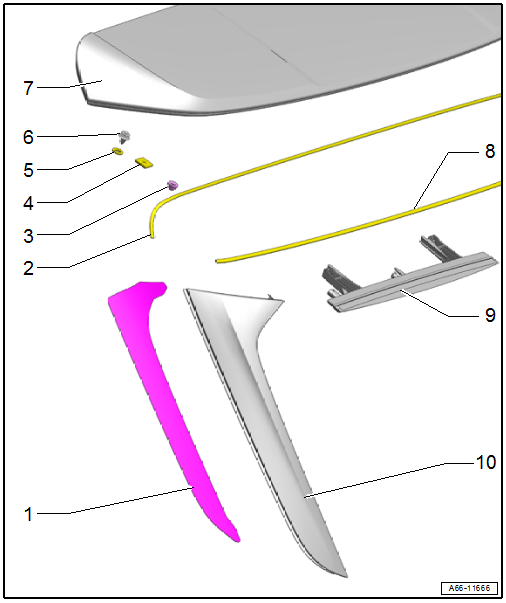
1 - Adhesive Tape
2 - Front Foam Seal
3 - Nut
- 4 Nm
- Quantity: 4
4 - Foam Seal
- For the securing pin
- Quantity: 3
5 - Foam Seal
- For the clips
- Quantity: 7
6 - Clip
- There are different versions. Refer to the Parts Catalog.
- Quantity: 7
7 - Spoiler
- Removing and installing. Refer to → Chapter "Spoiler, Removing and Installing".
8 - Rear Foam Seal
9 - High-Mounted Brake Lamp
- Overview. Refer to → Electrical Equipment; Rep. Gr.94; High-Mounted Brake Lamp; Overview - High-Mounted Brake Lamp.
10 - Aerodynamic Trim
- Removing and installing. Refer to → Chapter "Aerodynamic Trim, Removing and Installing".
Spoiler, Removing and Installing
Special tools and workshop equipment required
- Wedge Set -T10383-
- Wedge 1 -T10383/1-
Removing
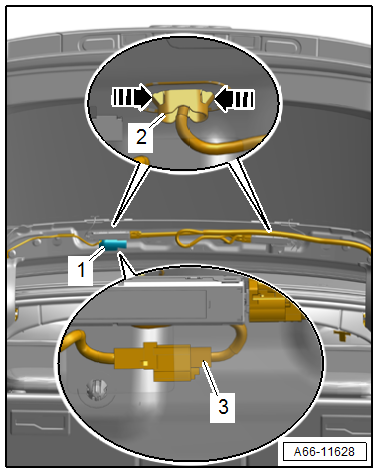
- Remove the antennas. Refer to → Communication; Rep. Gr.91; Antenna Systems; Component Location Overview - Antenna Systems.
- Free up the wiring harness -1- and disconnect the connector -3-.
- Release the retainers in the direction of -arrows- and free up the cable grommets -2-.
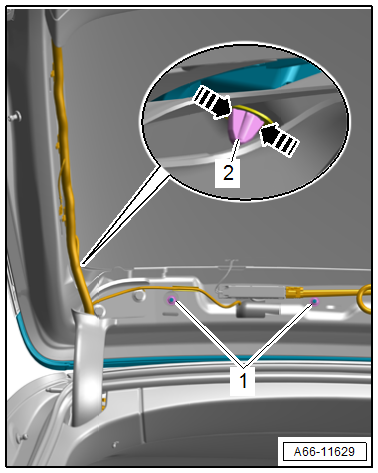
- Remove the nuts -1-.
- Release the clip -2- with needle nose pliers -arrows-.
- Close the rear lid.
- Press the spoiler off of the rear lid using the -T10383/1- and remove it.
Installing
Install in reverse order of removal and note the following:
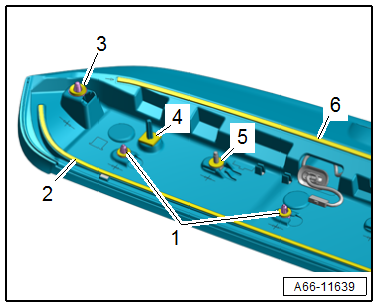
- Check the foam seals -1 through 6- for damage.
- The foam seals -1 through 6- must rest on the clips, securing tabs, threaded pins and the spoiler.
- Place the spoiler on the rear lid and push it in until it engages audibly.
Tightening Specifications
- Refer to → Chapter "Overview - Spoiler"
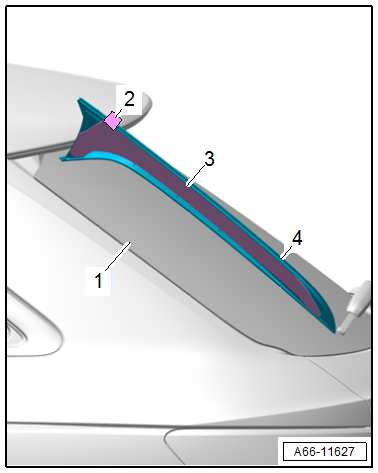
Aerodynamic Trim, Removing and Installing
Special tools and workshop equipment required
- Roller -3356-
- Wiring Harness Repair Set - Hot Air Blower -VAS1978/14A-
- Wedge Set -T10383-
- Wedge 1 -T10383/1-
- Cleaning Solution -D 009 401 04-
- Applicator -D 009 500 25-
- Bonding Agent -D 355 205 A2-
Removing
- Carefully warm up the aerodynamic trim -2- using the -VAS1978/14A-.
- Carefully pry the aerodynamic trim off the rear window -1- using the -T10383/1-.
- Remove the aerodynamic trim.

Installing
Install in reverse order of removal and note the following:
- Clean the adhesive surface using the Cleaning Solution -D 009 401 04-.
- Fold back the ends of the protective film, or attach a pulling aid -2- to the protective film.
- Align the aerodynamic trim -4- to the rear window -1-.
- Remove the protective film from the pulling aid and from the adhesive tape -3-.
- Push the entire length of the aerodynamic trim on using the -3356-.
- Vehicle resting time is at least one hour at room temperature.
- It is durable after at least 24 hours.
READ NEXT:
 Moldings, Trims, Extensions and Trim Panels
Overview - Trim Molding and Covers
Overview - Trim Molding
1 -
Front Door
2 -
Front Door Trim Molding
Removing and installing. Refer to
→ Chapter "Trim Molding, Removin
Trim Molding, Removing and Installing
Trim Molding, Removing and Installing, Front Door
Removing
- Using a small screwdriver -2-, pry
the trim molding -1- out of the
clip at the opening in the direction of
-arrow-.
- Carefull
Sill Panel Trim, Removing and Installing
Special tools and workshop equipment
required
Roller -3356-
Trim Removal Wedge -3409-
Wiring Harness Repair Set - Hot Air Blower -VAS1978/14A-
Cleaning Solution -D 009 401 04-
Applicator -D 009 500
SEE MORE:
Audi pre sense
Function overview
Applies to: vehicles with Audi pre sense
Within the limits of the system, the Audi pre
sense functions can initiate measures in certain
driving situations to protect the vehicle occupants
and other road users. Depending on the vehicle
equipment, various Audi pre sense systems
may b
Voice recognition system
General information
Applies to: vehicles with voice recognition system
You can operate many functions in the vehicle
easily using voice commands.
Using the voice recognition system optimally
Speak clearly and distinctly at a normal volume.
Speak louder when driving faster.
Emphasize the words in
