Audi A4: Seals
Component Location Overview - Gaskets
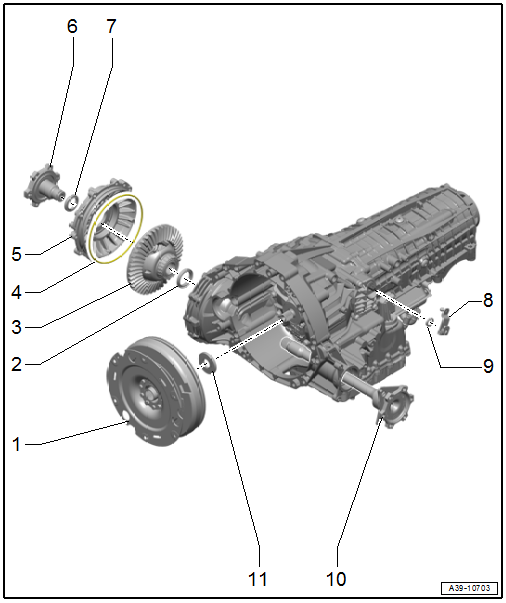
1 - Flywheel
- Removing an installing. Refer to → Chapter "Flywheel, Removing and Installing".
2 - Left Flange Shaft Seal
- Replacing. Refer to → Chapter "Left Seal, Replacing".
3 - Front Differential
4 - O-Ring
- Replace after removing.
5 - Final Drive Cover
- Tightening specifications and sequence. Refer to → Fig. "Final Drive Cover - Tightening Specification and Sequence"
6 - Right Flange Shaft
- Removing and installing. Refer to → 7-Speed Dual Clutch Transmission 0CK; Rep. Gr.39; Differential; Right Flange Shaft, Removing and Installing.
7 - Right Flange Shaft Seal
- Replacing. Refer to → 7-Speed Dual Clutch Transmission 0CK; Rep. Gr.39; Seals; Right Seal, Replacing.
8 - Selector Lever
- Removing and installing. Refer to → 7-Speed Dual Clutch Transmission 0CK; Rep. Gr.34; Gearshift Mechanism; Selector Shaft Seal, Replacing.
9 - Selector Shaft Seal. Refer to → 7-Speed Dual Clutch Transmission 0CK; Rep. Gr.34; Gearshift Mechanism; Selector Shaft Seal, Replacing.
- Replacing
10 - Left Flange Shaft
- Removing and installing. Refer to → 7-Speed Dual Clutch Transmission 0CK; Rep. Gr.39; Differential; Left Flange Shaft, Removing and Installing.
11 - Clutch Cover Seal
- Replacing. Refer to → Chapter "Input Shaft Seal, Replacing".
Left Seal, Replacing
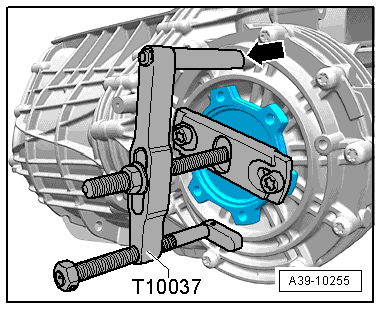
Special tools and workshop equipment required
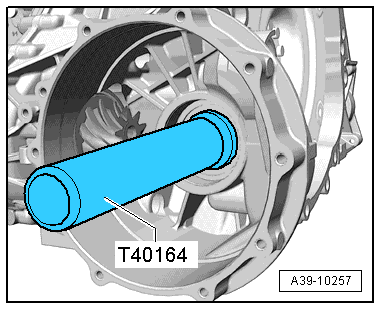
- Seal Installer - Flange Shaft -T40164-
- Puller - Flanged Shaft -T10037-
- Sealing Grease -G 052 128 A1-
- Transmission is secure on the Gearbox Support -T40206-. Refer to → Chapter "Securing on Engine and Transmission Holder"
Removing
- Remove the right flange shaft. Refer to → 7-Speed Dual Clutch Transmission 0CK; Rep. Gr.39; Differential; Right Flange Shaft, Removing and Installing.
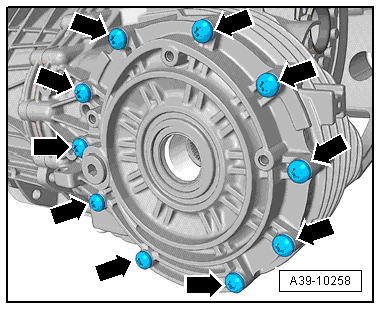
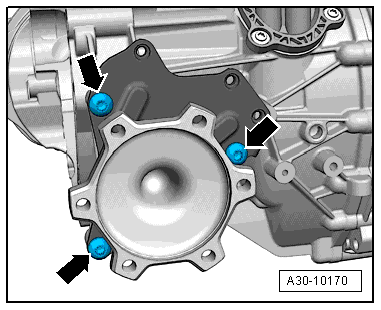
Remove the bolts -arrows- and the final drive cover.
 Caution
Danger of causing damage to the differential.
- Slowly and carefully remove final drive cover from transmission housing. Otherwise differential can fall out of transmission.
- A differential that has fallen out can no longer be installed. If differential falls out, transmission must be replaced.
- Carefully remove the front final drive cover. At the same time some transmission fluid will drain out.
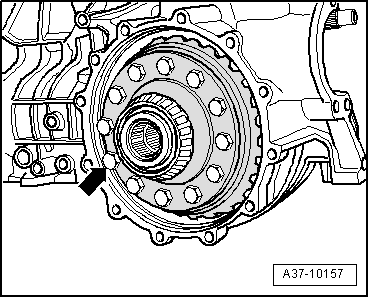
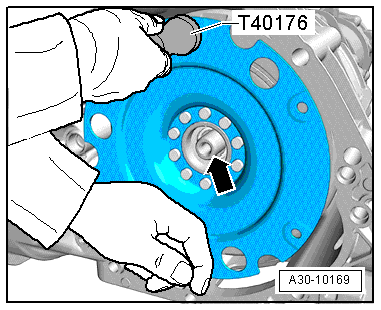
- Carefully remove the differential -arrow- and lay it on a soft support.
- Remove the left flange shaft. Refer to → 7-Speed Dual Clutch Transmission 0CK; Rep. Gr.39; Differential; Left Flange Shaft, Removing and Installing.
- Remove the flywheel. Refer to → Chapter "Flywheel, Removing and Installing".
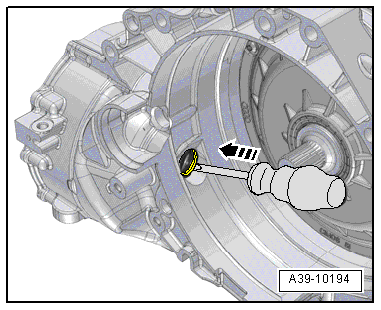
- Pry out the shaft seals with a screwdriver.
Caution
Danger of damaging the seating surface in the transmission housing.
Position the screwdriver carefully.
Installing
Install in reverse order of removal while noting the following:
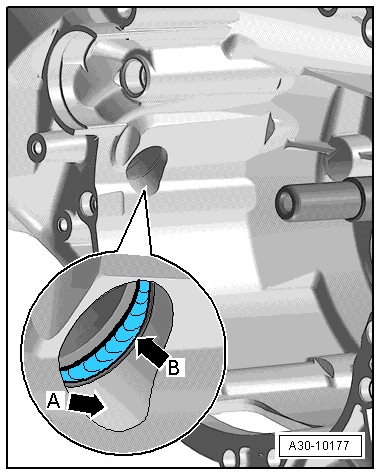
- Always clean the transmission housing in the area where the differential is accessed -arrow A- and the shaft seal seat -arrow B-.
- Lightly coat the new seal on the outside with oil and install it using the Seal Installer - Flange Shaft -T40164-.
- The open side of the seal faces the Thrust Piece for Final Drive at Gearbox -T40164-.
- Install the shaft seal all the way. Be careful not to bend it.
- Fill the space between the sealing/dust lip halfway with Sealing Grease -G 052 128 A1-.
- Install the differential -arrow-.
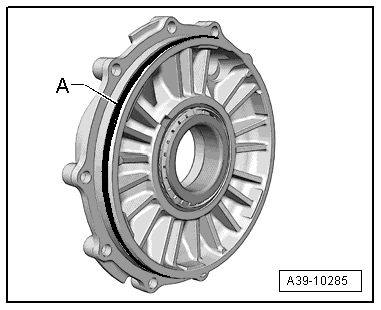
- Replace the O-ring -A- on the front final drive cover and coat it with transmission fluid.
- Insert the final drive cover and tighten the bolts -arrows-. Tightening specification. Refer to → Fig. "Final Drive Cover - Tightening Specification and Sequence".
- Installing the right flange shaft. Refer to → 7-Speed Dual Clutch Transmission 0CK; Rep. Gr.39; Differential; Right Flange Shaft, Removing and Installing.
- Install the flywheel. Refer to → Chapter "Flywheel, Removing and Installing".
- Installing the left flange shaft. Refer to → 7-Speed Dual Clutch Transmission 0CK; Rep. Gr.39; Differential; Left Flange Shaft, Removing and Installing.
Right Seal, Replacing
Description of the Procedure. Refer to → 7-Speed Dual Clutch Transmission 0CK; Rep. Gr.39; Seals; Right Seal, Replacing.
READ NEXT:
 Differential
Overview - Differential
1 - Left Flange Shaft Seal
Replacing. Refer to
→ Chapter "Left Seal, Replacing".
2 - Shim
Behind the taper roller bearing outer race
3 -
General, Technical data
Technical Data
Identification
The following details can be found on the transmission
housing -arrows-:
Codes
Serial Number
Production Date
Capacities
Safety Precautions
General Safety Precauti
SEE MORE:
Electrically Driven A/C Compressor, Rinsing (Remove Refrigerant Oil)
Vehicles with a High Voltage System (Hybrid Vehicles)
Extremely Dangerous Due to High-Voltage
The high-voltage system is under high-voltage. Death or serious
bodily injury by electric shock.
- Individuals with electronic/medical life- and health sustaining
machines in or on their person canno
Seat Heating Element, Removing and Installing
Removing
- Separate the cover and cushion. Refer to
→ Chapter "Cover and Cushion, Separating, Bench Seat".
- Disconnect the wire -3- directly
from the old heating element -1-.
Note
The old heating elements remain on the cushion and will be
covered over by the new heating
