Audi A4: Seat Belts
Component Location Overview - Seat Belts and Mounting Points
 Note
Note
The Avant is shown.
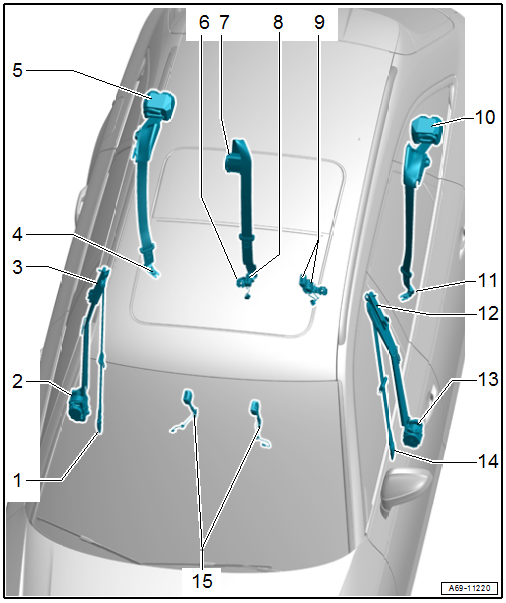
1 - Front Belt End Fitting
- Overview. Refer to → Chapter "Overview - Front Three-Point Seat Belt".
2 - Automatic Belt Retractor
- For the front three-point seat belt
- With:
- Front Passenger Seat Belt Tensioner Igniter 1 -N154-
- Front Passenger Belt Force Limiter -G552-
- Vehicle/market-specific versions with electric seat belt tensioner: Right Front Seat Belt Tensioner Control Module -J855-
- Overview. Refer to → Chapter "Overview - Front Three-Point Seat Belt".
3 - Belt Height Adjuster/Front Seat Belt Guide
- Overview. Refer to → Chapter "Overview - Front Three-Point Seat Belt".
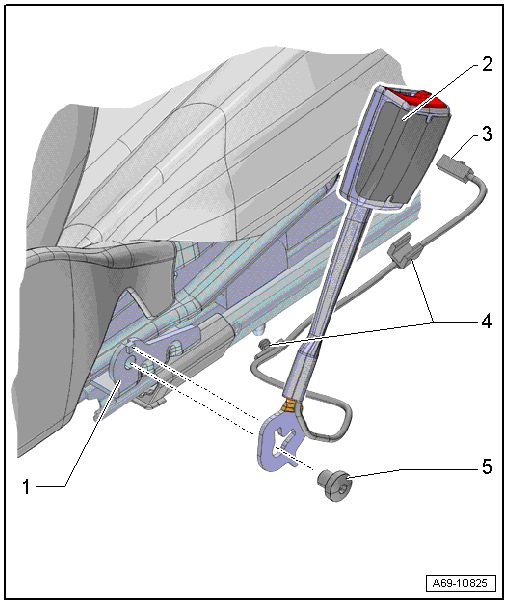
4 - Rear Belt End Fitting
- Overview. Refer to → Chapter "Overview - Outer Rear Three-Point Seat Belt".
5 - Automatic Belt Retractor
- For the rear three-point seat belt
- With Passenger Side Rear Seat Belt Tensioner Igniter -N197-
- Overview. Refer to → Chapter "Overview - Outer Rear Three-Point Seat Belt".
6 - Center Rear Belt End Fitting
- Overview. Refer to → Chapter "Overview - Rear Center Three-Point Seat Belt".
7 - Automatic Belt Retractor
- For the rear three-point seat belt in the center
- Overview. Refer to → Chapter "Overview - Rear Center Three-Point Seat Belt".
8 - Right Rear Seat Belt Latch
- With Passenger Side Rear Seat Belt Switch -E259-
- Overview. Refer to → Chapter "Overview - Rear Seat Belt Latch".
9 - Center/Left Rear Seat Belt Latch
- With
- Center Rear Seat Belt Switch -E609-
- Driver Side Rear Seat Belt Switch -E258-
- Overview. Refer to → Chapter "Overview - Rear Seat Belt Latch".
10 - Automatic Belt Retractor
- For the rear three-point seat belt
- With Driver Side Rear Seat Belt Tensioner Igniter -N196-
- Overview. Refer to → Chapter "Overview - Outer Rear Three-Point Seat Belt".
11 - Rear Belt End Fitting
- Overview. Refer to → Chapter "Overview - Outer Rear Three-Point Seat Belt".
12 - Belt Height Adjuster/Front Seat Belt Guide
- Overview. Refer to → Chapter "Overview - Front Three-Point Seat Belt".
13 - Automatic Belt Retractor
- For the front three-point seat belt
- With:
- Driver Seat Belt Tensioner Igniter 1 -N153-
- Driver Belt Force Limiter -G551-
- Vehicle/market-specific versions with electric seat belt tensioner: Left Front Seat Belt Tensioner Control Module -J854-
- Overview. Refer to → Chapter "Overview - Front Three-Point Seat Belt".
14 - Front Belt End Fitting
- Overview. Refer to → Chapter "Overview - Front Three-Point Seat Belt".
15 - Front Seat Belt Latches
- With
- Driver Seat Belt Switch -E24-
- Front Passenger Seat Belt Switch -E25-
- Overview. Refer to → Chapter "Overview - Front Seat Belt Latch".
Overview - Front Three-Point Seat Belt
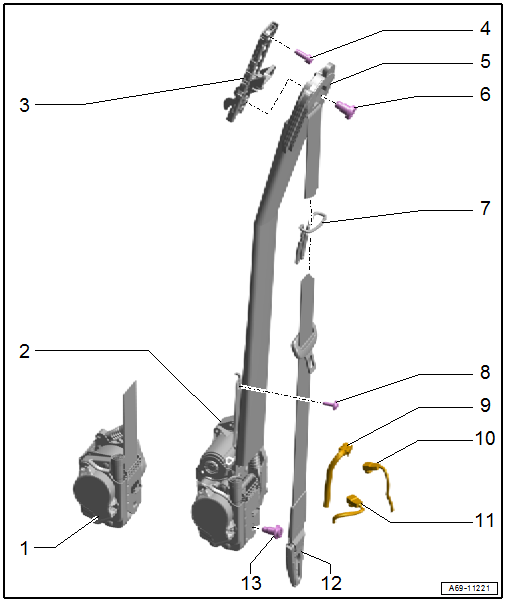
1 - Automatic Belt Retractor without Electric Seat Belt Tensioner
- Removing and installing. Refer to → Chapter "Front Three-Point Seat Belt, Removing and Installing".
2 - Automatic Belt Retractor with Electric Seat Belt Tensioner
- Removing and installing. Refer to → Chapter "Front Three-Point Seat Belt, Removing and Installing".
- The Left Front Seat Belt Tensioner Control Module -J854-/ Right Front Seat Belt Tensioner Control Module -J855- must be adapted after replacing the automatic belt retractors using the Vehicle Diagnostic Tester.
3 - Seat Belt Height Adjuster
- Seat belt height adjuster must be replaced if the belt tensioner has deployed with the belt on
- Removing and installing. Refer to → Chapter "Seat Belt Height Adjuster, Removing and Installing".
4 - Bolt
- 27 Nm
- Replace the bolt if it was removed because of an accident when the seat belt was buckled.
5 - Seat Belt Guide
6 - Bolt
- 45 Nm
- Replace the bolt if it was removed because of an accident when the seat belt was buckled.
7 - Front Seat Belt Guide
- Belt placed in the front belt guide
- Do not jam or damage the belt
- Removing and installing. Refer to → Chapter "Front Seat Belt Guide, Removing and Installing".
8 - Bolt
- 4 Nm
9 - Connector
- For the front seat belt tensioner control module
10 - Connector
- For the seat belt force limiter
11 - Connector
- For the seat belt tensioner igniter 1
12 - Belt End Fitting
- Removing and installing. Refer to → Chapter "Front Belt End Fitting, Removing and Installing".
13 - Bolt
- 45 Nm
- Replace the bolt if it was removed because of an accident when the seat belt was buckled.
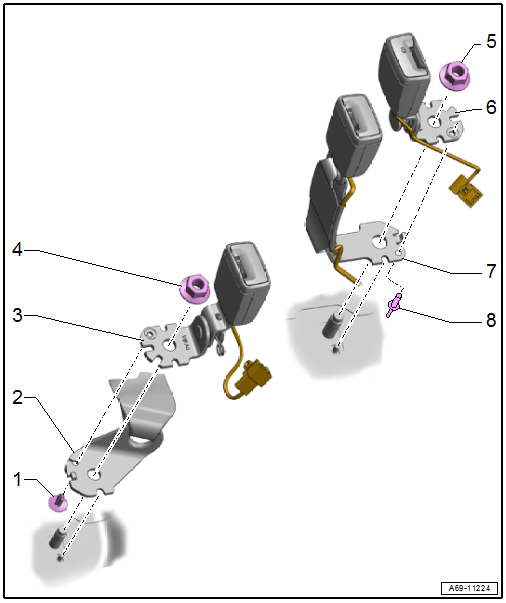
Overview - Outer Rear Three-Point Seat Belt
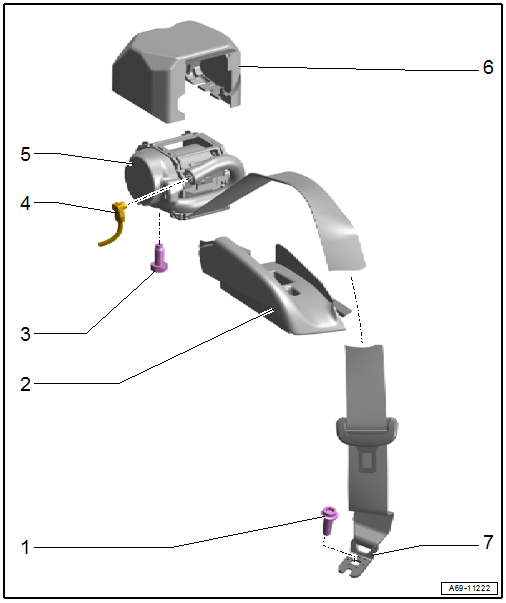
1 - Bolt
- 45 Nm
- Replace the bolt if it was removed because of an accident when the seat belt was buckled.
2 - Belt Guide
- Removing and installing. Refer to → Chapter "Rear Seat Belt Guide, Removing and Installing".
- Place in the bolt heads on the guides on the bracket and pull forward until the catches engage audibly.
3 - Bolt
- 45 Nm
- Replace the bolt if it was removed because of an accident when the seat belt was buckled.
4 - Connector
5 - Automatic Belt Retractor
- Removing and installing. Refer to → Chapter "Rear Three-Point Seat Belt, Removing and Installing".
6 - Noise Insulation
- For the automatic belt retractor
7 - Belt End Fitting
- Removing and installing. Refer to → Chapter "Front Belt End Fitting, Removing and Installing".
Overview - Rear Center Three-Point Seat Belt
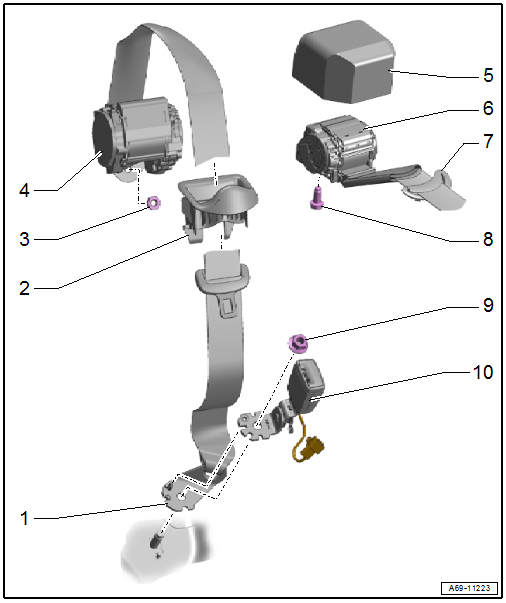
1 - Center Rear Belt End Fitting
- Removing and installing. Refer to → Chapter "Rear Seat Belt Latch, Removing and Installing".
2 - Seat Belt Guide in Rear Seat Backrest
- Replace the entire seat belt guide if damaged.
- Removing and installing. Refer to → Chapter "Seat Belt Guide in Rear Seat Backrest, Removing and Installing".
- Press on until it engages audibly
3 - Nut
- 40 Nm
- Replace the nut if it was removed because of an accident when the seat belt was buckled.
4 - Automatic Belt Retractor in Rear Seat Backrest
- Removing and installing. Refer to → Chapter "Rear Three Point Seat Belt in Folding Backrest, Removing and Installing".
5 - Noise Insulation
- For the automatic belt retractor
6 - Automatic Belt Retractor in Rear Shelf
- Removing and installing. Refer to → Chapter "Rear Three Point Seat Belt in Rear Shelf, Removing and Installing".
7 - Seat Belt Guide in Rear Shelf
- Removing and installing. Refer to → Chapter "Rear Seat Belt Guide in Rear Shelf, Removing and Installing".
- Press on until it engages audibly
8 - Bolt
- 45 Nm
- Replace the bolt if it was removed because of an accident when the seat belt was buckled.
9 - Nut
- Tightening specification -Item 4-.
10 - Seat Belt Latch
- Removing and installing. Refer to → Chapter "Rear Seat Belt Latch, Removing and Installing".
Overview - Front Seat Belt Latch
1 - Front Seat
2 - Front Seat Belt Latch
- Removing and installing. Refer to → Chapter "Front Seat Belt Latch, Removing and Installing".
- Replace the seat belt latch if the belt tensioner has deployed with the belt buckled
3 - Connector
- For the seat belt switch
4 - Cable Holder
- Clipped in the seat frame.
5 - Bolt
- 33 Nm
- Replace the bolt if it was removed because of an accident when the seat belt was buckled.
Overview - Rear Seat Belt Latch
1 - Clip
2 - Center Rear Belt End Fitting
3 - Right Seat Belt Latch
- Removing and installing. Refer to → Chapter "Rear Seat Belt Latch, Removing and Installing".
- Always replaced if the belt tensioner has deployed with the belt on
- Align with the direction of travel when bolting it on
- The locating pin on the floor panel must be in the opening on the seat belt latch bolting surface
4 - Nut
- 45 Nm
- Replace the bolt if it was removed because of an accident when the seat belt was buckled.
5 - Nut
- 45 Nm
- Replace the bolt if it was removed because of an accident when the seat belt was buckled.
6 - Left Seat Belt Latch
- Removing and installing. Refer to → Chapter "Rear Seat Belt Latch, Removing and Installing".
- Always replaced if the belt tensioner has deployed with the belt on
- Align with the direction of travel when bolting it on
- The locating pin on the floor panel must be in the opening on the seat belt latch bolting surface
7 - Center Seat Belt Latch
- Removing and installing. Refer to → Chapter "Rear Seat Belt Latch, Removing and Installing".
- Always replaced if the belt tensioner has deployed with the belt on
- Align with the direction of travel when bolting it on
- The locating pin on the floor panel must be in the opening on the seat belt latch bolting surface
8 - Pop Rivet
READ NEXT:
 Front Three-Point Seat Belt, Removing and Installing
Caution
This procedure contains mandatory replaceable parts.
Refer to component overview and parts catalog prior to
starting procedure.
Mandatory Replacement Parts
Bolt - Automatic Belt R
Rear Three-Point Seat Belt, Removing and Installing
Outer Rear Three-Point Seat Belt, Removing and Installing, Sedan
Caution
This procedure contains mandatory replaceable parts.
Refer to component overview and parts catalog prior to
starting
Rear Seat Belt Guide, Removing and Installing
Seat Belt Guide in Rear Seat Backrest, Removing and Installing
Special tools and workshop equipment required
Trim Removal Wedge -3409-
Removing
- Remove the center rear belt end fitting. Refer
SEE MORE:
Camera-based traffic sign recognition
Description
Applies to: vehicles with camera-based traffic sign recognition
Fig. 104 Instrument cluster: traffic sign recognition
The traffic sign recognition shows the traffic
signs detected by the front camera in the instrument
cluster display and in the head-up display*.
Data from the navigat
Component Location Overview - Navigation System
1 - Bracket
2 - Bolt
3 Nm
Quantity: 2
3 - Information Electronics Control Module 1 -J794-
Connector assignment. Refer to
→ Wiring diagrams, Troubleshooting & Component locations.
Removing and installing. Refer to
→ Chapter "Information E
