Audi A4: Thorax Airbags
Audi A4 (B9) 2016-2026 Service Manual / Body / Body Interior / Passenger Protection, Airbags, Seat Belts / Thorax Airbags
Overview - Front Thorax Airbag
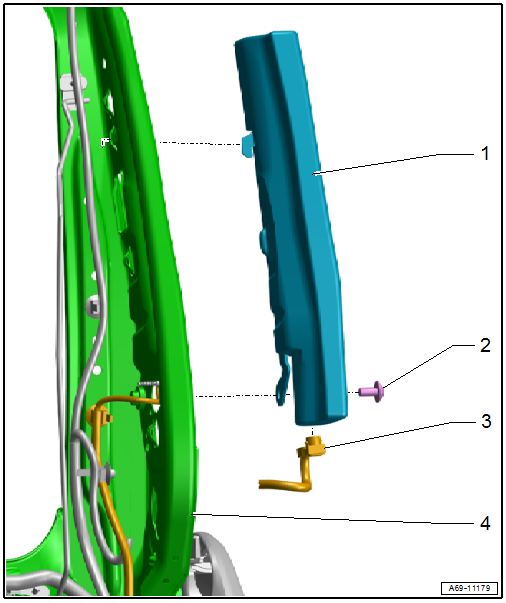
1 - Front Thorax Airbag
- With
- Driver Thorax Airbag Igniter -N199-
- Front Passenger Thorax Airbag Igniter -N200-
 WARNING
Risk of injury due to involuntary deployment.
Pay attention to the safety precautions when working with pyrotechnic components. Refer to → Chapter "Safety Precautions when Working with Pyrotechnic Components".
- Removing and installing. Refer to → Chapter "Front Thorax Airbag with Igniter, Removing and Installing".
2 - Bolt
- 10 Nm
- Replace after removing
- Clean the threaded hole for the bolt with for example a thread tap.
- Install with locking compound. Refer to the Parts Catalog for the locking compound.
3 - Wire
- From Driver Thorax Airbag Igniter -N199-/Front Passenger Thorax Airbag Igniter -N200- directly to the connector station
- Removing and installing. Refer to → Chapter "Thorax Airbag Wire, Removing and Installing".
4 - Backrest Frame
Overview - Rear Thorax Airbag
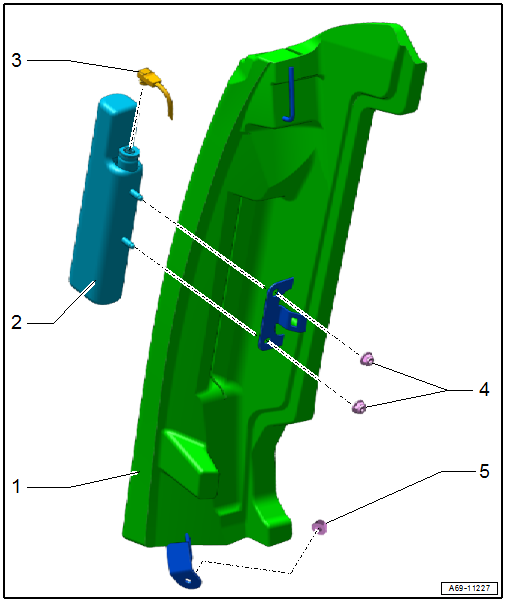
1 - Side Cushion
- Removing and installing. Refer to → Chapter "Rear Thorax Airbag with Igniter, Removing and Installing".
2 - Rear Thorax Airbag
- With
- Driver Side Rear Thorax Airbag Igniter -N201-
- Passenger Side Rear Thorax Airbag Igniter -N202-
WARNING
Risk of injury due to involuntary deployment.
Pay attention to the safety precautions when working with pyrotechnic components. Refer to → Chapter "Safety Precautions when Working with Pyrotechnic Components".
- Removing and installing. Refer to → Chapter "Rear Thorax Airbag with Igniter, Removing and Installing".
3 - Connector
- For
- Driver Side Rear Thorax Airbag Igniter -N201-
- Passenger Side Rear Thorax Airbag Igniter -N202-
4 - Nuts
- 6 Nm
- Replace after removing
- Install with locking compound. Refer to the Parts Catalog for the locking compound.
5 - Nut
- Tightening specification. Refer to → Chapter "Overview - Rear Seat Backrest, Folding Backrest".
READ NEXT:
 Front Thorax Airbag with Igniter, Removing and Installing
Caution
This procedure contains mandatory replaceable parts.
Refer to component overview and parts catalog prior to
starting procedure.
Mandatory Replacement Parts
Bolt - Front Thorax Air
Rear Thorax Airbag with Igniter, Removing and Installing
Caution
This procedure contains mandatory replaceable parts.
Refer to component overview and parts catalog prior to
starting procedure.
Mandatory Replacement Parts
Nut - Rear Thorax Airba
Head Curtain Airbags
Overview - Head Curtain Airbag
Note
The Avant is shown.
1 - Bolt
5 Nm
Replace after removing
2 - Clip
Quantity: 2
3 - Clip
Only available with -6-
Remo
SEE MORE:
Generator
Generator, Checking
Perform Generator Test
Vehicle Diagnostic Tester is attached.
- Select the Diagnostic mode and
start the diagnostics.
- Select the tab Test Plan.
- Select Select Individual Tests
and choose the following sequence.
Body
Electrical Equipment
27 - Starter, volta
Turbocharger, G-Charger
Turbocharger
All procedures and components are described under:
→ Servicing - 4-Cylinder 2.0L 4V TFSI Engine; Rep. Gr.21; Turbocharger;
Turbocharger, Removing and Installing.
Charge Air System
Overview - Charge Air System
1 - Charge Air Cooler
Removing and installing.
© 2019-2026 Copyright www.audia4b9.com
