Audi A4: Seat Forward/Back Adjuster, Removing and Installing
Seat Forward/Back Adjuster, Removing and Installing, Seat Forward/Back Adjustment Handle
Removing
- Unscrew the front seat and tip to the rear with the wires attached. Refer to → Chapter "Front Seat, Removing and Installing".
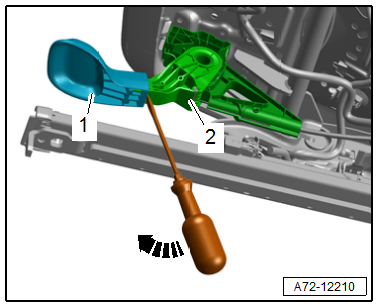
- To release the handle push a flat-head screwdriver between the handle -1- and the handle mount -2-.
- Remove the seat forward/back adjustment handle from the handle mount -arrow-.
Installing
Install in reverse order of removal.
Installation instructions: For example tightening specifications, replacing components. Refer to → Chapter "Overview - Seat Pan, Seat without Seat Depth Adjuster".
Seat Forward/Back Adjuster, Removing and Installing, Seat Forward/Back Adjuster Release Cable
 Caution
This procedure contains mandatory replaceable parts. Refer to component overview and parts catalog prior to starting procedure.
Mandatory Replacement Parts
- Handle - for Release Cable
- Bolt - Release Cable to Seat Pan
Removing
 WARNING
Risk of injury due to involuntary deployment.
- Pay attention to the safety precautions when working with pyrotechnic components. Refer to → Chapter "Safety Precautions when Working with Pyrotechnic Components".
- Before handling pyrotechnic components (For example, disconnecting the connector), the person handling it must "discharge static electricity". For example, this can be done by briefly touching the door striker.
- Remove the front seat. Refer to → Chapter "Front Seat, Removing and Installing".
- Fasten the front seat on the -VAS6136-. Refer to → Chapter "Front Seat, Mounting on Fixture for Seat Repair".
- Remove the cover and cushion from the seat pan in the area of the threaded connection. Refer to → Chapter "Seat Pan Cover and Cushion, Removing and Installing".
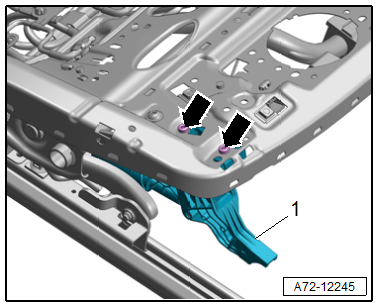
- Remove the bolts -arrows-.
- Remove the lever -1- with the seat forward/back adjuster release cable from the seat pan.
- Unclip the lower seat forward/back adjuster release cable from the seat pan.
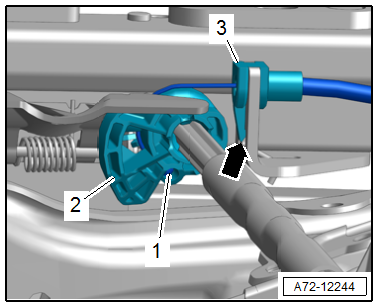
- Release the tab -arrow- to disengage the release cable support bracket -3- from the bracket on the seat pan.
- Disengage the release cable -1- from the seat forward/back adjustment release lever -2- and remove.
Installing
WARNING
Repairing pyrotechnic components (For example the airbag and seat belt tensioner) incorrectly increases the risk of unintentional deployments when the battery is connected.
- Pay attention to the safety precautions when working with pyrotechnic components. Refer to → Chapter "Safety Precautions when Working with Pyrotechnic Components".
- Before handling pyrotechnic components (For example, connecting a connector), the person handling it must "discharge static electricity". For example, this can be done by briefly touching the door striker.
- Follow all the instructions when installing the front seat. Refer to → Chapter "Front Seat, Removing and Installing".
Install in reverse order of removal.
Installation instructions: For example tightening specifications, replacing components. Refer to → Chapter "Overview - Seat Pan, Seat without Seat Depth Adjuster".
Seat Forward/Back Adjuster, Removing and Installing, Seat Forward/Back Adjustment Motor
Caution
This procedure contains mandatory replaceable parts. Refer to component overview and parts catalog prior to starting procedure.
Mandatory Replacement Parts
- Bolt - Seat Pan Lower Frame to Seat Pan Upper Frame
 Note
Note
The Driver Seat Forward/Back Adjustment Motor -V28-/ Front Passenger Seat Forward/Back Adjustment Motor -V31- is integrated into the seat pan lower frame. The motor cannot be replaced separately.
Removing
WARNING
Risk of injury due to involuntary deployment.
- Pay attention to the safety precautions when working with pyrotechnic components. Refer to → Chapter "Safety Precautions when Working with Pyrotechnic Components".
- Before handling pyrotechnic components (For example, disconnecting the connector), the person handling it must "discharge static electricity". For example, this can be done by briefly touching the door striker.
- Move the front seat to the highest position possible to keep the torsion bar tension as low as possible.
- Remove the front seat. Refer to → Chapter "Front Seat, Removing and Installing".
- Fasten the front seat on the -VAS6136-. Refer to → Chapter "Front Seat, Mounting on Fixture for Seat Repair".
- Remove the front and rear cover for the seat rail. Refer to → Chapter "Front and Rear Seat Rail Cover, Removing and Installing".
- Remove the center seat rail cover. Refer to → Chapter "Center Seat Rail Cover, Removing and Installing".
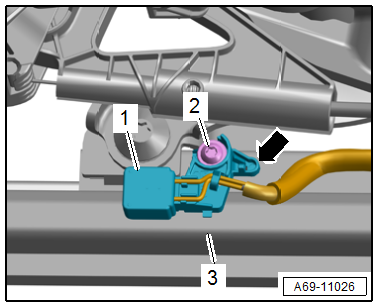
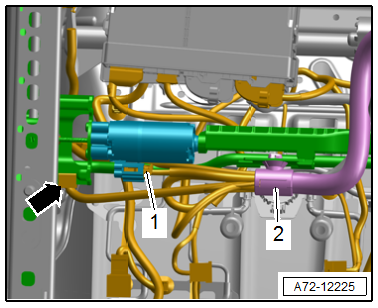
- Remove the bolt -2- and unclip the seat position sensor -1- from the seat pan lower frame -3--arrow- and disengage.
- Remove the front seat belt latch from the seat rail on the tunnel side and move it to the side with the wire still connected. Refer to → Chapter "Front Seat Belt Latch, Removing and Installing".
- Unclip the rear bracket -2- for the wire routing on the seat pan with a screwdriver.
- Disconnect the connector -1- on the seat forward/back adjustment motor.
- Free up the wire -arrow-.
- Support the seat pan upper frame with the backrest so that it cannot fall down when separating it from the lower frame and become damaged.
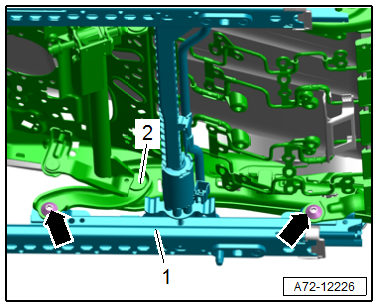
- Remove the front and rear bolts -arrows- on the left and right sides.
- Remove the seat pan upper frame -2- with the backrest form the lower frame -1- and place it on a clean surface.
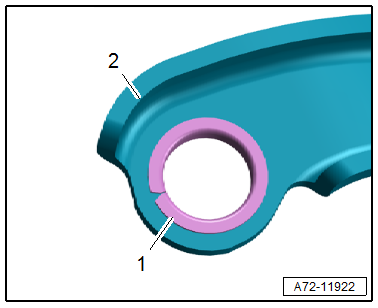
Caution
Risk of damaging the bushings -1- in the bearing points -2- (upper/lower frame bolted connection).
- The bushings cannot be replaced with workshop materials.
- If the bushings are damaged, the corresponding parts must be replaced.
Installing
WARNING
Repairing pyrotechnic components (For example the airbag and seat belt tensioner) incorrectly increases the risk of unintentional deployments when the battery is connected.
- Pay attention to the safety precautions when working with pyrotechnic components. Refer to → Chapter "Safety Precautions when Working with Pyrotechnic Components".
- Before handling pyrotechnic components (For example, connecting a connector), the person handling it must "discharge static electricity". For example, this can be done by briefly touching the door striker.
- Follow all the instructions when installing the front seat. Refer to → Chapter "Front Seat, Removing and Installing".
Install in reverse order of removal.
Installation instructions: For example tightening specifications, replacing components. Refer to → Chapter "Overview - Seat Pan, Power Seat Forward/Back Adjustment".
Seat Height Adjuster, Removing and Installing
Seat Height Adjuster, Removing and Installing, Seat Height Adjustment Handle
Special tools and workshop equipment required
- Trim Removal Wedge -3409-
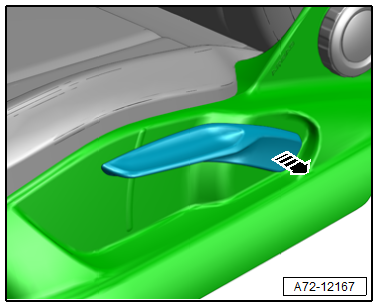
Removing
- Remove the seat height adjuster handle from the seat to the side -arrow-.
Installing
Install in reverse order of removal.
Installation instructions: For example tightening specifications, replacing components. Refer to → Chapter "Overview - Seat Pan, Trim Panels".
Seat Height Adjuster, Removing and Installing, Seat Height Adjustment Motor
Special tools and workshop equipment required
- Engine/Transmission Holder - Seat Repair Fixture -VAS6136-
Removing
WARNING
Risk of injury due to involuntary deployment.
- Pay attention to the safety precautions when working with pyrotechnic components. Refer to → Chapter "Safety Precautions when Working with Pyrotechnic Components".
- Before handling pyrotechnic components (For example, disconnecting the connector), the person handling it must "discharge static electricity". For example, this can be done by briefly touching the door striker.
- Move the front seat to the highest position possible to keep the torsion bar tension as low as possible.
- Remove the front seat. Refer to → Chapter "Front Seat, Removing and Installing".
- Fasten the front seat on the -VAS6136-. Refer to → Chapter "Front Seat, Mounting on Fixture for Seat Repair".
- Remove the seat pan cover and cushion. Refer to → Chapter "Seat Pan Cover and Cushion, Removing and Installing".
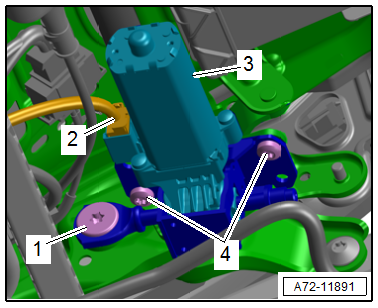
- Disconnect the connector -1- at seat height adjustment motor.
- Remove the bolts -2-.
- Loosen the motor -3- for the seat height adjustment from the seat pan and remove.
Installing
WARNING
Repairing pyrotechnic components (For example the airbag and seat belt tensioner) incorrectly increases the risk of unintentional deployments when the battery is connected.
- Pay attention to the safety precautions when working with pyrotechnic components. Refer to → Chapter "Safety Precautions when Working with Pyrotechnic Components".
- Before handling pyrotechnic components (For example, connecting a connector), the person handling it must "discharge static electricity". For example, this can be done by briefly touching the door striker.
- Follow all the instructions when installing the front seat. Refer to → Chapter "Front Seat, Removing and Installing".
Install in reverse order of removal.
Installation instructions: For example tightening specifications, replacing components. Refer to → Chapter "Overview - Seat Pan, Seat Height Adjustment".
Seat Angle Adjuster, Removing and Installing
Caution
This procedure contains mandatory replaceable parts. Refer to component overview and parts catalog prior to starting procedure.
Mandatory Replacement Parts
- Bolt - Angle Adjustment Motor to Adjustment Shaft
Removing
- Move the front seat into its highest position.
- Unscrew the front seat and tip to the rear with the wires attached. Refer to → Chapter "Front Seat, Removing and Installing".
Caution
Risk of damage to the bushing in the bearing point (adjusting spindle/seat pan threaded connection -1-).
- The bushing cannot be replaced with workshop materials.
- If the bushing is damaged, the corresponding assembly parts must be replaced.
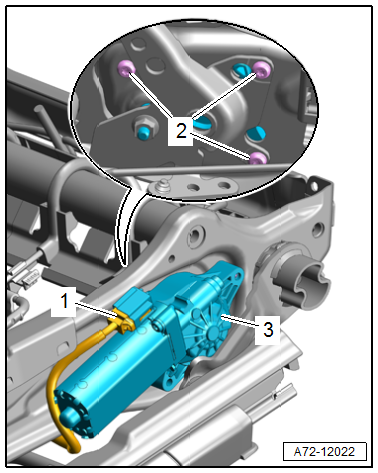
- Remove the bolt -1- for the seat angle adjustment motor adjusting spindle.
- Disconnect the connector -2- on the seat angle adjustment motor.
- Remove the bolts -4- and remove the seat angle adjuster motor -3-.
Installing
Install in reverse order of removal.
Installation instructions: For example tightening specifications, replacing components. Refer to → Chapter "Overview - Seat Pan, Seat Angle Adjuster".
READ NEXT:
 Backrest Adjuster, Removing and Installing
Backrest Adjustment Hand Wheel, Removing and Installing
Special tools and workshop equipment required
Assembly Tool -3399-
Removing
- Move the front seat all the way forward into its highest
Front Backrest, Removing and Installing
Front Backrest, Removing and Installing
Special tools and workshop equipment required
Engine/Transmission Holder - Seat Repair Fixture -VAS6136-
Caution
This procedure contains mandatory r
Headrest, Removing and Installing
Removing
- Set the backrest toward the rear at an angle.
- Grip the rear cover -1- at the
lower edge and push it upward out of the locking mechanism in
the direction of -arrows-.
- Mo
SEE MORE:
Air Filter
Overview - Air Filter Housing
1 - Snow Screen
Market-Specific Version
2 - Air Duct
On the lock carrier
Clean off any salt and dirt
3 - Water Drain
Clean
4 - Mount
For the air filter housing
5 - Sealing Piece
6 - Air Duct
Mar
Electromechanical
parking brake
Operating the parking brake
The electromechanical parking brake is used to
secure the vehicle from rolling away unintentionally.
The switch is located under the
selector lever
in the center console. It turns on when the parking
brake is set. You can release the parking
brake manually or automatic
