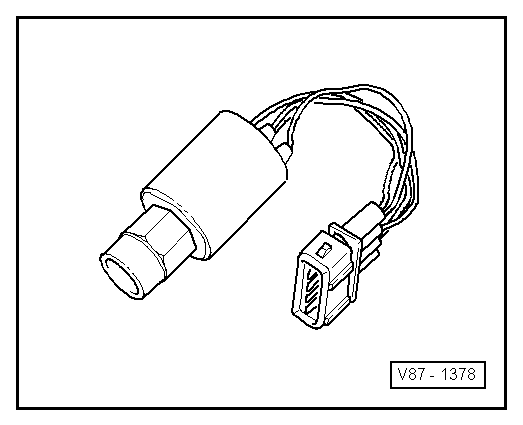
Audi A4: A/C Pressure Switch -F129-
 Note
Note
Switch pressures, removing and installing switches as well as switch arrangement and version. Refer to vehicle specific refrigerant circuit → Heating, Ventilation and Air Conditioning; Rep. Gr.87; System Overview - Refrigerant Circuit (vehicle-specific repair manual).
This pressure switch has 3 functions:
1. Switches the coolant fan to the next higher level when the pressure in the refrigerant circuit increases (approximately 16 bar (232 psi) ).
2. Switches off A/C system if pressure is excessive (approximately 32 bar (464 psi) ), for example because of insufficient engine cooling.
3. Switches off A/C system if pressure is insufficient (approximately 2 bar (29 psi) ), for example loss of refrigerant.
Note
A/C Pressure Switch -F129- replaces the A/C Refrigerant High Pressure Switch -F23-, A/C Refrigerant Low Pressure Switch -F73- and the Magnetic Clutch High Pressure Switch -F118-.
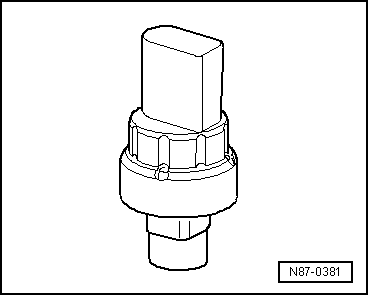
High Pressure Sensor -G65-, Refrigerant Circuit Pressure Sensor -G805-
- This High Pressure Sensor -G65- is installed instead of the A/C Pressure Switch -F129- or the A/C Pressure/Temperature Sensor -G395-.
- The Refrigerant Circuit Pressure Sensor -G805- replaces the High Pressure Sensor -G65- on specific vehicles from a specific version and from a specific date of manufacture.
- When a voltage is applied, a version of the High Pressure Sensor -G65- generates a square wave signal and the others a data telegram. This signal changes along with pressure in the system. When voltage is applied, the other versions and the Refrigerant Circuit Pressure Sensor -G805- exchange information with the Data bus (i.e. via the "LIN-Bus") with the corresponding control module. Refer to → Heating, Ventilation and Air Conditioning; Rep. Gr.87; System Overview - Refrigerant Circuit (vehicle-specific repair manual).
- On Audi A3 from MY 2005 and Audi Q3. a High Pressure Sensor -G65- is installed, for example, which emits its measured values to the corresponding control module (for example to the A/C Control Module -J301- or the Climatronic Control Module -J255-). On Audi Q7 from MY 2016, a High Pressure Sensor -G65- is installed, for example, which sends its measured values via a "LIN Bus". Use the Vehicle Diagnostic Tester ("OBD" function or A/C system "Guided Fault Finding") and → Wiring diagrams, Troubleshooting & Component locations.
- The Refrigerant Circuit Pressure Sensor -G805- is installed on the Audi A3 from MY 2013, for example. It exchanges information with the corresponding control module (on Audi A3, the A/C Control Module -J301- or the Climatronic Control Module -J255-) via a data bus cable. Refer to → Wiring diagrams, Troubleshooting & Component locations
- The A/C Pressure/Temperature Sensor -G395-, the Refrigerant Circuit Pressure Sensor -G805- and the High Pressure Sensor -G65- are available in different versions. Currently the sensor's only exterior difference is the parts number. Therefore, make sure that the part numbers are correctly allocated when replacing them (part number Parts Catalog ). Reason: These sensors produce different signals that can only be evaluated by the respective control modules using the → Vehicle Diagnostic Tester (function "OBD" or "Guided Fault Finding" for the A/C system). Refer to → Heating, Ventilation and Air Conditioning; Rep. Gr.87; System Overview - Refrigerant Circuit (vehicle-specific repair manual).
- The High Pressure Sensor -G65- and the Refrigerant Circuit Pressure Sensor -G805- only transmits the measured value for the refrigerant circuit pressure to the connected control module. The A/C Pressure/Temperature Sensor -G395- transmits the measured value for the refrigerant circuit pressure and the measured temperature to the connected control module. Even though only the pressure signal is evaluated on a vehicle, an A/C Pressure/Temperature Sensor -G395- is not and must not be installed on a vehicle for which a High Pressure Sensor -G65- or a Refrigerant Circuit Pressure Sensor -G805- is designed. Refer to Parts Catalog.
- The downstream control modules (Radiator Fan Control Module, Engine Control Module, Front A/C Display Control Head -E87- or Climatronic Control Module -J255-, etc.) use this signal to calculate the refrigerant circuit pressure and activate the radiator fans, the motor, and the A/C Clutch -N25- if necessary, or to change the activation of the A/C Compressor Regulator Valve -N280-. Use the Vehicle Diagnostic Tester ("OBD" or "Guided Fault Finding" function). Refer to → Heating, Ventilation and Air Conditioning; Rep. Gr.87; Refrigerant Circuit; System Overview - Refrigerant Circuit (vehicle-specific repair manual).
READ NEXT:
 A/C Pressure/Temperature Sensor
There are different versions of this sensor with different
functions and with different names. For exact name, allocation
and notes doe the respective function, refer to
→ Heating, Ventilatio
Refrigerant Circuit Pressures and Temperatures
General Information
Caution
When performing work on refrigerant circuit, observe
all generally applicable safety precautions and pressure
container regulations.
The pressures and temperatur
Pressure Gauge, Tests and Measurements
General Information
Indicators on pressure gauge
1 - Temperature scale for refrigerant R134a CF3-CH2F or
CH2F-CF3.
2 - Pressure scale
Note
Pressure is measured in differe
SEE MORE:
Radiator, Removing and Installing
Special tools and workshop equipment required
Coolant Collection System -VAS5014- or Shop Crane - Drip
Tray -VAS6208-
Elbow Assembly Tool -T10118-
Caution
This procedure contains mandatory replaceable parts.
Refer to component overview and parts catalog prior to
starting procedure.
M
Rear Lid Closing Assist Motor -V382-, Removing and Installing
TIP
The procedure only refers to the Avant.
Removing
- Remove the rear lid lower trim panel. Refer to
→ Body Interior; Rep. Gr.70; Luggage Compartment Trim Panels;
Rear Lid Lower Trim Panel, Removing and Installing.
- Disengage the support bracket -7-
by releasing the c
