Audi A4: Air Filter
Overview - Air Filter Housing
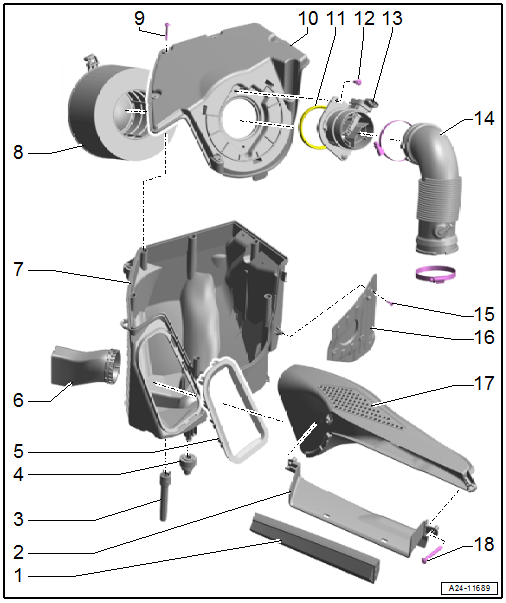
1 - Snow Screen
- Market-Specific Version
2 - Air Duct
- On the lock carrier
- Clean off any salt and dirt
3 - Water Drain
- Clean
4 - Mount
- For the air filter housing
5 - Sealing Piece
6 - Air Duct
- Market-specific with Intake Air Switch-Over Valve -N335-
7 - Air Filter Lower Section
- Clean off any salt and dirt
- Removing and installing. Refer to → Chapter "Air Filter Housing, Removing and Installing".
8 - Air Filter Element
- Use an original air filter element. Refer to the Parts Catalog.
- Replacement intervals. Refer to →Maintenance Intervals; Rep. Gr.03
- Removing and installing.
9 - Bolt
- 3.5 Nm
- Thread cutting
- Position the bolt by hand and tighten it until it finds the old threads. Then tighten the bolt to the specification.
10 - Air Filter Upper Section
- Clean off any salt and dirt
- Removing and installing.
11 - Bolt
- 3.5 Nm
- Thread cutting
- Position the bolt by hand and tighten it until it finds the old threads. Then tighten the bolt to the specification.
12 - Mass Airflow Sensor -G70-
- Removing and installing. Refer to → Chapter "Mass Airflow Sensor -G70-, Removing and Installing".
13 - Air Duct Pipe
- Pay attention to the marks for installing
- Screw-type clamps tightening specification. Refer to → Chapter "Overview - Charge Air Hose Connections".
14 - Bolt
- 1.5 Nm
- Thread cutting
- Position the bolt by hand and tighten it until it finds the old threads. Then tighten the bolt to the specification.
15 - Heat Shield
16 - Air Duct
- On the lock carrier
- Clean off any salt and dirt
17 - Bolt
- 2.5 Nm
- Thread cutting
- Position the bolt by hand and tighten it until it finds the old threads. Then tighten the bolt to the specification.
Air Filter Housing, Removing and Installing
Special tools and workshop equipment required
- Engine Bung Set -VAS6122-
Removing
- Remove the lock carrier cover. Refer to → Body Exterior; Rep. Gr.63; Front Bumper; Attachments, Removing and Installing.
Equipment Version with Air Filter Bypass Door Valve -N275-
- Remove the front wheel spoiler. Refer to → Body Exterior; Rep. Gr.66; Wheel Housing Liner; Front Wheel Housing Liner, Removing and Installing.
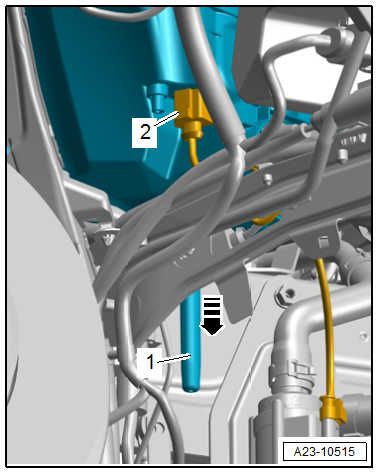
- Disconnect the connector -2- for the Air Filter Bypass Door Valve -N275-.
- Remove the water drain -1- downward -arrow-.
Continuation for All Vehicles
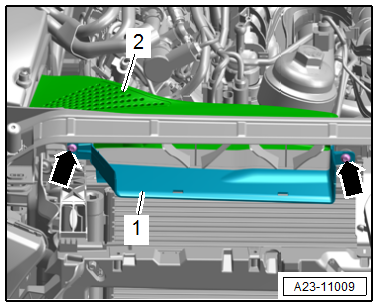
- Remove the bolts -arrows- and the air duct -2- from the lock carrier.
 Note
Note
Ignore item -1-.
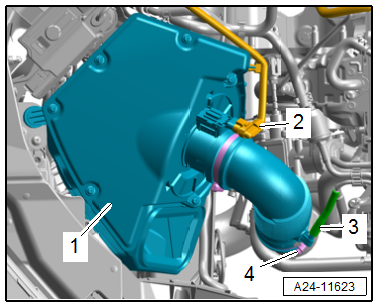
- Disconnect the connector -2- for the Mass Airflow Sensor -G70-.
- Remove the vacuum hose -3-.
- Loosen the hose clamp -4- and remove the air duct hose.
- Pull the air filter housing -1- upward.
- Seal the turbocharger with thoroughly cleaned plugs from the -VAS6122-.
Installing
Install in reverse order of removal and note the following:
Note
- The air filter housing must always be clean.
- Use a silicone-free lubricant for installing the air duct hose.
- Secure all hose connections with hose clamps that match the ones used in series production. Refer to the Parts Catalog.
- Check the water drain in the air filter lower section for dirt and adhesive and clean if necessary.
- Check the air duct from the lock carrier to the air filter housing for dirt.
- Install the lock carrier cover. Refer to → Body Exterior; Rep. Gr.63; Front Bumper; Attachments, Removing and Installing.
Tightening Specifications
- Refer to → Chapter "Overview - Air Filter Housing"
- Refer to → Servicing - 4-Cylinder 2.0L 4V TFSI Engine; Rep. Gr.21; Charge Air System; Overview - Charge Air Hose Connections.
- Refer to → Body Exterior; Rep. Gr.66; Wheel Housing Liner; Overview - Front Wheel Housing Liner.
Intake Manifold
All procedures and components are described under: → Servicing - 4-Cylinder 2.0L 4V TFSI Engine; Rep. Gr.24; Intake Manifold.
Fuel Injectors
All procedures and components are described under: → Servicing - 4-Cylinder 2.0L 4V TFSI Engine; Rep. Gr.24; Fuel Injectors.
READ NEXT:
 Sensors
Intake Air Temperature Sensor -G42-/Manifold Absolute Pressure Sensor
-G71-, Removing and Installing
All procedures are described under:
→ Servicing - 4-Cylinder 2.0L 4V TFSI Engine; Rep
Engine Control Module
Overview - Engine Control Module
1 - Bolt
9 Nm
2 - Mount
For the Engine Control Module -J623-
3 - Engine Control Module -J623-
Before replacing perform the "01 -
Exhaust System, Emissions Controls
Exhaust Pipes/Mufflers
Overview - Muffler
Overview - Muffler, FWD Vehicle
1 - Retaining Loop
Replace if damaged
Exhaust system, installing without tension. Refer to
→ Chapter "Exh
SEE MORE:
Coolant Pump/Coolant Thermostat
Overview - Coolant Pump/Coolant Thermostat
1 - Connection
2 - O-ring
Installation instructions. Refer to
→ Servicing - 4-Cylinder 2.0L 4V TFSI Engine; Rep. Gr.19; Coolant
Pump/Coolant Regulation; Overview - Coolant Pump/Coolant Regulation.
3 - Cen
Special Tools
Special tools and workshop equipment required
Seal Installer - Final Drive/Gearbox -T10337-
Puller - Crankshaft/Power Steering Seal -T20143/1-
Seal Installer - Flange Shaft -T40163-
Seal Installer - Output Shaft -T40239-
Circlip Pliers -VAS5503A-
Used Oil Collection and Extraction Unit -SM
