Audi A4: Overview - Wheel Bearing
Audi A4 (B9) 2016-2026 Service Manual / Chassis / Front Suspension / Wheel Bearing / Overview - Wheel Bearing
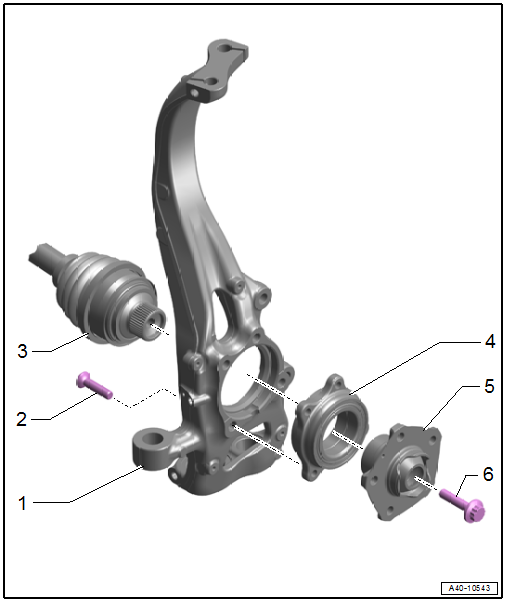
1 - Wheel Bearing Housing
- Removing and installing. Refer to → Chapter "Wheel Bearing Housing, Removing and Installing".
2 - Bolt
- 80 Nm + 90º
- Replace after removing
3 - Drive Axle
4 - Wheel Bearing
- Wheel bearing unit, removing and installing. Refer to → Chapter "Wheel Bearing Unit, Removing and Installing".
- Removing and installing. Refer to → Chapter "Wheel Bearing Unit, Servicing".
- Handling. Refer to → Fig. "Wheel Bearing, Handling"
5 - Wheel Hub
- Removing and installing. Refer to → Chapter "Wheel Bearing Unit, Servicing".
6 - Bolt
- Replace after removing
- Before installing, clean the threads in the CV joint with a thread tap.
- Drive axle threaded connection, loosening and tightening. Refer to → Chapter "Drive Axle Threaded Connection, Loosening and Tightening".
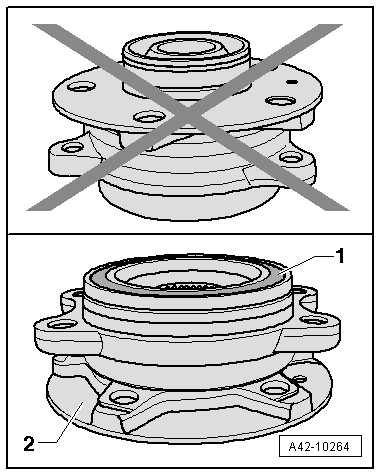
Wheel Bearing, Handling
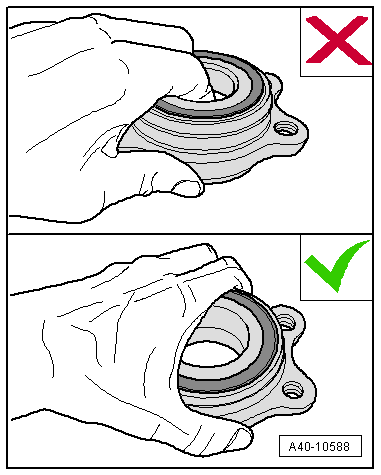
 Caution
There is a risk of contaminating and damaging the seal.
- The wheel bearing -1- must always face up in order to remove the wheel bearing unit.
- Always set the wheel bearing unit down on the wheel hub -2-.
- Never reach inside when lifting the wheel bearing.
- Hold the wheel bearing only on the outside.
READ NEXT:
 Wheel Bearing Housing, Removing and Installing
Special tools and workshop equipment required
Spreader Tool -3424-
Torque Wrench 1332 40-200Nm -VAG1332-
Engine and Gearbox Jack -VAS6931-
Ball Joint Splitter -VAS251805-, not illustrated
Puller
Wheel Bearing Unit, Removing and Installing
Special tools and workshop equipment required
Torque Wrench 1332 40-200Nm -VAG1332-
Caution
This procedure contains mandatory replaceable parts.
Refer to component overview and parts cata
SEE MORE:
Rear Window
Overview - Rear Window
Overview - Rear Window, Sedan
1 -
Rear Window
Removing and installing. Refer to
→ Chapter "Rear Window, Removing and Installing".
Distance to roof: dimension -a- = 2 mm
Distance to C-pillars: dimension -d- =
approximately 3 mm; center if necessary
2
Driver and Front Passenger Seat Heating Element -Z6-/-Z8-, Removing and
Installing
Seat Heating Element, Removing and Installing, Seat Cushion
Procedure
- Separate the cover and cushion. Refer to
→ Chapter "Seat Pan Cover and Cushion, Separating".
- Clip the wires directly at the heating elements.
Note
The old heating elements remain on the cushion and wi
© 2019-2026 Copyright www.audia4b9.com
