Audi A4: Bumper Cover Bracket, Removing and Installing
- Follow the safety precautions. Refer to → Body Interior; Rep. Gr.00; Safety Precautions; Safety Precautions when Working on Pyrotechnic Components.
Removing
- Remove the impact member. Refer to → Chapter "Impact Member, Removing and Installing".
 CAUTION
Pyrotechnic components may deploy unintentionally.
Risk of injury.
- Discharge static electricity by briefly touching the door striker.
- Vehicles with pedestrian protection: Disconnect the connector -1- from the pedestrian protection crash sensor and free up the wiring harness -2-.
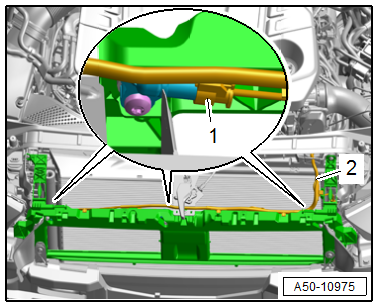
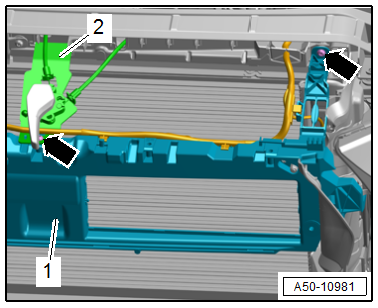
- Remove the bolts -arrows-.
- Push the mounting bracket -2- with the release cable for the release lever hook in the direction of lock carrier.
- Remove the bumper cover bracket -1- forward.
Installing
Install in reverse order of removal and note the following:
- Push the bracket downward before tightening the bolts.
Tightening Specifications
- Refer to → Chapter "Overview - Lock Carrier"
Spring Element for Bumper Cover Bracket, Removing and Installing
Special tools and workshop equipment required
- Pop Rivet Nut Pliers -VAS5072A-
- Drill
- Pop rivets. Refer to the Parts Catalog.
Removing
- Remove the impact member. Refer to → Chapter "Impact Member, Removing and Installing".
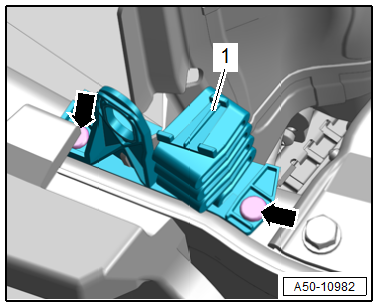
- Drill out the rivet heads -arrows-, drive out the rivet shafts and remove any rivet remnants.
- Remove the spring element -1- for the bumper cover bracket.
Installing
Install in reverse order of removal and note the following:
- Push the spring element all the way down and tighten the bolt.
- Adjust the spring element. Refer to → Chapter "Height, Adjusting using Spring Element".
Tightening Specifications
- Refer to → Chapter "Overview - Lock Carrier"
READ NEXT:
 Fender
Overview - Fender
1 -
Nut
8 Nm
2 -
Outer Fender Brace
Removing and installing. Refer to
→ Chapter "Brace and Outer Fender Brace, Removing and Installing".
3 -&n
Fender, Removing and Installing
Special tools and workshop equipment
required
Pop Rivet Nut Pliers -VAS5072A-
Drill
Pop rivets. Refer to the Parts Catalog.
Follow the safety precautions. Refer to
→ Body Interior; Re
Fender Brace, Removing and Installing
Removing
- Remove the front wheel housing liner. Refer to
→ Chapter "Front Wheel Housing Liner, Removing and Installing".
- Remove the front wheel spoiler. Refer to
→ Chapter
SEE MORE:
General Information
High pressure side are the condenser, receiver/dryer and
restrictor or expansion valve to separate the high and low
pressure liquid ends.
High pressure results from the restrictor or expansion valve
forming a constriction and causing the refrigerant to
accumulate, thus leading to an increase in
Menus and symbols
Fig. 15 MMI: center display
Overview screen
Displays selected information tiles and provides quick access to
certain functions
Quick access bar
Return to the home screen or the overview page, open menus quickly
Display area
Select a menu, apply settings, display content
F
