Audi A4: Fender Brace, Removing and Installing
Removing
- Remove the front wheel housing liner. Refer to → Chapter "Front Wheel Housing Liner, Removing and Installing".
- Remove the front wheel spoiler. Refer to → Chapter "Front Wheel Spoiler, Removing and Installing".
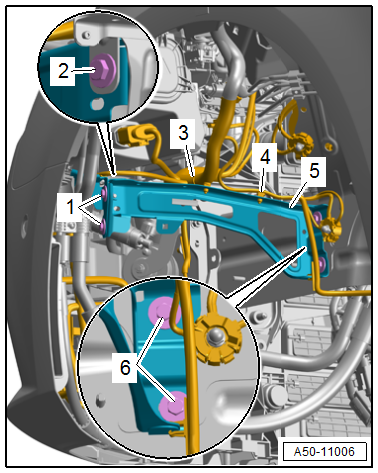
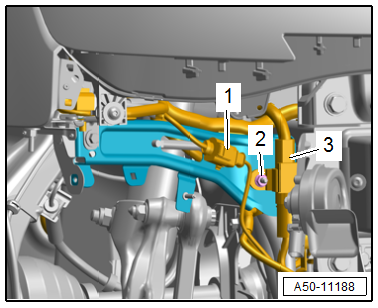
Left Side of Vehicle
- Free up the wiring harnesses -3 and 4-.
- Remove the bolts -1, 2 and 6-.
- Remove the fender brace -5-.
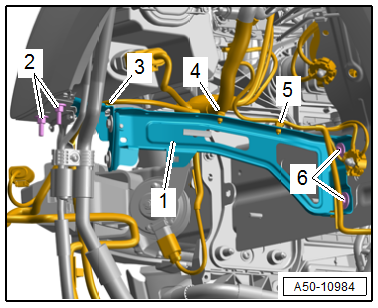
Right Side of Vehicle
- Free up the connector -2-.
- Remove the nut -3- and free up the wiring harness -4-.
- Remove the bolt -1-.
- Free up the wiring harness -2 and 3-.
- Remove the bolts -1 and 4-.
- Remove the fender brace -5-.
Installing
Install in reverse order of removal.
Tightening Specifications
- Refer to → Chapter "Overview - Fender"
Brace and Outer Fender Brace, Removing and Installing
Removing
- Remove the bumper cover mount. Refer to → Chapter "Bumper Cover Mount, Removing and Installing".
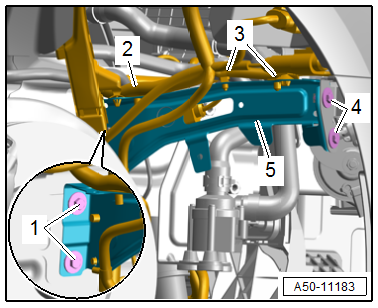
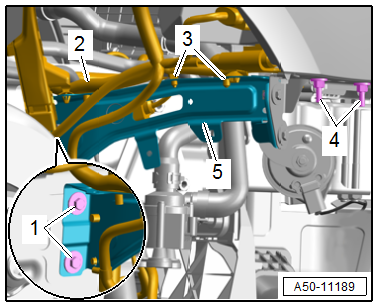
Left Side of Vehicle
- Free up the wiring harnesses -3, 4 and 5-.
- Remove the bolts -6- and the double bolts -2-.
- Remove the fender brace -1-.
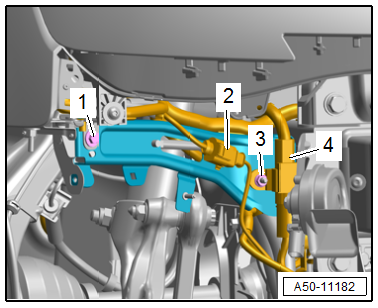
Right Side of Vehicle
- Free up the connector -1-.
- Remove the nut -2- and free up the wiring harness -3-.
- Free up the wiring harness -2 and 3-.
- Remove the bolts -1- and the double bolts -4-.
- Remove the fender brace -5-.
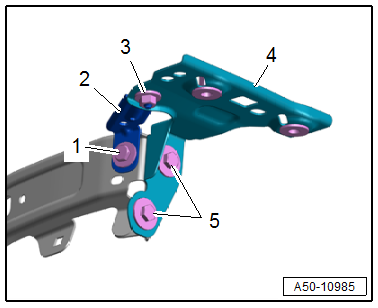
Continuation for Both Vehicle Sides
- Remove the bolts -1 and 5- and the nut -3-.
- Remove the brace -2- and the outer fender brace -4-.
Installing
Install in reverse order of removal.
Tightening Specifications
- Refer to → Chapter "Overview - Fender"
READ NEXT:
 Fender Front Cover, Removing and Installing
Fender Front Cover, Removing and Installing, Small Version
Removing
- Loosen the front wheel housing liner in the front and push it to
the side. Refer to
→ Chapter "Front Wheel Housing L
Bulkhead
Overview - Bulkhead
1 -
Lock Washer
2 -
Heat Shield
Overview. Refer to
→ Chapter "Overview - Heat Shield".
3 -
Pass-Through
For coolant lines
Can be replac
Plenum Chamber Bulkhead, Removing and Installing
Removing
- Remove the engine cover. Refer to
→ Engine Mechanical; Rep. Gr.10; Engine Cover; Engine Cover,
Removing and Installing.
- For vehicles that have a pass-through
SEE MORE:
Audi pre sense front
Applies to: vehicles with Audi pre sense front
Audi pre sense front provides the same scope of
functions as Audi pre sense city, with a few exceptions. The system has an
extensive
field of view due to additional sensors that
are installed. Because of this, vehicles that are
braking or traveling sig
Release Cable, Removing and Installing
Latch Release Cable, Removing and Installing
Removing
- Remove the vehicle electrical system control module bracket.
Refer to
→ Electrical Equipment; Rep. Gr.97; Relay Panels, Fuse Panels,
E-boxes; Component Location Overview - Relay Panels, Fuse
Panels, E-boxes.
- Loo
