Audi A4: Fender Front Cover, Removing and Installing
Fender Front Cover, Removing and Installing, Small Version
Removing
- Loosen the front wheel housing liner in the front and push it to the side. Refer to → Chapter "Front Wheel Housing Liner, Removing and Installing".
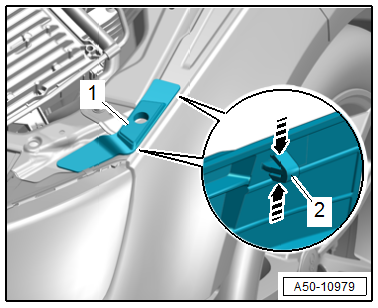
- Release the retainers -2- in the direction of -arrows- and remove the cover -1-.
Installing
Install in reverse order of removal.
Fender Front Cover, Removing and Installing, Large Version
Removing
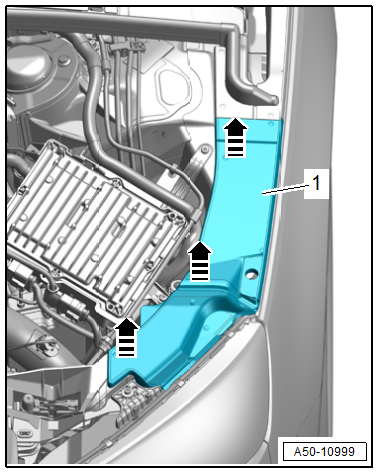
- Pry out the cover -1- in the direction of -arrows-.
Installing
Install in reverse order of removal.
Rear Fender Cover, Removing and Installing
Removing
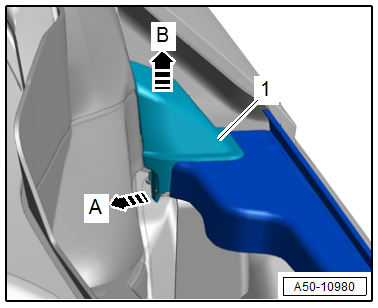
- Release the retainer in the direction of -arrow A- and remove the stop buffer -1- from the threaded pin in the direction of -arrow B-.
- If equipped, remove the large cover for the fender. Refer to → Chapter "Fender Front Cover, Removing and Installing, Large Version".
- Remove the front wheel housing liner. Refer to → Chapter "Front Wheel Housing Liner, Removing and Installing".
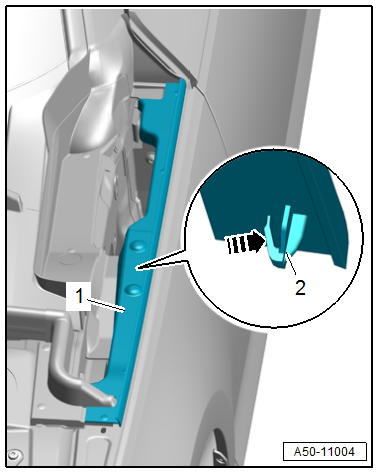
- Release the retainers -2- in the direction of -arrow- and remove the rear cover -1- upward.
Installing
Install in reverse order of removal.
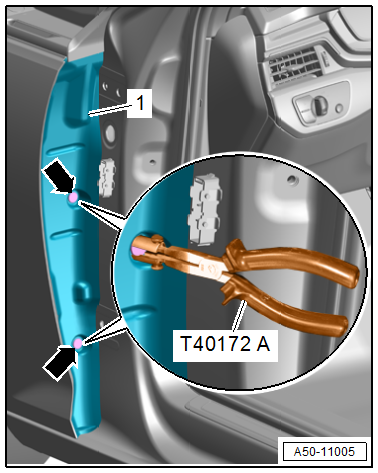
End Panel, Removing and Installing
Special tools and workshop equipment required
- Pliers -T40172C-
- Adapter -T40172/1-
Removing
- Remove the front door. Refer to → Chapter "Door, Removing and Installing".
- Use the -T40172C- with the -T40172/1- to remove the expanding rivets -arrows-.
- Remove the end panel -1- to the rear.
Installing
Install in reverse order of removal.
READ NEXT:
 Bulkhead
Overview - Bulkhead
1 -
Lock Washer
2 -
Heat Shield
Overview. Refer to
→ Chapter "Overview - Heat Shield".
3 -
Pass-Through
For coolant lines
Can be replac
Plenum Chamber Bulkhead, Removing and Installing
Removing
- Remove the engine cover. Refer to
→ Engine Mechanical; Rep. Gr.10; Engine Cover; Engine Cover,
Removing and Installing.
- For vehicles that have a pass-through
SEE MORE:
Mechatronic, Removing and Installing
Special tools and workshop equipment required
Used Oil Collection and Extraction Unit -SMN372500-
Assembly Tool -T40305-
Oil Sump Assembly Pin -T40199-
Electronic Torque Wrench 3-60Nm -VAS6583-
Cover -T40322-
Support -T40321-
Removing
Note
General repair instructions. Refer to
→
Efficiency assist
Description
Applies to: vehicles with efficiency assist
Efficiency assist can assist the driver with predictive
information in order to reduce fuel consumption.
Depending on vehicle equipment, the system
may access data from the navigation system,
the camera behind the windshield, and the radar
s
