Audi A4: Plenum Chamber Bulkhead, Removing and Installing
Removing
- Remove the engine cover. Refer to → Engine Mechanical; Rep. Gr.10; Engine Cover; Engine Cover, Removing and Installing.
- For vehicles that have a pass-through for the coolant lines through the plenum chamber bulkhead, drain the coolant. Refer to → Engine Mechanical; Rep. Gr.19; Cooling System/Coolant; Coolant, Draining and Filling.
- Remove the plenum chamber cover. Refer to → Chapter "Plenum Chamber Cover, Removing and Installing".
- Remove the tower brace. Refer to → Suspension, Wheels, Steering; Rep. Gr.40; Suspension Strut, Upper Control Arm; Tower Brace, Removing and Installing.
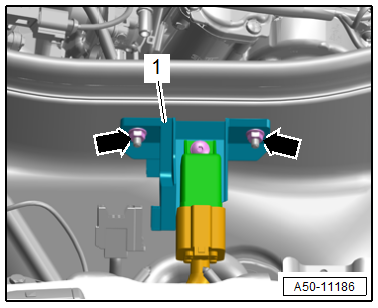
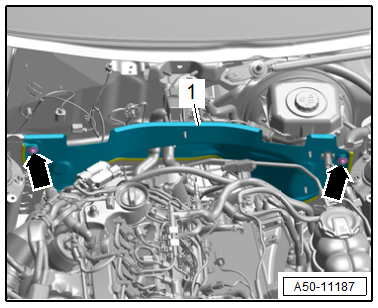
- Remove the nuts -arrows- and remove the bracket -1- with the Relay and Fuse Panel 3 -SR3-.
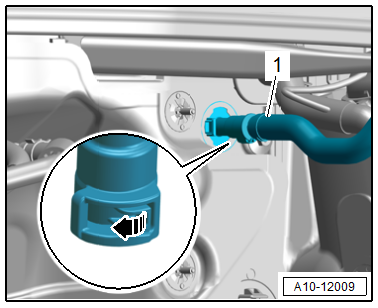
- Release the retainer -arrow- and remove the vacuum hose -1-.
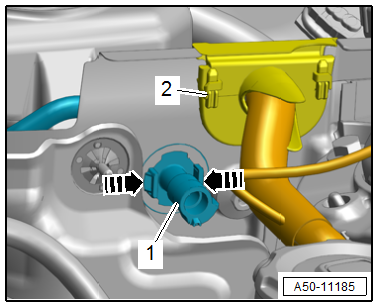
- Release the retainers -arrows- and push the vacuum connection -1- into the plenum chamber.
- Free up the wiring harness -2-.
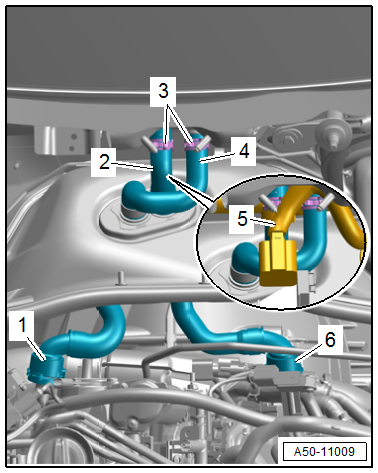
- Lift the clamps -1 and 6- and remove the coolant hoses.
- If equipped, free up the wiring harness -5-.
- Loosen the hose clamps -3-, disconnect and free up the coolant hoses -2 and 4-.
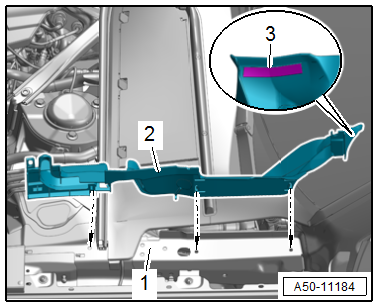
- Remove the bolts -arrows-.
- Remove the plenum chamber bulkhead -1- upward.
Installing
Install in reverse order of removal and note the following:
- Fill with coolant. Refer to → Engine Mechanical; Rep. Gr.19; Cooling System/Coolant; Coolant, Draining and Filling.
Tightening Specifications
- Refer to → Chapter "Overview - Bulkhead"
Plenum Chamber Cover, Removing and Installing
Removing
- Remove the windshield wiper arms. Refer to → Electrical Equipment; Rep. Gr.92; Windshield Wiper System; Windshield Wiper Arms, Removing and Installing.
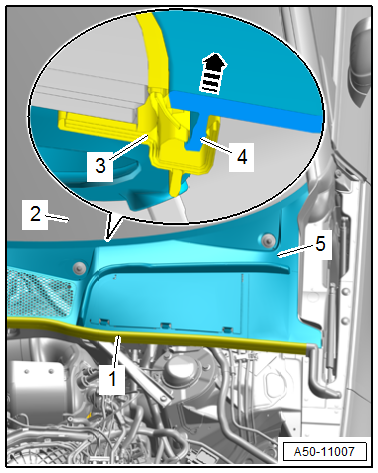
- Remove the seal -1-.
- Coat the transition between the windshield -2- and the plenum chamber cover -5- with some soapy water. Starting at the window edge, carefully remove the plenum chamber cover vertically upward from the retainer on the windshield.
- Remove the plenum chamber cover -5- by carefully removing the plenum chamber cover tab -4- in the direction of -arrow- from the windshield mount -3-.
Installing
Install in reverse order of removal and note the following:
- The plenum chamber cover tab must be completely engaged in the windshield frame.
TIP
If the plenum chamber cover is damaged or mounted incorrectly, water can flow into the fresh air intake duct. This can lead to complaints regarding odor coming from the heater/A/C system and/or moisture in the vehicle interior.
Plenum Chamber Side Cover, Removing and Installing
Special tools and workshop equipment required
- Wiring Harness Repair Set - Hot Air Blower -VAS1978/14A-
- Cleaning Solution -D 009 401 04-
- Applicator -D 009 500 25-
- Bonding Agent -D 355 205 A2-
Removing
- Remove the rear cover for the fender. Refer to → Chapter "Rear Fender Cover, Removing and Installing".
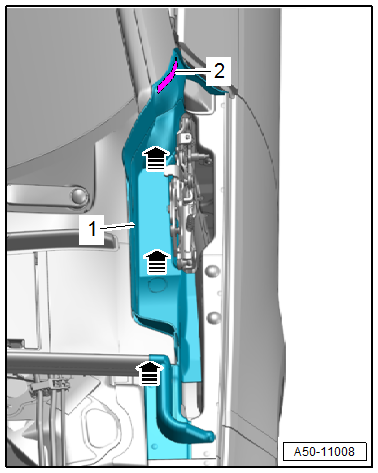
- Use the -VAS1978/14A- to warm up the cover -1- carefully near the A-pillar.
- Pry out the cover in the direction of -arrows- and remove it carefully near the bonding -2-.
Installing
Install in reverse order of removal and note the following:
- Remove the old adhesive tape from the body.
- Clean the adhesive surface using the Cleaning Solution -D 009 401 04-.
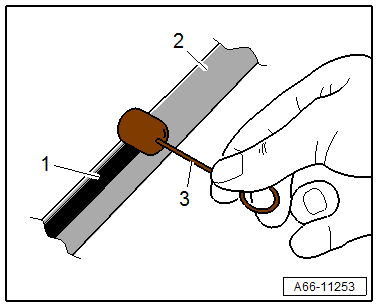
- Using the applicator -3-, apply the Bonding Agent -D355 205 A2--1- evenly in one stroke on the adhesive surface -2-.
- Position the cover -2- using the Christmas tree clip on the body -1- in the direction of -arrows- and press it on.
- Remove the protective film from the adhesive tape -3- and press the cover onto the A-pillar.
Special Tools
Special tools and workshop equipment required
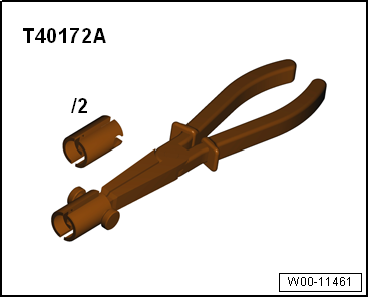
- Pliers -T40172C-
- Wiring Harness Repair Set - Hot Air Blower -VAS1978/14A-
- Adapter -T40172/1-
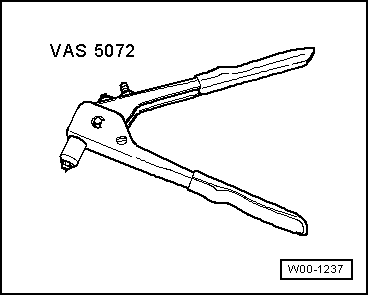
- Pop Rivet Nut Pliers -VAS5072A-
- Engine Bung Set -VAS6122-
READ NEXT:
 Front Lid
Overview - Front Lid
Overview - Hood
1 -
Adjusting Buffer
Adjusting. Refer to
→ Chapter "Height, Adjusting using Adjusting Buffer".
2 -
Striker
Removing and installin
Front Lid, Removing and Installing
To complete the procedure, a second technician is required to be at the
following position.
NOTICE
Risk of damaging the hood by opening when the pedestrian
protection is triggered.
-
SEE MORE:
Sill Panel Trim, Removing and Installing
Special tools and workshop equipment
required
Roller -3356-
Trim Removal Wedge -3409-
Wiring Harness Repair Set - Hot Air Blower -VAS1978/14A-
Cleaning Solution -D 009 401 04-
Applicator -D 009 500 25-
Bonding Agent -D 355 205 A2-
CAUTION
This procedure contains mandatory replaceable par
Radio functions
Overview
Fig. 150 Center display: left side: playback view of radio functions, right
side: sources
Operating
Applies to: MMI: To open the playback view (1),
select on the home screen: RADIO > Source > a
category > a station/podcast*.
Applies to: MMI: To open the sources (2), select
