Audi A4: Front Lid, Removing and Installing
- To complete the procedure, a second technician is required to be at the following position.
 NOTICE
Risk of damaging the hood by opening when the pedestrian protection is triggered.
- Only open the hood after the triggered pedestrian protection has been reset.
- Removed pedestrian protection: Hinge is reset. Refer to → Chapter "Hinge, Resetting"
Removing
- Remove the washer nozzles. Refer to → Electrical Equipment; Rep. Gr.92; Windshield Washer System; Washer Nozzles, Removing and Installing.
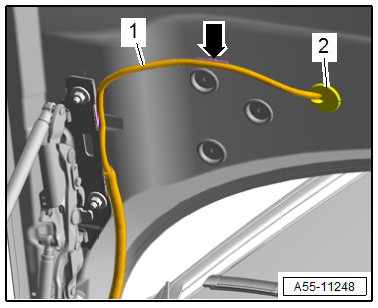
- Remove the grommet -2-.
- Guide the wiring harness -1- out of the hood and free it up -arrow-.
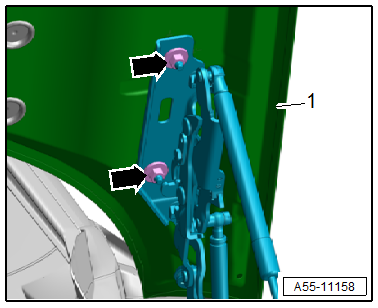
- Remove the nuts -arrows- from the hinge.
- Remove the hood -1-.
Installing
Install in reverse order of removal and note the following:
- Adjust the front lid. Refer to → Chapter "Front Lid, Adjusting".
Tightening Specifications
- Refer to → Chapter "Overview - Front Lid"
Front Lid, Adjusting
Adjustment Dimensions
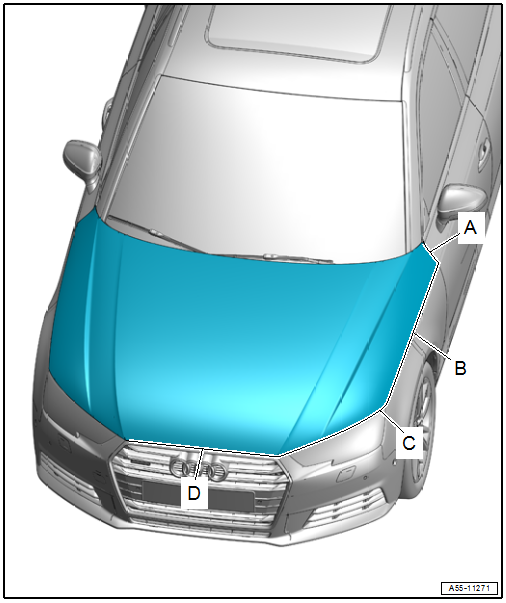
A - Front Lid to Front Door
- Gap dimension = 3.2 mm
B - Front Lid to Fender
- Gap dimension = 3.0 mm
C - Hood to Headlamp
- Gap dimension = 3.5 mm
D - Front Lid to Radiator Grille
- Gap dimension = 4.5 mm
Side, Length and Height Adjustment at Hinge
Special tools and workshop equipment required
- Gauge - Gap Adjustment -3371-
- Adjustment dimensions. Refer to → Chapter "Adjustment Dimensions".
Procedure
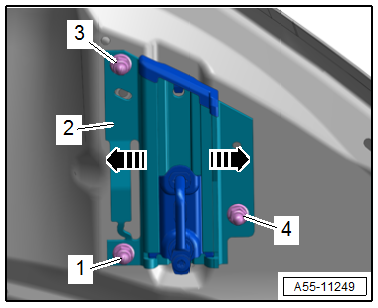
Side and Length Adjustment on Hood
- Loosen the nuts -arrows-.
- Adjust the hood -1- from side to side and lengthwise.
- Tighten the nuts.
Tightening Specifications
- Refer to → Chapter "Overview - Front Lid"
Height Adjustment on Hinge
- Loosen the bolts -arrows-.
- Adjust the height of the hinge -1-.
- Tighten the bolts.
Tightening Specifications
- Refer to → Chapter "Overview - Front Lid"
Side and Height Adjustment at Striker
Special tools and workshop equipment required
- Gauge - Gap Adjustment -3371-
- Adjustment dimensions. Refer to → Chapter "Adjustment Dimensions".
Procedure
Side Adjustment
- Loosen the nuts -1, 3 and 4-.
- Move the striker -2-.
- During the closing test, the lid must fall from the balance position into the latch and engage completely.
- Tighten the nuts.
Tightening Specifications
- Refer to → Chapter "Overview - Front Lid"
Height Adjustment
- Install the adjusting buffer completely. Refer to → Chapter "Height, Adjusting using Adjusting Buffer".
- Adjust the striker -2- by turning the adjusting screw -1--arrows-.
- During the closing test, the lid must fall from the balance position into the latch and engage completely.
- Adjust the striker height if necessary.

Height, Adjusting using Adjusting Buffer
Special tools and workshop equipment required
- Gauge - Gap Adjustment -3371-
- Adjustment dimensions. Refer to → Chapter "Adjustment Dimensions".
Procedure
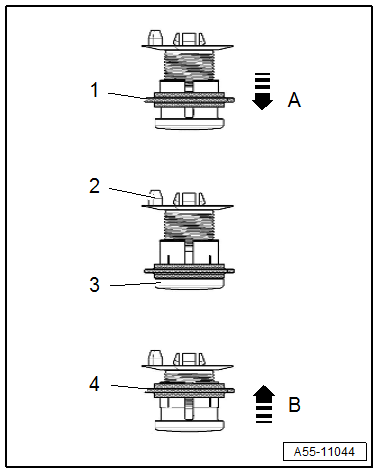
Height Adjustment with Front Adjusting Buffer
- Open the hood and release the retainer -1- in the direction of -arrow A-.
- Completely remove the stop -3- from the buffer -2-.
- Place the hood slowly on the stop until the hood gap dimension to the fender is reached.
- Open the hood and lock the retainer -4- in the direction of -arrow B-.
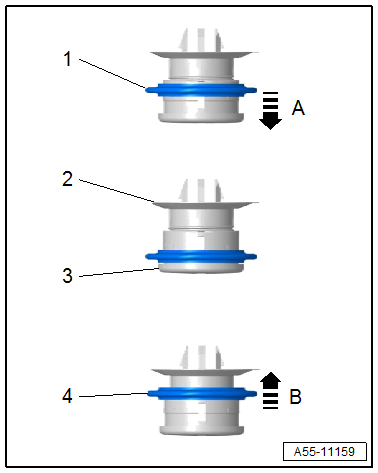
Height Adjustment with Rear Adjusting Buffer
- Open the hood and release the retainer -1- in the direction of -arrow A-.
- Completely remove the stop -3- from the buffer -2-.
- Let the hood fall from the balanced position into the latch.
- The adjusting buffer must rest on the stop buffer without any play.
- Open the hood and lock the retainer -4- in the direction of -arrow B-.
Height, Adjusting using Spring Element
Special tools and workshop equipment required
- Gauge - Gap Adjustment -3371-
- Adjustment dimensions. Refer to → Chapter "Adjustment Dimensions".
Procedure
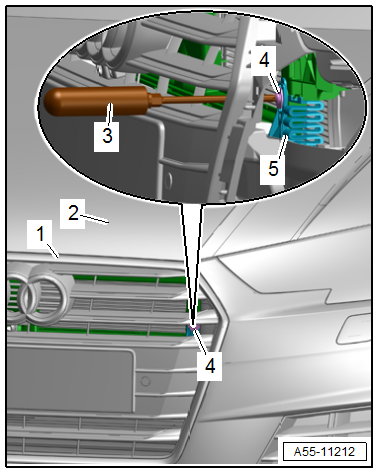
- Front bumper installed.
- The spring element -5- must be tensioned.
- Loosen the bolt -4- using a screwdriver -3-.
- Adjust the distance between the radiator grille -1- and the hood -2-.
- Tighten the bolt.
Tightening Specifications
- Refer to → Chapter "Overview - Lock Carrier"
Hinges, Removing and Installing
- Follow the safety precautions. Refer to → Body Interior; Rep. Gr.00; Safety Precautions; Safety Precautions when Working on Pyrotechnic Components.
NOTICE
Risk of damaging the hood by opening when the pedestrian protection is triggered
- Only open the hood after the triggered pedestrian protection has been reset.
- Removed pedestrian protection: Hinge is reset. Refer to → Chapter "Hinge, Resetting"
Removing
- Vehicles with pedestrian protection: disconnect the battery. Refer to → Electrical Equipment; Rep. Gr.27; Battery; Battery, Disconnecting and Connecting.
- Remove the front lid. Refer to → Chapter "Front Lid, Removing and Installing".
- If required, remove the washer fluid reservoir. Refer to → Electrical Equipment; Rep. Gr.92; Windshield Washer System; Washer Fluid Reservoir, Removing and Installing.
- Vehicles with pedestrian protection: Remove the pedestrian protection trigger. Refer to → Body Interior; Rep. Gr.69; Pedestrian Protection; Overview - Pedestrian Protection.
- Remove the gas-filled strut. Refer to → Chapter "Gas-Filled Strut, Removing and Installing".
- Bring the hinge into the "closed" position.
- Mark the hinge installation position for reinstallation.
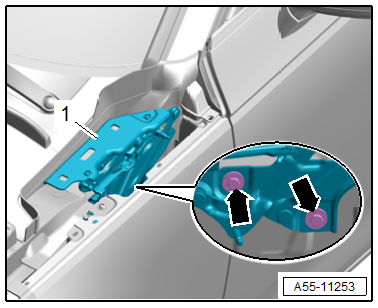
- Remove the bolts -arrows-.
- Remove the hinge -1-.
Installing
Install in reverse order of removal and note the following:
- Install the hinge according the marking made during removal.
- Adjust the hinge. Refer to → Chapter "Side, Length and Height Adjustment at Hinge".
Tightening Specifications
- Refer to → Chapter "Overview - Front Lid"
READ NEXT:
 Hinge, Resetting
To complete the procedure, a second technician is required to be at the
following position.
NOTICE
Risk of damaging the hood by opening when the pedestrian
protection is triggered.
-
Release Cable, Removing and Installing
Latch Release Cable, Removing and Installing
Removing
- Remove the vehicle electrical system control module bracket.
Refer to
→ Electrical Equipment; Rep. Gr.97; Relay Panels,
Rear Lid
Overview - Rear Lid, Sedan
Overview - Rear Lid
1 -
Tension Spring
Quantity: 2
Removing and installing. Refer to
→ Chapter "Tension Spring, Removing and Installing".
2 -
SEE MORE:
Sill Panel Trim, Removing and Installing
Special tools and workshop equipment
required
Roller -3356-
Trim Removal Wedge -3409-
Wiring Harness Repair Set - Hot Air Blower -VAS1978/14A-
Cleaning Solution -D 009 401 04-
Applicator -D 009 500 25-
Bonding Agent -D 355 205 A2-
CAUTION
This procedure contains mandatory replaceable par
Subwoofer -R211-, Removing and Installing
Subwoofer -R211-, Removing and Installing, Sedan
The Subwoofer -R211- is located in the rear shelf.
Removing
- Turn off the ignition and all electrical equipment and
remove the ignition key.
- Remove the rear shelf. Refer to
→ Body Interior; Rep. Gr.70; Vehicle Interior
