Audi A4: Release Cable, Removing and Installing
Latch Release Cable, Removing and Installing
Removing
- Remove the vehicle electrical system control module bracket. Refer to → Electrical Equipment; Rep. Gr.97; Relay Panels, Fuse Panels, E-boxes; Component Location Overview - Relay Panels, Fuse Panels, E-boxes.
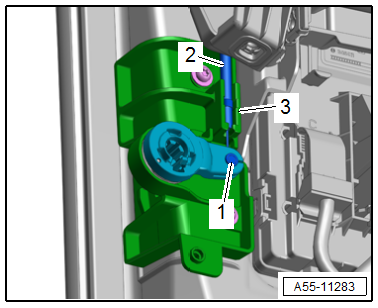
- Loosen the release cable -2- from the support bracket -3- and disengage the release cable nipple -1-.
- Remove the plenum chamber cover. Refer to → Chapter "Plenum Chamber Cover, Removing and Installing".
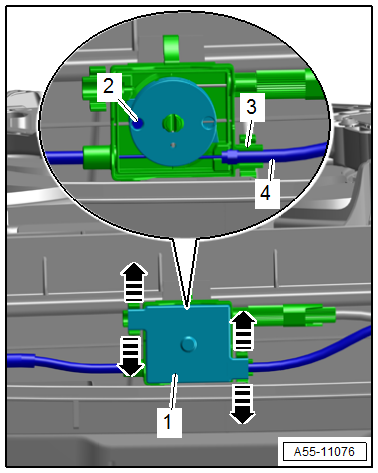
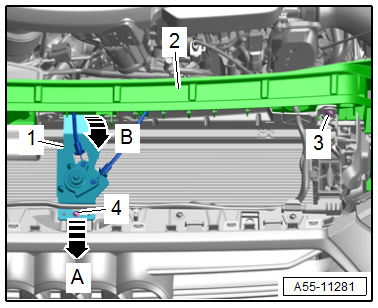
- Release the retainers -arrows- and remove the housing cover -1-.
- Loosen the release cable -4- from the support bracket -3- and disengage the release cable nipple -2-.
- Free up the release cable at the lock carrier and the body.
- Remove the grommet and remove the release cable outward.
Installing
Install in reverse order of removal and note the following:
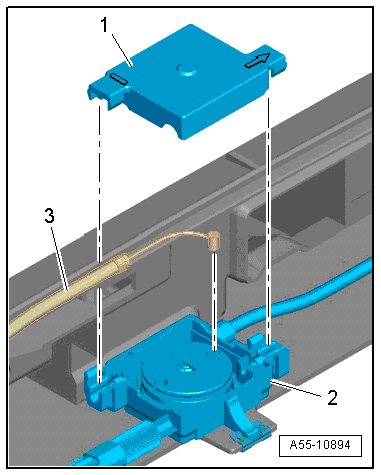
- Engage the release cable nipple -3- into the coupling roller -2- and push the release cable into the support bracket.
- Position the housing cover -1- so that the printed arrow points toward the free coupling connection.
- To release the latches evenly, adjust the release cable at the thumbwheel.
Latch Release Cable, Removing and Installing
Removing
- Remove the latch. Refer to → Chapter "Latch, Removing and Installing".
- Release the retainers -arrows- and remove the housing cover -1-.
- Loosen the release cable -4- from the support bracket -3- and disengage the release cable nipple -2-.
- Release the catches and remove the coupling from the lock carrier.
- Free up the release cables and guide them out of the lock carrier.
Installing
Install in reverse order of removal and note the following:
- Engage the release cable nipple -3- into the coupling roller -2- and push the release cable into the support bracket.
- Position the housing cover -1- so that the printed arrow points toward the free coupling connection.
- To release the latches evenly, adjust the release cable at the thumbwheel.
Latch, Removing and Installing
Removing
- If required, remove the air filter housing. For TDI vehicles, refer to → Engine Mechanical; Rep. Gr.23; Air Filter; Air Filter Housing, Removing and Installing. For TFSI vehicles, refer to → Engine Mechanical; Rep. Gr.24; Air Filter; Air Filter Housing, Removing and Installing.
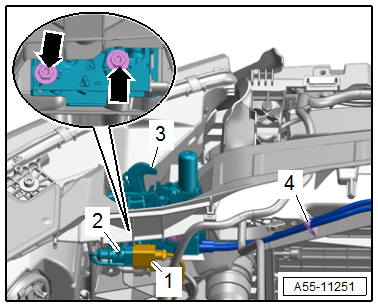
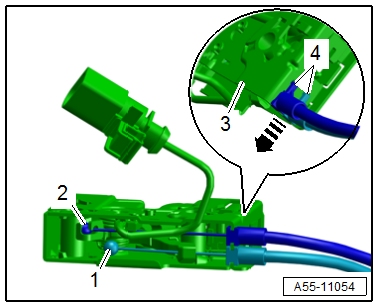
- Disconnect the connector -1-.
- Free up the connector -2-.
- Pry out the clip -4-.
- Remove the bolts -arrows-.
- Remove the latch -3- downward.
- Release the catches -4- and remove the support bracket from the mount -3- in the direction of -arrow-.
- Pull the release cable nipples -1 and 2- out of the release levers on the latch.
- Remove the latch.
Installing
Install in reverse order of removal.
Tightening Specifications
- Refer to → Chapter "Overview - Front Lid"
Latch Release Lever, Removing and Installing
Removing
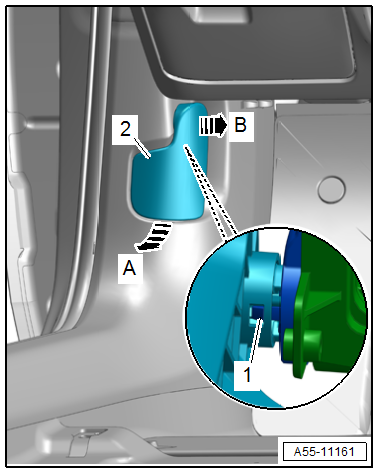
- Pull the release lever -2- toward the rear -arrow A- (doing so releases the hood) and hold it in this position.
- Release the retainer -1- and keeping the release lever level, pull it out of its mount toward the center of the vehicle -arrow B-.
Installing
Install in reverse order of removal.
Hook Release Lever, Removing and Installing
Removing
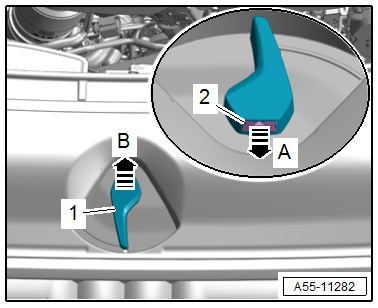
- Pull the clip -2- out of the release lever -1- slightly -arrow A- using a small screwdriver.
- Remove the release lever upward -arrow B-.
Installing
Install in reverse order of removal and note the following:
- Slide the clip all the way into the release lever.
- Press the release lever on until it audibly engages.
Latch Release Lever Mounting Bracket, Removing and Installing
Removing
- Remove the latch release lever. Refer to → Chapter "Latch Release Lever, Removing and Installing".
- Remove the A-pillar lower trim panel. Refer to → Body Interior; Rep. Gr.70; Vehicle Interior Trim Panels; A-Pillar Trim Panel, Removing and Installing.
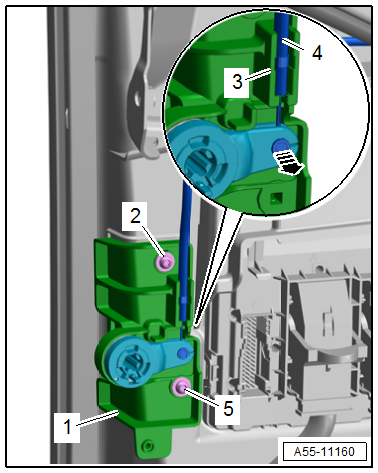
- Loosen the release cable -4- from the support bracket -3- and disengage the release cable nipple -arrow-.
- Remove the bolts -2 and 5-.
- Remove the mounting bracket -1-.
Installing
Install in reverse order of removal.
Tightening Specifications
- Refer to → Chapter "Overview - Release Cable"
Mounting Bracket with Hook Release Lever Release Cable, Removing and Installing
Removing
- Remove the hook release lever. Refer to → Chapter "Hook Release Lever, Removing and Installing".
- Remove the lock carrier cover. Refer to → Chapter "Lock Carrier Cover, Removing and Installing".
- Remove the latch and disengage the mounting bracket release cable. Refer to → Chapter "Latch, Removing and Installing".
- Remove the bolts -3 and 4-.
- Pull the mounting bracket -1- forward out of the lock carrier -2- in the direction of -arrow A-, pivot it upward in the direction of -arrow B- and remove it.
- Remove the mounting bracket and free up the release cables.
Installing
Install in reverse order of removal.
Tightening Specifications
- Refer to → Chapter "Overview - Release Cable"
READ NEXT:
 Rear Lid
Overview - Rear Lid, Sedan
Overview - Rear Lid
1 -
Tension Spring
Quantity: 2
Removing and installing. Refer to
→ Chapter "Tension Spring, Removing and Installing".
2 -
Rear Lid, Removing and Installing
Rear Lid, Removing and Installing, Sedan
To complete the procedure, a second technician is required to be at
the following position.
Removing
- Remove the rear lid lower trim panel. Refer to
Rear Lid, Adjusting
Adjustment Dimensions
Adjustment Dimensions, Sedan
A -
Rear Lid to Top of Side Panel
Gap dimension = 3.5 mm
B -
Rear Lid to Side Panel
Gap dimension = 3.5 mm
C -
SEE MORE:
Airbag Control Module
Overview - Airbag Control Module
1 - Center Tunnel
2 - Nut
9 Nm
Quantity: 4
The thread must be paint and contaminant free, nut and ground pins serve
as ground connection for the control module.
3 - Airbag Control Module -J234-
Removing and installing. Refer to
Engine, Installing
Special tools and workshop equipment required
Clutch Module Assembly Aid -T40169-
Clutch Module Transportation Lock -T40170-
as well as when removing with listed special tools
Engine Support Bridge - Spindle -10-222A/11-
Shop Crane -VAS6100-
Engine Sling -2024A-
Torque Wrench 1332 Insert - R
