Audi A4: Hinges, Removing and Installing
Hinges, Removing and Installing, Sedan
Removing
- Remove the rear lid. Refer to → Chapter "Rear Lid, Removing and Installing, Sedan".
- Remove the luggage compartment side trim panel. Refer to → Body Interior; Rep. Gr.70; Luggage Compartment Trim Panels; Luggage Compartment Side Trim Panel, Removing and Installing.
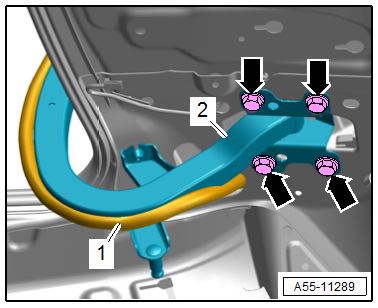
- Free up the wiring harness -1-.
- Remove the bolts -arrows-.
- Remove the hinge -2-.
Installing
Install in reverse order of removal and note the following:
- Adjust the rear lid after installing the hinge. Refer to → Chapter "Rear Lid, Adjusting".
Tightening Specifications
- Refer to → Chapter "Overview - Rear Lid, Sedan"
Hinges, Removing and Installing, Avant
Removing
- Remove the rear lid upper trim panel. Refer to → Body Interior; Rep. Gr.70; Luggage Compartment Trim Panels; Rear Lid Upper Trim Panel, Removing and Installing.
- Remove the headliner. Refer to → Body Interior; Rep. Gr.70; Roof Trim Panels; Headliner, Removing and Installing.
- If equipped, remove the rear lid motor. Refer to → Chapter "Rear Lid Motor 1 -V444- and Rear Lid Motor 2 -V445-, Removing and Installing".
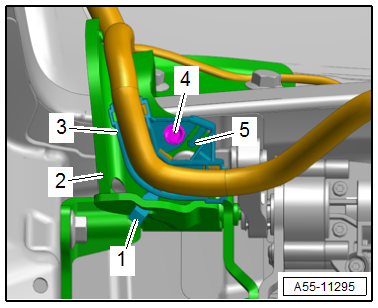
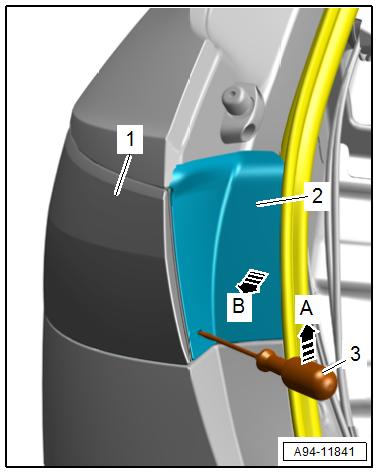
- Push the expanding pin -4- through.
- Release the retainers -1 and 5- and remove the wiring harness bracket -3- from the mount on the hinge -2-.
- Free up the wiring harness.
- Remove the left and right gas-filled strut. Refer to → Chapter "Gas-Filled Strut, Removing and Installing".
- Close the rear lid.
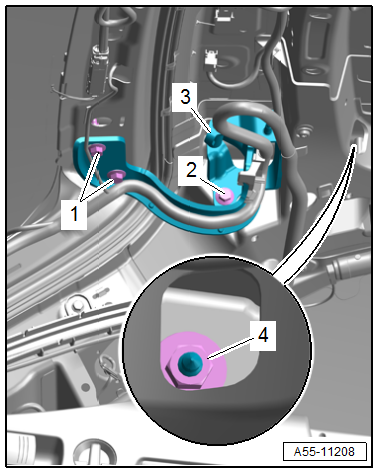
- Remove the bolts -1 and 2- and nut -4-.
- Remove the hinge -3-.
Installing
Install in reverse order of removal and note the following:
- Adjust the rear lid after installing the hinge. Refer to → Chapter "Rear Lid, Adjusting".
Tightening Specifications
- Refer to → Chapter "Overview - Rear Lid, Avant"
Rear Lid Seal, Removing and Installing
Rear Lid Seal, Removing and Installing, Sedan
Removing
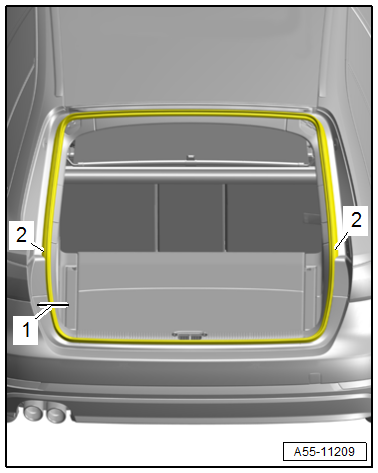
- Remove the rear lid seal from the body flange.
Installing
Install in reverse order of removal and note the following:
- Position the rear lid seal on the body flange.
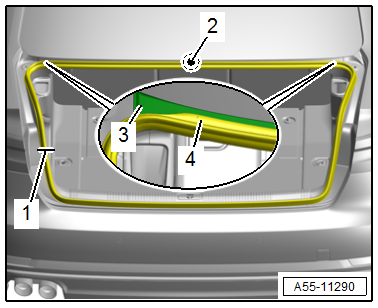
- The butt joint -1- for the rear lid seal must face toward the center of the left tail lamp.
- The top of the cover lip -4- must be aligned with the center -2- of the window crossmember -3-.
- Press on the entire length of the rear lid seal.
Rear Lid Seal, Removing and Installing, Avant
Removing
- Insert the screwdriver -3- into the opening and release the lower catch -arrow A-.
- Grip between the cover -2- and the tail lamp -1- and release the remaining catches.
- Remove the cover from the tail lamp -arrow B-.
TIP
The cover must be removed very carefully so that the guide and the hooks do not get damaged.
- Remove the rear lid seal from the body flange.
Installing
Install in reverse order of removal and note the following:
- Position the rear lid seal on the body flange.
- The butt joint -1- for the rear lid seal must face the left toward the bumper cover.
- The cover lips -2- must be aligned evenly with the tail lamps.
- Press on the entire length of the rear lid seal.
Roof Frame Cover, Removing and Installing
Special tools and workshop equipment required
- Wiring Harness Repair Set - Hot Air Blower -VAS1978/14A-
- Wedge Set -T10383-
- Cleaning Solution -D 009 401 04-
- Applicator -D 009 500 25-
- Bonding Agent -D 355 205 A2-
Removing
- Open the rear lid.
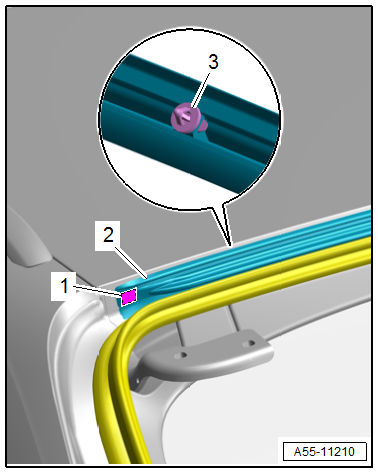
- Carefully warm the roof frame cover -2- using the -VAS1978/14A-.
- Loosen the bonding -1- and detach the roof frame cover from the body by releasing the retainers -3-.
- Remove the roof frame cover.
Installing
Install in reverse order of removal and note the following:
- Clean the adhesive surface using the Cleaning Solution -D 009 401 04-.
- Apply Bonding Agent -D 355 205 A2- on the adhesive surface using the Applicator -D 009 500 25- and let dry.
- Align the roof frame cover -1- with the centering pin -4- on the body -3-.
- Remove the protective film from the adhesive tape -2-.
- Press the roof frame cover on until it audibly engages.
- Press the roof frame cover on near the adhesive surface.
READ NEXT:
 Adjusting Buffer, Removing and Installing
Adjusting Buffer, Removing and Installing, Sedan
Body Adjusting Buffer
Removing
- Turn the adjusting buffer -1-
counter-clockwise -arrow- to
remove.
- Remove the adjusting buffer locking m
Gas-Filled Strut, Removing and Installing
Removing
- Support the lid or secure it against falling.
- Sedan: remove the right luggage compartment side trim panel.
Refer to
→ Body Interior; Rep. Gr.70; Luggage Compa
Rear Lid Closing Assist Motor -V382-, Removing and Installing
TIP
The procedure only refers to the Avant.
Removing
- Remove the rear lid lower trim panel. Refer to
→ Body Interior; Rep. Gr.70; Luggage Compartment Trim Panels;
Rear Lid Low
SEE MORE:
Overview - Rearview Camera System
The rear view camera system (KA2) assists the driver during
back-up driving for diagonal and parallel parking for trailer
towing and watching cross traffic by providing the driver with
an image of the traffic situation behind the vehicle via the
Front Information Display Control Head -J685-.
The
Flywheel, Removing and Installing
Special tools and workshop equipment required
Puller - Clutch Module -T40176-
Clutch Disc Shaft Spline Lubricant -G 000 100-
Sealing Grease. Refer to the Parts Catalog.
Removing
Note
There is a normal "clicking" in
the dual mass flywheel with "LuK" centrifugal pendulum absorber
-A-.
