Audi A4: Adjusting Buffer, Removing and Installing
Adjusting Buffer, Removing and Installing, Sedan
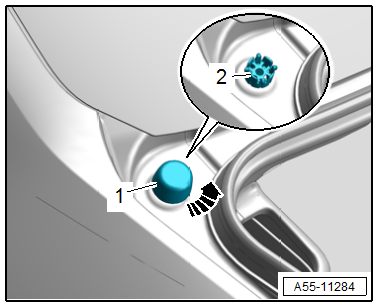
Body Adjusting Buffer
Removing
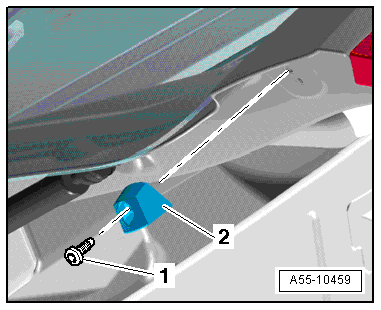
- Turn the adjusting buffer -1- counter-clockwise -arrow- to remove.
- Remove the adjusting buffer locking mechanism -2- from the threaded pin.
Installing
Install in reverse order of removal and note the following:
- Adjust the adjusting buffer. Refer to → Chapter "Height, Adjusting using Adjusting Buffer".
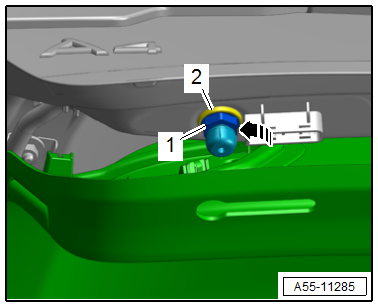
Rear Lid Adjusting Buffer
Removing
- Loosen the rear lid lower trim panel near the adjusting buffer. Refer to → Body Interior; Rep. Gr.70; Luggage Compartment Trim Panels; Rear Lid Lower Trim Panel, Removing and Installing.
- Turn the adjusting buffer -1- counter-clockwise -arrow- and remove it.
Installing
Install in reverse order of removal and note the following:
- Check the seal -2- between the adjusting buffer and the rear lid for damage.
- Adjust the adjusting buffer. Refer to → Chapter "Height, Adjusting using Adjusting Buffer".
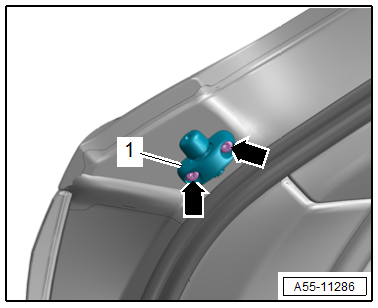
Adjusting Buffer, Removing and Installing, Avant
Removing
- Remove the bolts -arrows-.
- Remove the adjusting buffer -1-.
Installing
Install in reverse order of removal and note the following:
- Adjust the adjusting buffer. Refer to → Chapter "Height, Adjusting using Adjusting Buffer".
Tightening Specifications
- Refer to → Chapter "Overview - Rear Lid, Avant"
Stop, Removing and Installing
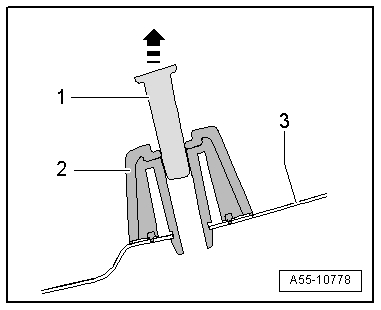
Stop, Removing and Installing, Sedan
Removing
- Remove the slider -1- from the stop -2--arrow-.
- Remove the stop from the side panel/rear lid -3-.
Installing
Install in reverse order of removal.
Stop, Removing and Installing, Avant
Removing
- Remove the bolt -1- and the stop -2-.
Installing
Install in reverse order of removal.
Tightening Specifications
- Refer to → Chapter "Overview - Rear Lid, Avant"
READ NEXT:
 Gas-Filled Strut, Removing and Installing
Removing
- Support the lid or secure it against falling.
- Sedan: remove the right luggage compartment side trim panel.
Refer to
→ Body Interior; Rep. Gr.70; Luggage Compa
Rear Lid Closing Assist Motor -V382-, Removing and Installing
TIP
The procedure only refers to the Avant.
Removing
- Remove the rear lid lower trim panel. Refer to
→ Body Interior; Rep. Gr.70; Luggage Compartment Trim Panels;
Rear Lid Low
Fuel Filler Door Unit
Overview - Fuel Filler Door Unit
1 -
Drain Hose
From the fuel filler door unit
Removing and installing. Refer to
→ Chapter "Fuel Filler Door Unit Drain Hose, Removing and Installi
SEE MORE:
Front Door Trim Panel, Removing and Installing
Special tools and workshop equipment required
Wedge Set -T10383-
Wedge Set - Wedge 1 -T10383/1-
Removing
- Switch off the ignition.
- Unclip the decorative trim -1-
using the -T10383/1- in the direction of
-arrow A-.
- Release the remaining retainers, disengage the decorative tr
Instrument Panel Side Cover, Removing and Installing
Special tools and workshop equipment required
Trim Removal Wedge -3409-
Removing
- Pry off the cover -1- for the
instrument panel side cover using the -3409- in the direction of
-arrow-.
- Release the remaining retainers, pull the instrument panel cover
out of the A-pillar gap cover a
