Audi A4: Rear Lid Closing Assist Motor -V382-, Removing and Installing
TIP
The procedure only refers to the Avant.
Removing
- Remove the rear lid lower trim panel. Refer to → Body Interior; Rep. Gr.70; Luggage Compartment Trim Panels; Rear Lid Lower Trim Panel, Removing and Installing.
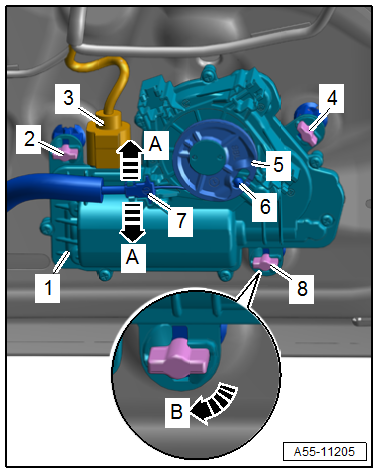
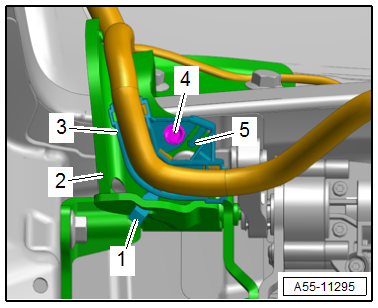
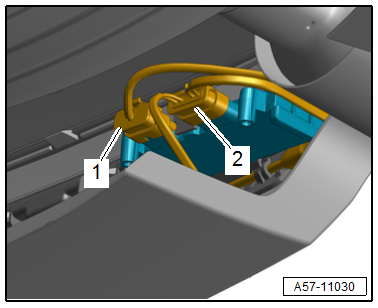
- Disengage the support bracket -7- by releasing the catches in the direction of -arrows A-.
- Disengage the release cable nipple -6- from the release lever -5-.
- Disconnect the connector -3-.
- Release the catches -2, 4 and 8- by turning them 90º clockwise in the direction of -arrow B-.
- Remove the Rear Lid Closing Assist Motor -V382--1-.
Installing
Install in reverse order of removal.
Closing Assist Release Cable, Removing and Installing
TIP
The procedure only refers to the Avant.
Removing
- Remove the rear lid lower trim panel and the latch cover. Refer to → Body Interior; Rep. Gr.70; Luggage Compartment Trim Panels; Rear Lid Lower Trim Panel, Removing and Installing.
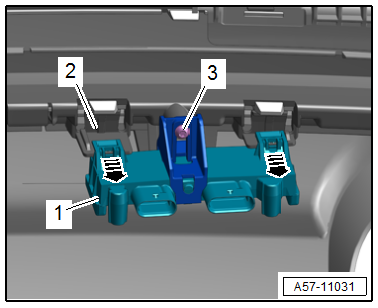
- Turn the operating cable 90º in the direction of -arrow A- at the lever -3- and remove it from the support bracket for the latch -2-.
- Using a screwdriver -1-, secure the operating lever -5- on the opposite side in the direction of -arrow B-.
- Disengage the release cable nipple -4- from the release lever in the direction of -arrow C- and free up the release cable.
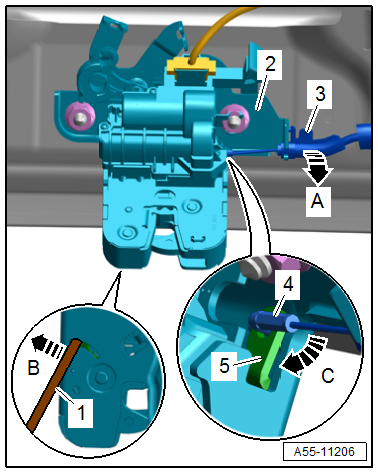
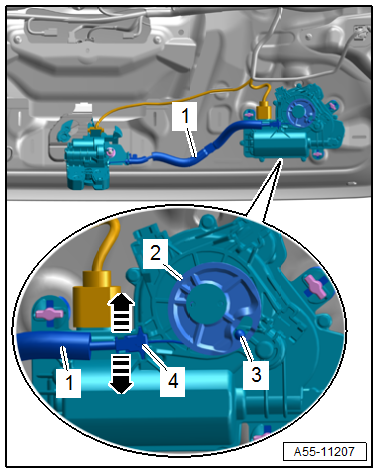
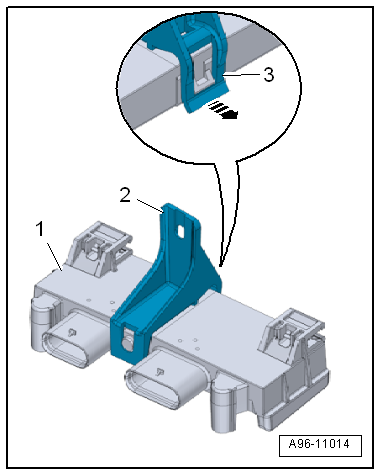
- Disengage the support bracket -4- from the Rear Lid Closing Assist Motor -V382- by releasing the catches -arrows-.
- Disengage the release cable nipple -3- at the actuator -2-.
- Remove the release cable -1-.
Installing
Install in reverse order of removal.
Rear Lid Motor 1 -V444- and Rear Lid Motor 2 -V445-, Removing and Installing
 CAUTION
This procedure contains mandatory replaceable parts. Refer to component overview and parts catalog prior to starting procedure.
Mandatory Replacement Parts
- Bolt - Rear Lid Motor
Removing
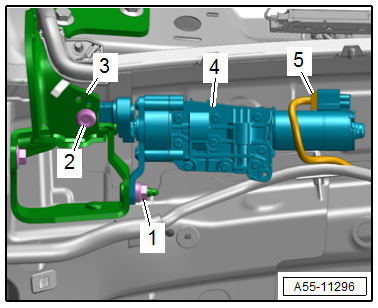
- Remove the D-pillar trim panel. Refer to → Body Interior; Rep. Gr.70; Vehicle Interior Trim Panels; D-Pillar Trim Panel, Removing and Installing.
- Release the catches -arrows- and remove the cover -2- from the hinge -1-.
- Push the expanding pin -4- through.
- Release the retainers -1 and 5- and remove the wiring harness bracket -3- from the mount on the hinge -2-.
- Disconnect the connector -5-.
- Remove the bolt -2- and the nut -1-.
- Remove the rear lid motor -4- from the mount on the hinge -3-.
Installing
Install in reverse order of removal and note the following:
- Perform the adaptation under the diagnostic address 6D on the Vehicle Diagnostic Tester.
Tightening Specifications
- Refer to → Chapter "Overview - Electric Rear Lid Release, Avant"
Rear Lid Control Module -J605-, Removing and Installing
Removing
- Remove the roof end strip. Refer to → Body Interior; Rep. Gr.70; Roof Trim Panels; Roof End Strip, Removing and Installing.
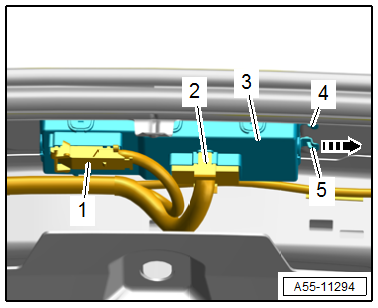
- Disconnect the connectors -1 and 2-.
- Release the catches -4 and 5- and at the same time push the control module -3- to the right side -arrow-.
- Doing so disengages the brackets from the guides.
- Remove the Rear Lid Control Module -J605-.
Installing
Install in reverse order of removal and note the following:
- Insert the control module and push it to the left until the catches engage audibly.
Rear Lid Opener Control Module -J938-, Removing and Installing
Removing
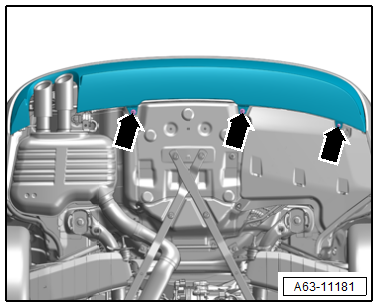
- Remove the bolts -arrows- on the lower section of the bumper cover.
- Disconnect the connectors -1 and 2-.
- Remove the bolt -3-.
- Remove the control module -1- from the brackets on the bumper cover -2- in the direction of -arrows-.
- If the control module is replaced, release the tab -3- in the direction of -arrow- and disengage the bracket -2- from the control module -1-.
Installing
Install in reverse order of removal.
Tightening Specifications
- Refer to → Chapter "Overview - Electric Rear Lid Release"
- Refer to → Chapter "Overview - Bumper Cover"
Power Rear Lid Opener Sensors -G750-/-G760-, Removing and Installing
Removing
- Remove the bolts -arrows- on the lower section of the bumper cover.
- Disconnect the connector -2-.
- Free up the sensor -1- at the brackets -arrows-.
- Remove the sensor.
Installing
Install in reverse order of removal and note the following:
- The Rear Lid Opener Sensor 2 -G760- must be secured on the upper bumper cover. Identifying feature: "Pin 4 and 5" on the connector.
Tightening Specifications
- Refer to → Chapter "Overview - Bumper Cover"
READ NEXT:
 Fuel Filler Door Unit
Overview - Fuel Filler Door Unit
1 -
Drain Hose
From the fuel filler door unit
Removing and installing. Refer to
→ Chapter "Fuel Filler Door Unit Drain Hose, Removing and Installi
Door
Overview - Door
1 -
Door
Removing and installing. Refer to
→ Chapter "Door, Removing and Installing".
2 -
Bolt
8 Nm
Quantity: 2
3 -
Bolt
33 Nm
4 -&
SEE MORE:
Efficiency assist
Description
Applies to: vehicles with efficiency assist
Efficiency assist can assist the driver with predictive
information in order to reduce fuel consumption.
Depending on vehicle equipment, the system
may access data from the navigation system,
the camera behind the windshield, and the radar
s
Current Draw Test
WARNING
Do not check or charge a Battery -A- when the visual
indicator has "no color or is
bright yellow". Jump starting must not be used!
There is a risk of explosion during testing,
charging or jump starting.
These Batteries -A- must be replaced.
Make sure the correct charging mode is
