Audi A4: Rear Lid
Overview - Rear Lid, Sedan
Overview - Rear Lid
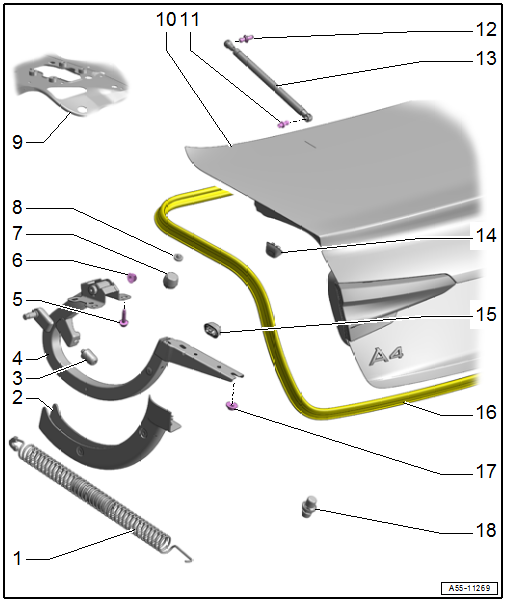
1 - Tension Spring
- Quantity: 2
- Removing and installing. Refer to → Chapter "Tension Spring, Removing and Installing".
2 - Rear Lid Hinge Trim Panel
- Removing and installing. Refer to → Body Interior; Rep. Gr.70; Luggage Compartment Trim Panels; Overview - Rear Lid Lower Trim Panel.
3 - Stop Buffer
- For the rear lid hinge
4 - Hinge
- Removing and installing. Refer to → Chapter "Hinges, Removing and Installing, Sedan".
5 - Bolt
- 21 Nm
- Quantity: 4
6 - Nut
- 21 Nm
- Quantity: 2
7 - Adjusting Buffer
- Removing and installing. Refer to → Chapter "Adjusting Buffer, Removing and Installing, Sedan".
- Adjusting. Refer to → Chapter "Height, Adjusting using Adjusting Buffer".
8 - Buffer
9 - Body
10 - Rear Lid
- Removing and installing. Refer to → Chapter "Rear Lid, Removing and Installing, Sedan".
- Adjusting. Refer to → Chapter "Rear Lid, Adjusting".
11 - Ball Pin
- 21 Nm
12 - Ball Pin
- 21 Nm
13 - Gas-Filled Strut
- Only on the right side of the vehicle
- Removing and installing. Refer to → Chapter "Gas-Filled Strut, Removing and Installing".
14 - Stop
- On the lid side
- Removing and installing. Refer to → Chapter "Stop, Removing and Installing, Sedan".
15 - Stop
- On the body side
- Removing and installing. Refer to → Chapter "Stop, Removing and Installing, Sedan".
16 - Rear Lid Seal
- Removing and installing. Refer to → Chapter "Rear Lid Seal, Removing and Installing, Sedan".
17 - Nut
- 21 Nm
- Quantity: 2
18 - Adjusting Buffer
- Removing and installing. Refer to → Chapter "Adjusting Buffer, Removing and Installing, Sedan".
- Adjusting. Refer to → Chapter "Height, Adjusting using Adjusting Buffer".
Overview - Rear Lid Release
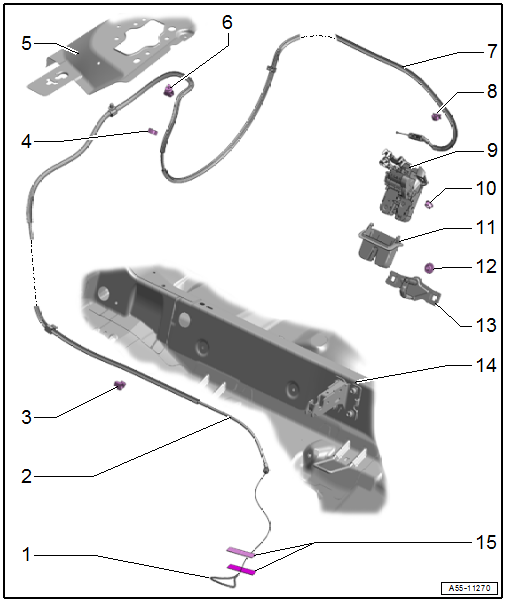
1 - Emergency Release Cable Loop
- On the seat pan for the rear bench seat
2 - Emergency Release Cable
- Only for a fixed backrest
3 - Release Cable Bracket
- With locking mechanism
4 - Release Cable Bracket
- Open
5 - Bracket
- For the seat belt
6 - Release Cable Bracket
- With locking mechanism
7 - Release Cable to Latch
8 - Release Cable Bracket
- Open
9 - Latch
- Removing and installing. Refer to → Chapter "Latch, Removing and Installing".
10 - Nut
- 21 Nm
- Quantity: 2
11 - Rear Lid Latch Trim Panel
- Removing and installing. Refer to → Body Interior; Rep. Gr.70; Luggage Compartment Trim Panels; Rear Lid Lower Trim Panel, Removing and Installing
12 - Nut
- 8 Nm
- Quantity: 2
13 - Striker
- Removing and installing. Refer to → Chapter "Striker, Removing and Installing".
- Adjusting. Refer to → Chapter "Height Adjustment at Striker".
14 - Floor Panel
- Rear bench seat
15 - Velcro Strip
- For securing the emergency release cable loop
Overview - Rear Lid, Avant
Overview - Rear Lid

1 - Rear Lid Seal
- Removing and installing. Refer to → Chapter "Rear Lid Seal, Removing and Installing, Avant".
2 - Bolt
- 8 Nm
- Quantity: 2
3 - Adjusting Buffer
- Removing and installing. Refer to → Chapter "Adjusting Buffer, Removing and Installing, Avant".
- Adjusting. Refer to → Chapter "Height, Adjusting using Adjusting Buffer".
4 - Bolt
- 8 Nm
5 - Stop
- For the adjusting buffer
- Removing and installing. Refer to → Chapter "Stop, Removing and Installing, Avant".
6 - Ball Pin
- 21 Nm
7 - Gas-Filled Strut
- Removing and installing. Refer to → Chapter "Gas-Filled Strut, Removing and Installing".
- Venting. Refer to → Chapter "Gas-Filled Strut, Venting".
8 - Ball Pin
- 21 Nm
- 9 - Bolt
- 30 Nm
- Quantity: 2
10 - Rear Lid Hinge Trim Panel
- Removing and installing. Refer to → Body Interior; Rep. Gr.70; Luggage Compartment Trim Panels; Overview - Rear Lid Lower Trim Panel.
11 - Hinge
- Removing and installing. Refer to → Chapter "Hinges, Removing and Installing, Avant".
12 - Nut
- 21 Nm
13 - Bolt
- 21 Nm
14 - Roof Frame Cover
- Removing and installing. Refer to → Chapter "Roof Frame Cover, Removing and Installing".
15 - Rear Lid
- Removing and installing. Refer to → Chapter "Rear Lid, Removing and Installing, Avant".
- Adjusting. Refer to → Chapter "Rear Lid, Adjusting".
Overview - Rear Lid Release
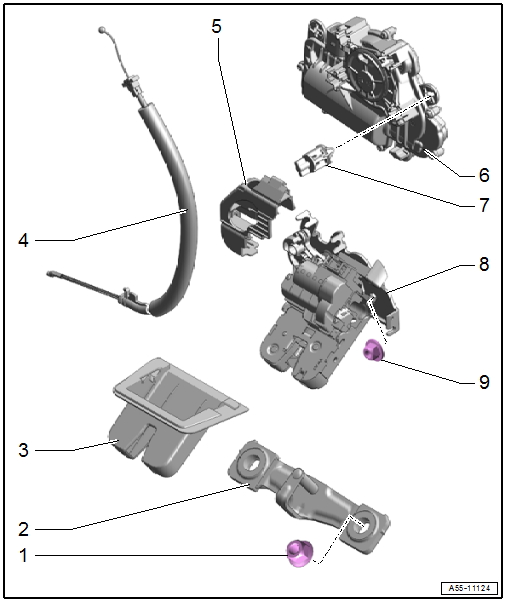
1 - Nut
- 21 Nm
- Quantity: 2
2 - Striker
- Removing and installing. Refer to → Chapter "Striker, Removing and Installing".
- Adjusting. Refer to → Chapter "Height Adjustment at Striker".
3 - Rear Lid Latch Trim Panel
- Removing and installing. Refer to → Body Interior; Rep. Gr.70; Luggage Compartment Trim Panels; Rear Lid Lower Trim Panel, Removing and Installing
4 - Closing Assist Release Cable
- Removing and installing. Refer to → Chapter "Closing Assist Release Cable, Removing and Installing".
5 - Anti-Theft Protection
- For the latch
6 - Rear Lid Closing Assist Motor -V382-
- Removing and installing. Refer to → Chapter "Rear Lid Closing Assist Motor -V382-, Removing and Installing".
7 - Locking Element
- For the closing assist
8 - Latch
- Removing and installing. Refer to → Chapter "Latch, Removing and Installing".
9 - Nut
- 21 Nm
- Quantity: 2
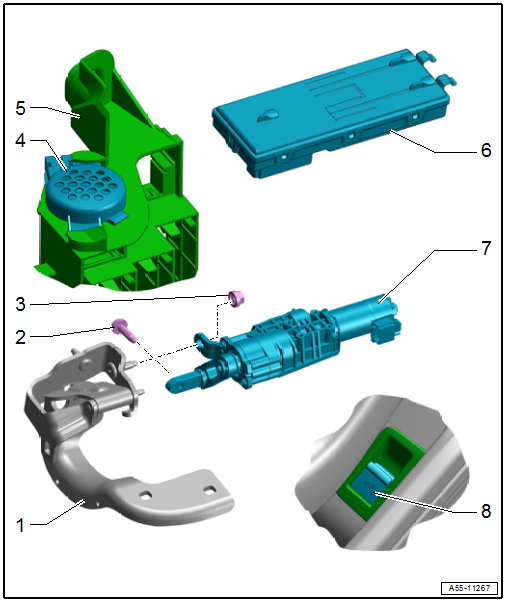
Overview - Electric Rear Lid Release, Sedan
Overview - Sensor-Controlled Rear Lid Opener
1 - Power Rear Lid Opener Sensor -G750-
- Removing and installing. Refer to → Chapter "Power Rear Lid Opener Sensors -G750-/-G760-, Removing and Installing".
2 - Rear Lid Opener Sensor 2 -G760-
- Removing and installing. Refer to → Chapter "Power Rear Lid Opener Sensors -G750-/-G760-, Removing and Installing".
3 - Rear Lid Opener Control Module -J938-
- Removing and installing. Refer to → Chapter "Rear Lid Opener Control Module -J938-, Removing and Installing".
4 - Bolt
- 2 Nm
5 - Bracket
6 - Rear Bumper Cover
Overview - Electric Rear Lid Release, Avant
Overview - Power Rear Lid Opener
1 - Hinge
- Removing and installing. Refer to → Chapter "Hinges, Removing and Installing, Avant".
2 - Bolt
- 20 Nm + 90º
- Replace after removing
3 - Nut
- 30 Nm
4 - Rear Lid Warning Buzzer -H32-
- Removing and installing. Refer to → Electrical Equipment; Rep. Gr.96; Controls; Rear Lid Warning BuzzerH32, Removing and Installing.
5 - Relay and Fuse Panel 2 -SR2-
- On the left side of the luggage compartment
6 - Rear Lid Control Module -J605-
- Removing and installing. Refer to → Chapter "Rear Lid Control Module -J605-, Removing and Installing".
7 - Rear Lid Motor
- Rear Lid Motor 1 -V444-, Rear Lid Motor 2 -V445-
- Removing and installing. Refer to → Chapter "Rear Lid Motor 1 -V444- and Rear Lid Motor 2 -V445-, Removing and Installing".
8 - Rear Lid Remote Release Button -E233-
- Removing and installing. Refer to → Electrical Equipment; Rep. Gr.96; Controls; Rear Lid Remote Release ButtonE233, Removing and Installing.
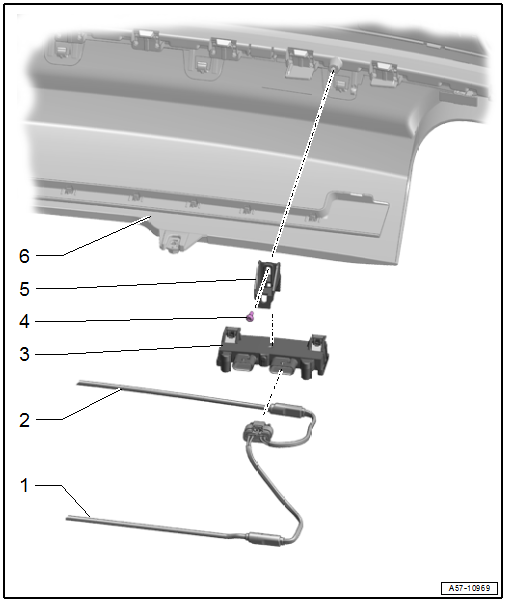
Overview - Sensor-Controlled Rear Lid Opener
1 - Power Rear Lid Opener Sensor -G750-
- Removing and installing. Refer to → Chapter "Power Rear Lid Opener Sensors -G750-/-G760-, Removing and Installing".
2 - Rear Lid Opener Sensor 2 -G760-
- Removing and installing. Refer to → Chapter "Power Rear Lid Opener Sensors -G750-/-G760-, Removing and Installing".
3 - Rear Lid Opener Control Module -J938-
- Removing and installing. Refer to → Chapter "Rear Lid Opener Control Module -J938-, Removing and Installing".
4 - Bolt
- 2 Nm
5 - Bracket
6 - Rear Bumper Cover
READ NEXT:
 Rear Lid, Removing and Installing
Rear Lid, Removing and Installing, Sedan
To complete the procedure, a second technician is required to be at
the following position.
Removing
- Remove the rear lid lower trim panel. Refer to
Rear Lid, Adjusting
Adjustment Dimensions
Adjustment Dimensions, Sedan
A -
Rear Lid to Top of Side Panel
Gap dimension = 3.5 mm
B -
Rear Lid to Side Panel
Gap dimension = 3.5 mm
C -
Hinges, Removing and Installing
Hinges, Removing and Installing, Sedan
Removing
- Remove the rear lid. Refer to
→ Chapter "Rear Lid, Removing and Installing, Sedan".
- Remove the luggage compartment side trim panel
SEE MORE:
Manually releasing the parking lock
Fig. 98 Front cup holder: removing the cover
Fig. 99 Front cup holder: parking lock emergency release
The emergency release is located in the front cup
holder under a cover.
You will need the screwdriver and the socket
wrench from the vehicle tool kit in order to release. Use the flat side of the
Head-up display
Description
Applies to: vehicles with head-up display
Fig. 19 Instrument panel: knob for the head-up display
The head-up display projects certain warnings or
selected information from the assist systems on
the windshield. The display appears within the
driver's field of vision.
Switching on and off
