Audi A4: Rear Lid, Removing and Installing
Rear Lid, Removing and Installing, Sedan
- To complete the procedure, a second technician is required to be at the following position.
Removing
- Remove the rear lid lower trim panel. Refer to → Body Interior; Rep. Gr.70; Luggage Compartment Trim Panels; Rear Lid Lower Trim Panel, Removing and Installing.
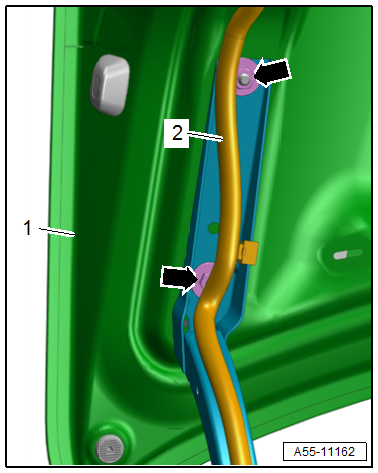
- Disconnect the connectors and free up the wiring harness -2-.
- Remove the nuts-arrows-.
- Remove the rear lid -1-.
Installing
Install in reverse order of removal and note the following:
- Adjust the rear lid. Refer to → Chapter "Rear Lid, Adjusting".
Tightening Specifications
- Refer to → Chapter "Overview - Rear Lid, Sedan"
Rear Lid, Removing and Installing, Avant
- To complete the procedure, a second technician is required to be at the following position.
Removing
- Remove the rear lid upper trim panel. Refer to → Body Interior; Rep. Gr.70; Luggage Compartment Trim Panels; Rear Lid Upper Trim Panel, Removing and Installing.
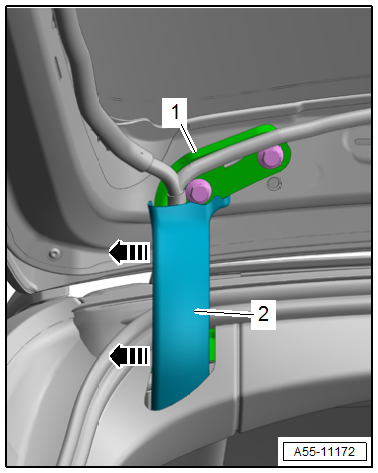
- Release the catches -arrows- and remove the cover -2- from the hinge -1-.
- Disconnect the connectors and antenna wires and free up the wiring harness.
- Remove the gas-filled strut. Refer to → Chapter "Gas-Filled Strut, Removing and Installing".
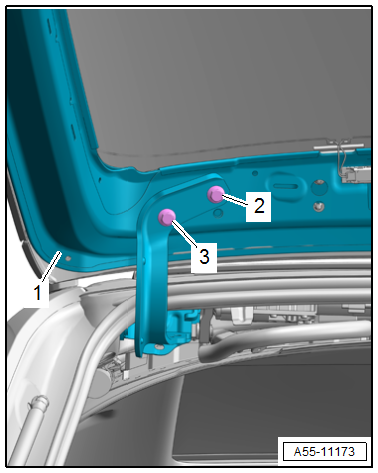
- Remove the bolts -2 and 3-.
- Remove the rear lid -1-.
Installing
Install in reverse order of removal and note the following:
- Adjust the rear lid. Refer to → Chapter "Rear Lid, Adjusting".
Tightening Specifications
- Refer to → Chapter "Overview - Rear Lid, Avant"
READ NEXT:
 Rear Lid, Adjusting
Adjustment Dimensions
Adjustment Dimensions, Sedan
A -
Rear Lid to Top of Side Panel
Gap dimension = 3.5 mm
B -
Rear Lid to Side Panel
Gap dimension = 3.5 mm
C -
Hinges, Removing and Installing
Hinges, Removing and Installing, Sedan
Removing
- Remove the rear lid. Refer to
→ Chapter "Rear Lid, Removing and Installing, Sedan".
- Remove the luggage compartment side trim panel
Adjusting Buffer, Removing and Installing
Adjusting Buffer, Removing and Installing, Sedan
Body Adjusting Buffer
Removing
- Turn the adjusting buffer -1-
counter-clockwise -arrow- to
remove.
- Remove the adjusting buffer locking m
SEE MORE:
Thorax Airbags
Overview - Front Thorax Airbag
1 - Front Thorax Airbag
With
Driver Thorax Airbag Igniter -N199-
Front Passenger Thorax Airbag Igniter -N200-
WARNING
Risk of injury due to involuntary deployment.
Pay attention to the safety precautions when working with
pyrotechnic compone
Front Midrange Speaker, Removing and Installing
The Left Front Midrange Speaker -R103-/Right Front Midrange
Speaker -R104--1- are located in
the center of the front doors.
Removing and installing is identical.
Removing
- Turn off the ignition and all electrical equipment and
remove the ignition key.
- Remove the front door trim panel
