Audi A4: Clamp on Triple Roller Joint and Outer Joint, Tensioning
Audi A4 (B9) 2016-2026 Service Manual / Chassis / Front Suspension / Drive Axle / Clamp on Triple Roller Joint and Outer Joint, Tensioning
 Note
Note
Depending on the version of the clamp, use the following tools:
Special tools and workshop equipment required
- Torque Wrench 1331 5-50Nm -VAG1331-
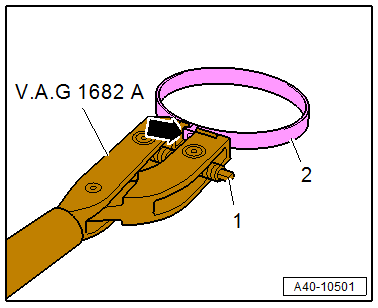
- Clamping Pliers -VAG1682A-
- Locking Pliers -VAS6199-
Tension the Stainless Steel Clamp using the -VAG1682A-.
- Attach the -VAG1682- as shown.
- The jaws on the pliers must be centered -arrow- on the clamp -2-.
Note
- The spindle threads must turn easily. If necessary, coat with MoS2 lubricating grease.
- If difficult to tighten, for example because of dirty threads, the proper clamping force of the clamping sleeve will not be reached even when tightened to the specification.
- Tension the clamp by turning the spindle -1- with the torque wrench. Do not tilt the clamping pliers during this.
- Tightening specification: 20 Nm.
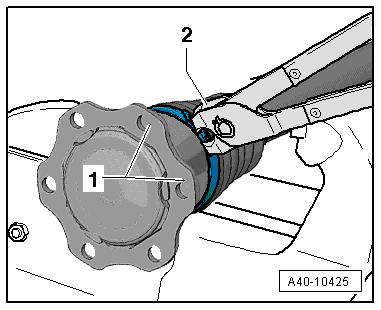
Tension the Clamp with Retaining Tabs using the -VAS6199-.
Note
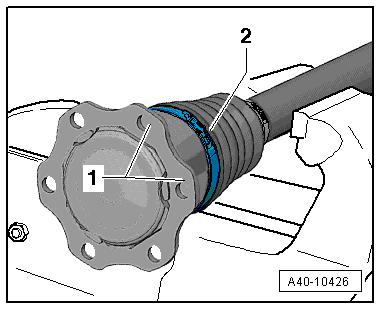
To better position the internal multi-point bolts when installing the drive axle, the clamp crimping ear -2- must be between the joint connecting flanges -1-.
- Engage the clamp at the first catch by hand.
- Close the clamp using the -VAS6199--2-.
READ NEXT:
 Special Tools
Special tools and workshop equipment required
Shock Absorber Set -T10001-
Tensioning Strap -T10038-
Tripod Joint Tool -T10065-
Engine/Gearbox Jack Adapter - Wheel Hub Support -T10149-
SEE MORE:
Radiator, Removing and Installing
Special tools and workshop equipment required
Coolant Collection System -VAS5014- or Shop Crane - Drip
Tray -VAS6208-
Elbow Assembly Tool -T10118-
Caution
This procedure contains mandatory replaceable parts.
Refer to component overview and parts catalog prior to
starting procedure.
M
Speaker Trim in Door Trim Panels, Removing and Installing
Special tools and workshop equipment required
Pry Lever -80-200-
Front Bass Speaker Trim, Removing
- Carefully pry out the speaker trim -1-
along the door trim panel seam using the Pry Lever -80-200- in
the direction of -arrow A-.
- Disengage the speaker trim at the rear from the door
© 2019-2026 Copyright www.audia4b9.com
